Ks0115 keyestudio EASY plug Digital Tilt Sensor Module: Difference between revisions
Keyestudio (talk | contribs) |
Keyestudio (talk | contribs) No edit summary |
||
| Line 1: | Line 1: | ||
[[image:ks0115图.jpg|thumb|600px|right|Keyestudio EASY plug Tilt Sensor Module ]] | |||
==Introduction== | ==Introduction== | ||
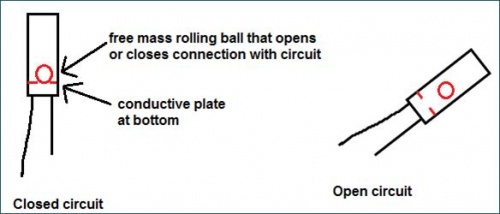
The tilt-switch twig is the equivalent of a button, and is used as a digital input. Inside the tilt switch is a ball that make contact with the pins when the case is upright. Tilt the case over and the balls don't touch, thus not making a connection. <br> | |||
When the switch is level it is open, and when tilted, the switch closes.<br> | |||
It can be used for orientation detection, alarm device or others. <br> | |||
Here is the principle of tilt sensor to illustrate how it works:<br> | |||
<br>[[File:ks0115 works.jpg|500px|frameless|thumb]]<br> | |||
<br> | |||
== | ==Features== | ||
* | * Connector: Easy plug | ||
* Supply Voltage: 3.3V to 5V | * Supply Voltage: 3.3V to 5V | ||
* Sensor type: Digital | * Sensor type: Digital | ||
<br> | |||
== | ==Technical Details== | ||
* Dimensions: 39mm*20mm*18mm | |||
* Weight: 4.8g | |||
<br> | |||
==Connect It Up== | |||
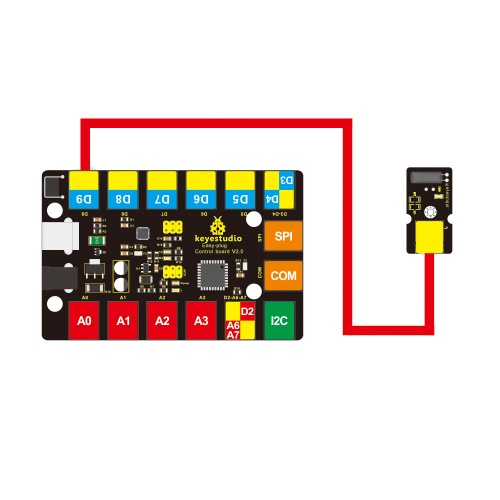
Connect the EASY Plug Tilt sensor to control board using an RJ11 cable. Then connect the control board to your PC with a USB cable. | |||
<br>[[File:ks0115.jpg|500px|frameless|thumb]]<br> | |||
== | <br> | ||
==Upload the Code== | |||
Copy and paste below code to [http://wiki.keyestudio.com/index.php/How_to_Download_Arduino_IDE Arduino IDE] and upload. | |||
<pre> | <pre> | ||
int ledPin = 13; | int ledPin = 13;// Connect LED to pin 13 | ||
int switcher = | int switcher = 9;// Connect Tilt sensor to Pin9 | ||
void setup() | void setup() | ||
{ | { | ||
pinMode(ledPin, OUTPUT);// Set digital pin 13 to output mode | |||
pinMode(switcher, INPUT);// Set digital pin 9 to input mode | |||
} | } | ||
void loop() | void loop() | ||
{ | { | ||
if(digitalRead(switcher)==HIGH) //Read sensor value | |||
{ | |||
digitalWrite(ledPin, HIGH);// Turn on LED when the sensor is tilted | |||
} | |||
else | |||
{ | |||
digitalWrite(ledPin, LOW);// Turn off LED when the sensor is not triggered | |||
} | |||
} | } | ||
</pre> | </pre> | ||
<br> | |||
==What You Should See== | |||
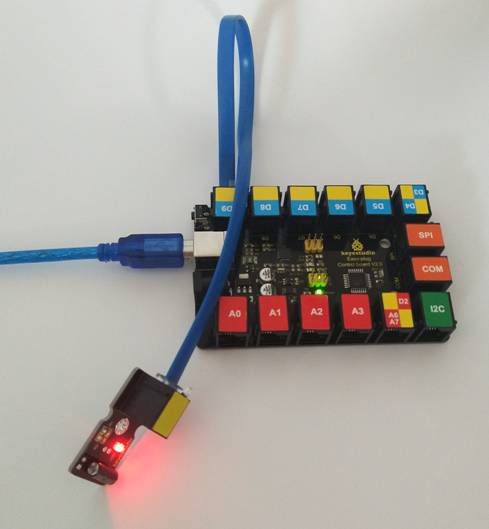
Done uploading the code, if tilt the sensor, you should see the led state ON or OFF. | |||
<br>[[File:ks0115 Result.jpg|500px|frameless|thumb]]<br> | |||
<br> | |||
==Resources == | ==Resources == | ||
'''PDF'''<br> | |||
'''PDF''' | |||
https://drive.google.com/open?id=11zcE-Avm45q59CnFpU486L5WpoqgaPB9 | https://drive.google.com/open?id=11zcE-Avm45q59CnFpU486L5WpoqgaPB9 | ||
<br> | |||
==Buy from == | ==Buy from == | ||
'''Official Website''' | '''Official Website'''<br> | ||
http://www.keyestudio.com/keyestudio-easy-plug-digital-tilt-sensor-module-for-arduino-starter.html | |||
[[category:EASY Plug]] | [[category:EASY Plug]] | ||
Revision as of 10:27, 16 November 2018
Introduction
The tilt-switch twig is the equivalent of a button, and is used as a digital input. Inside the tilt switch is a ball that make contact with the pins when the case is upright. Tilt the case over and the balls don't touch, thus not making a connection.
When the switch is level it is open, and when tilted, the switch closes.
It can be used for orientation detection, alarm device or others.
Here is the principle of tilt sensor to illustrate how it works:

Features
- Connector: Easy plug
- Supply Voltage: 3.3V to 5V
- Sensor type: Digital
Technical Details
- Dimensions: 39mm*20mm*18mm
- Weight: 4.8g
Connect It Up
Connect the EASY Plug Tilt sensor to control board using an RJ11 cable. Then connect the control board to your PC with a USB cable.

Upload the Code
Copy and paste below code to Arduino IDE and upload.
int ledPin = 13;// Connect LED to pin 13
int switcher = 9;// Connect Tilt sensor to Pin9
void setup()
{
pinMode(ledPin, OUTPUT);// Set digital pin 13 to output mode
pinMode(switcher, INPUT);// Set digital pin 9 to input mode
}
void loop()
{
if(digitalRead(switcher)==HIGH) //Read sensor value
{
digitalWrite(ledPin, HIGH);// Turn on LED when the sensor is tilted
}
else
{
digitalWrite(ledPin, LOW);// Turn off LED when the sensor is not triggered
}
}
What You Should See
Done uploading the code, if tilt the sensor, you should see the led state ON or OFF.

Resources
PDF
https://drive.google.com/open?id=11zcE-Avm45q59CnFpU486L5WpoqgaPB9
Buy from
Official Website
http://www.keyestudio.com/keyestudio-easy-plug-digital-tilt-sensor-module-for-arduino-starter.html
