Ks0127 keyestudio EASY plug Single Relay Module: Difference between revisions
Keyestudio (talk | contribs) |
Keyestudio (talk | contribs) |
||
| (8 intermediate revisions by the same user not shown) | |||
| Line 1: | Line 1: | ||
[[image:ks0127图.jpg|thumb|600px|right|Keyestudio EASY plug Single Relay Module]] | |||
==Introduction== | ==Introduction== | ||
This EASY Plug relay module integrates a high-quality relay. A relay is basically an electrically controlled mechanical switch.<br> | |||
It is one of the most important controlled elements, which is widely used to control the lighting, communications, remote sensing, electrical and other equipment.<br> | |||
The Relay output state by a light-emitting diode, observing the relay ON and OFF status. <br> | |||
It can be controlled through the digital IO port, such as lamps, motors and other high current or high voltage devices. <br> | |||
This module needs to be used together with EASY plug control board.<br> | |||
<span style=color:red> '''Special Note:''' <br> | |||
The sensor/module is equipped with the RJ11 6P6C interface, compatible with our keyestudio EASY plug Control Board with RJ11 6P6C interface. <br> If you have the control board of other brands, it is also equipped with the RJ11 6P6C interface but has different internal line sequence, can’t be used compatibly with our sensor/module. </span><br> | |||
<br> | |||
==Specification== | ==Specification== | ||
* | * Connector: Easy plug | ||
* Type: Digital | * Type: Digital | ||
* Rated current: 10A (NO) 5A (NC) | * Rated current: 10A (NO) 5A (NC) | ||
* Maximum switching voltage: 150VAC 24VDC | * Maximum switching voltage: 150VAC 24VDC | ||
* Digital interface | * Digital interface | ||
* Control signal: TTL level | * Control signal: TTL level | ||
* Rated load: 8A 150VAC (NO) 10A 24VDC (NO) | * Rated load: 8A 150VAC (NO) 10A 24VDC (NO); 5A 250VAC (NO/NC) 5A 24VDC (NO/NC) | ||
* Maximum switching power: AC1200VA DC240W (NO) AC625VA DC120W (NC) | * Maximum switching power: AC1200VA DC240W (NO); AC625VA DC120W (NC) | ||
* Contact action time: 10ms | * Contact action time: 10ms | ||
== | <br> | ||
==Technical Details== | |||
<br>[[File:ks0127 | * Dimensions: 47mm*28mm*19mm | ||
* Weight: 17.4g | |||
<br> | |||
<br> | |||
==Connect It Up == | |||
Connect the EASY Plug single relay module to control board using an RJ11 cable. Then connect the control board to your PC with a USB cable. | |||
<br>[[File:ks0127.jpg|500px|frameless|thumb]]<br> | |||
<br> | |||
==Upload the Code== | |||
Below is an example code. Open or drag below code to [https://wiki.keyestudio.com/Getting_Started_with_Mixly Mixly Blocks] and upload. <br> | |||
<br>[[File:ks0397 5.png|500px|frameless|thumb]]<br> | |||
== | <br> | ||
< | ==What You Should See== | ||
<br>[[File:ks0397 5-1.png|500px|frameless|thumb]]<br> | |||
<br> | |||
Done uploading the code, you should be able to hear the relay contacts click. When the relay is off, the COM (common) terminal block will be connected to the NC (Normally Closed) terminal block.<br> | |||
When the relay is on, the COM (common) terminal block will be connected to the NO (Normally Open) terminal block. | |||
<br>[[File:ks0127 Result.jpg|500px|frameless|thumb]]<br> | |||
< | |||
<br> | |||
==Resources == | ==Resources == | ||
https://fs.keyestudio.com/KS0127 | |||
<br> | |||
https:// | ==Buy from == | ||
*[https://www.keyestudio.com/new-keyestudio-easy-plug-single-relay-one-channel-module-for-arduino-steam-p0069.html '''Official Website''' ] | |||
= | *[https://www.aliexpress.com/store/product/2016-New-Keyestudio-EASY-plug-Single-Relay-Module-for-arduino/1452162_32638920199.html?spm=2114.12010612.8148356.36.41484ba7sOdIoI Shop on aliexpress ] | ||
[[category:EASY Plug]] | [[category:EASY Plug]] | ||
Latest revision as of 16:40, 7 January 2021
Introduction
This EASY Plug relay module integrates a high-quality relay. A relay is basically an electrically controlled mechanical switch.
It is one of the most important controlled elements, which is widely used to control the lighting, communications, remote sensing, electrical and other equipment.
The Relay output state by a light-emitting diode, observing the relay ON and OFF status.
It can be controlled through the digital IO port, such as lamps, motors and other high current or high voltage devices.
This module needs to be used together with EASY plug control board.
Special Note:
The sensor/module is equipped with the RJ11 6P6C interface, compatible with our keyestudio EASY plug Control Board with RJ11 6P6C interface.
If you have the control board of other brands, it is also equipped with the RJ11 6P6C interface but has different internal line sequence, can’t be used compatibly with our sensor/module.
Specification
- Connector: Easy plug
- Type: Digital
- Rated current: 10A (NO) 5A (NC)
- Maximum switching voltage: 150VAC 24VDC
- Digital interface
- Control signal: TTL level
- Rated load: 8A 150VAC (NO) 10A 24VDC (NO); 5A 250VAC (NO/NC) 5A 24VDC (NO/NC)
- Maximum switching power: AC1200VA DC240W (NO); AC625VA DC120W (NC)
- Contact action time: 10ms
Technical Details
- Dimensions: 47mm*28mm*19mm
- Weight: 17.4g
Connect It Up
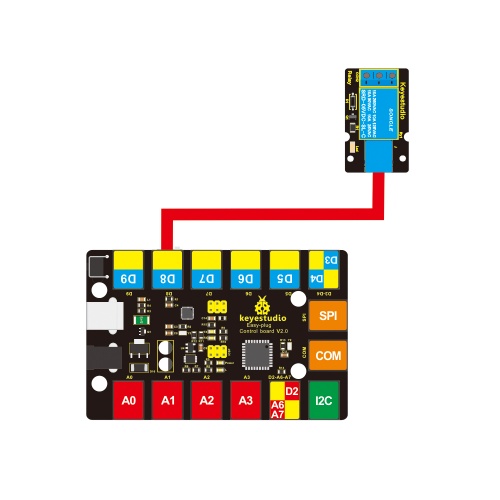
Connect the EASY Plug single relay module to control board using an RJ11 cable. Then connect the control board to your PC with a USB cable.

Upload the Code
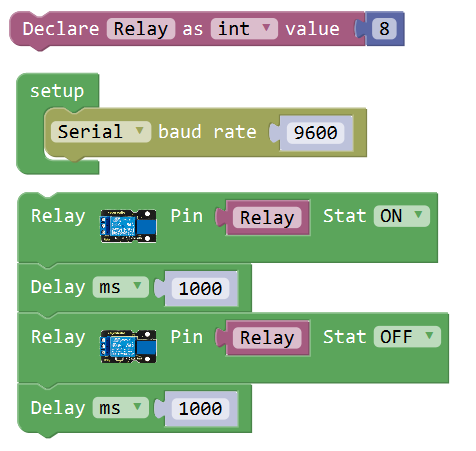
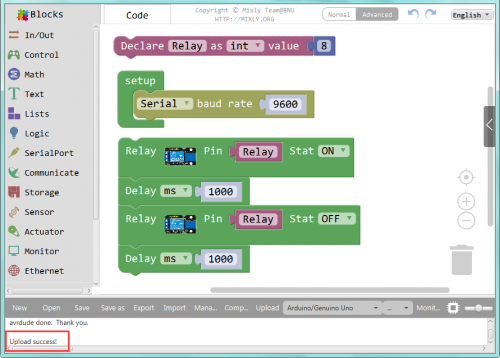
Below is an example code. Open or drag below code to Mixly Blocks and upload.

What You Should See

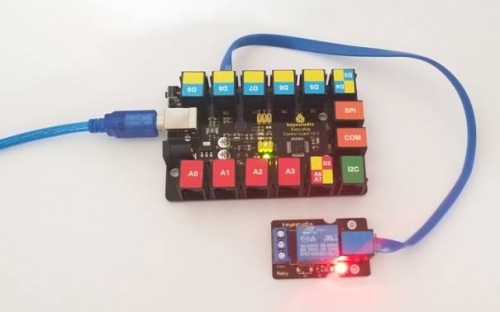
Done uploading the code, you should be able to hear the relay contacts click. When the relay is off, the COM (common) terminal block will be connected to the NC (Normally Closed) terminal block.
When the relay is on, the COM (common) terminal block will be connected to the NO (Normally Open) terminal block.

Resources
https://fs.keyestudio.com/KS0127
