Ks0129 keyestudio EASY plug DHT11 Temperature and Humidity Sensor: Difference between revisions
Keyestudio (talk | contribs) |
Keyestudio (talk | contribs) |
||
| (5 intermediate revisions by the same user not shown) | |||
| Line 6: | Line 6: | ||
This DHT11 sensor has fast response, anti-interference ability, excellent reliability and long term stability.<br> | This DHT11 sensor has fast response, anti-interference ability, excellent reliability and long term stability.<br> | ||
<span style=color:red> '''Special Note:''' <br> | |||
The sensor/module is equipped with the RJ11 6P6C interface, compatible with our keyestudio EASY plug Control Board with RJ11 6P6C interface. <br> If you have the control board of other brands, it is also equipped with the RJ11 6P6C interface but has different internal line sequence, can’t be used compatibly with our sensor/module. </span><br> | |||
<br> | <br> | ||
==Specification== | ==Specification== | ||
* Connector: Easy plug | * Connector: Easy plug | ||
| Line 28: | Line 31: | ||
<br> | <br> | ||
==Upload the Code== | ==Upload the Code== | ||
Below is an example code. Open or drag below code to [https://wiki.keyestudio.com/Getting_Started_with_Mixly Mixly Blocks] and upload. <br> | |||
< | <br>[[File:ks0397 20.1.png|500px|frameless|thumb]]<br> | ||
<br> | |||
==What You Should See== | |||
Open the Serial monitor, you should be able to see the temperature and humidity data. <br> | |||
<br>[[File:ks0397 20-2.png|600px|frameless|thumb]]<br> | |||
<br> | |||
<span style="color: red">'''Little Knowledge:'''</span> <br> | |||
* If the data is scrolling very fast, you can’t make out the data clearly, so you can modify the Delay time in the code to check it easily. | |||
<br>[[File:ks0397 20-5.png|500px|frameless|thumb]]<br> | |||
<br> | |||
Serial | |||
< | |||
<span style= | ==Extension Experiment== | ||
<br> | |||
<span style=color:brown>'''Make a Hygrothermograph'''</span><br> | |||
<br> | |||
'''Hookup Guide'''<br> | |||
Connect the EASY Plug DHT11 sensor and 1602 LCD module to control board using RJ11 cables. | |||
<br>[[File:温湿度2.jpg|500px|frameless|thumb]]<br> | |||
<br> | <br> | ||
'''Test Code'''<br> | |||
Below is an example code. | |||
<br>[[File:ks0397 20.1.png|500px|frameless|thumb]]<br> | |||
<br> | |||
'''What You Should See'''<br> | |||
<br>[[File: | <br>[[File:ks0397 20-3.png|500px|frameless|thumb]]<br> | ||
<br> | |||
Upload success, you should be able to see the temperature and humidity data are showed on the LCD screen. | |||
<br>[[File:ks0397 20-4.png|500px|frameless|thumb]]<br> | |||
<br> | <br> | ||
<br> | |||
==Resources == | ==Resources == | ||
https://fs.keyestudio.com/KS0129 | |||
https:// | |||
<br> | <br> | ||
==Buy from == | ==Buy from == | ||
* | *[https://www.keyestudio.com/new-keyestudio-easy-plug-dht11-temp-humidity-sensor-module-for-arduino-steam-p0070-p0070.html '''Official Website'''] | ||
* [https://www.aliexpress.com/store/product/New-Keyestudio-EASY-plug-DHT11-Temperature-Humidity-Sensor-Module-for-arduino/1452162_32645959631.html?spm=2114.12010612.8148356.24.41484ba7oHPAY6 Shop on aliexpress ] | * [https://www.aliexpress.com/store/product/New-Keyestudio-EASY-plug-DHT11-Temperature-Humidity-Sensor-Module-for-arduino/1452162_32645959631.html?spm=2114.12010612.8148356.24.41484ba7oHPAY6 Shop on aliexpress ] | ||
Latest revision as of 16:42, 7 January 2021
Introduction
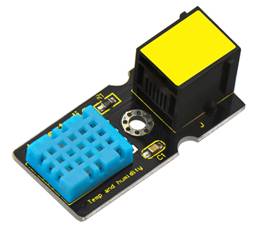
The DHT11 is a basic, ultra low-cost digital temperature and humidity sensor.
It uses a capacitive humidity sensor and a thermistor to measure the surrounding air, and provides a pre-calibrated digital signal output.
This DHT11 sensor has fast response, anti-interference ability, excellent reliability and long term stability.
Special Note:
The sensor/module is equipped with the RJ11 6P6C interface, compatible with our keyestudio EASY plug Control Board with RJ11 6P6C interface.
If you have the control board of other brands, it is also equipped with the RJ11 6P6C interface but has different internal line sequence, can’t be used compatibly with our sensor/module.
Specification
- Connector: Easy plug
- Supply Voltage: 5V
- Relative Humidity and temperature measurement
- Good for 20-90% humidity readings with 5% accuracy
- Good for 0-50°C temperature readings ±2°C accuracy
- Interface: Digital
- Low Cost
Technical Details
- Dimensions: 42mm*20mm*18mm
- Weight: 5.6g
Connect It Up
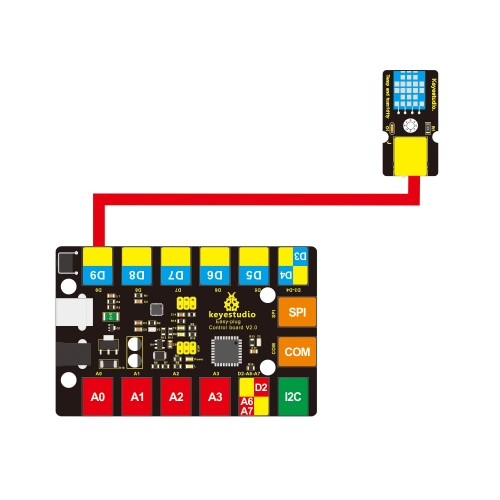
Connect the EASY Plug DHT11 sensor to control board using an RJ11 cable. Then connect the control board to your PC with a USB cable.
Upload the Code
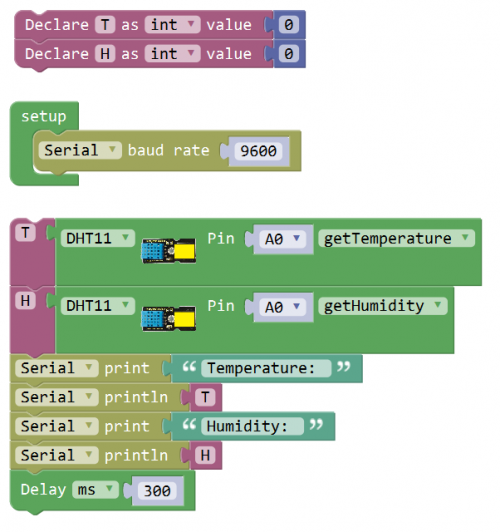
Below is an example code. Open or drag below code to Mixly Blocks and upload.
What You Should See
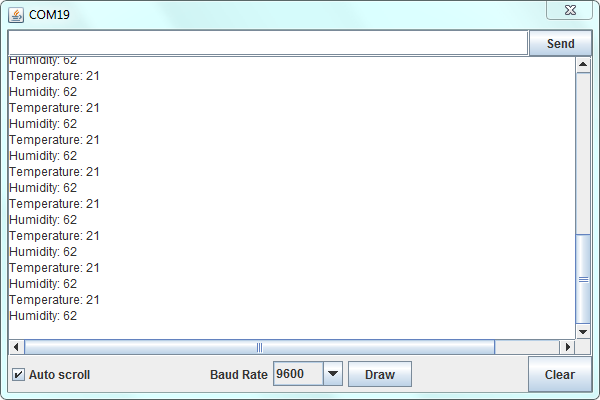
Open the Serial monitor, you should be able to see the temperature and humidity data.
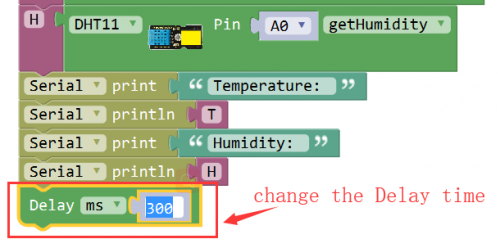
Little Knowledge:
- If the data is scrolling very fast, you can’t make out the data clearly, so you can modify the Delay time in the code to check it easily.
Extension Experiment
Make a Hygrothermograph
Hookup Guide
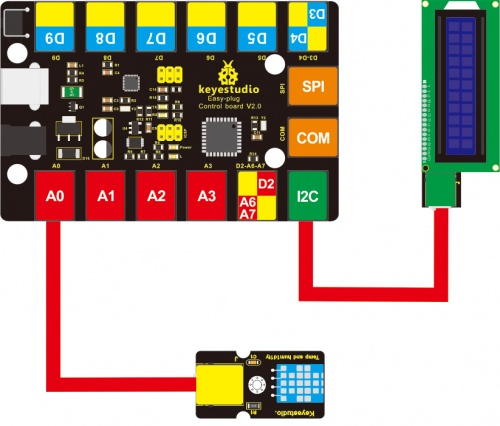
Connect the EASY Plug DHT11 sensor and 1602 LCD module to control board using RJ11 cables.
Test Code
Below is an example code.

What You Should See
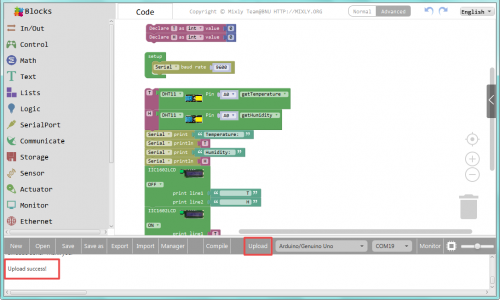
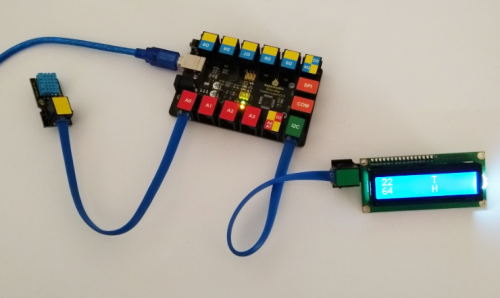
Upload success, you should be able to see the temperature and humidity data are showed on the LCD screen.
Resources
https://fs.keyestudio.com/KS0129
