Ks0261 keyestudio AD8232 ECG Measurement Heart Monitor Sensor Module: Difference between revisions
Keyestudio (talk | contribs) |
Keyestudio (talk | contribs) |
||
| (8 intermediate revisions by the same user not shown) | |||
| Line 1: | Line 1: | ||
== | |||
<br> | |||
==Introduction== | |||
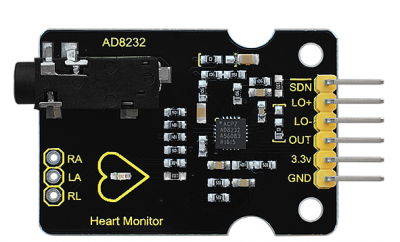
The AD8232 is an integrated front end for signal conditioning of cardiac bioelectrical signals to monitor heart rate. <br> | |||
This is a low-power, single-lead and heart rate monitor front end for all types of vital signs. <br> | |||
<br>[[File:KS0261.png|500px|frameless|thumb]]<br> | <br>[[File:KS0261.png|500px|frameless|thumb]]<br> | ||
<br> | |||
==Specification== | ==Specification== | ||
* Power voltage:DC 3.3V | * Power voltage:DC 3.3V | ||
* Output:analog output | * Output:analog output | ||
* Interface(connect RA, LA, RL):3PIN, 2.54PIN or earphone jack | * Interface(connect RA, LA, RL): 3PIN, 2.54PIN or earphone jack | ||
* Working Temperature:-40℃ to +85℃ | |||
* Working Temperature:- | <br>[[File:Ks0261-1.png|400px|frameless|thumb]]<br> | ||
<br> | |||
==Connection Diagram == | ==Connection Diagram == | ||
<br>[[File:KS0261-2.png| | <br>[[File:KS0261-2.png|800px|frameless|thumb]]<br> | ||
<br> | |||
== Sample Code == | == Sample Code == | ||
'''1> Burn the code to UNO board using arduino IDE''' <br> | |||
'''1> | |||
<pre> | <pre> | ||
void setup() { | void setup() { | ||
| Line 42: | Line 48: | ||
</pre> | </pre> | ||
<br>[[File:KS0261 心率 (6).jpg|500px|frameless|thumb]]<br> | |||
<br> | |||
'''2> Using processing software[[File:KS0261-3.png|500px|frameless|thumb]] to find the program as below:''' <br> | |||
<br>[[File:KS0261-4.png| | <span style=color:red> myPort = new Serial(this, Serial.list()[2], 9600); </span> <br> | ||
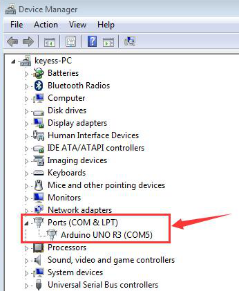
This program,'''Serial.list()[2],9600''',is to check the serial port of the computer you used,for example,the below figure shows only one port, so it is '''Serial.list()[0],9600'''. <br> | |||
<br>[[File:KS0261-4.png|700px|frameless|thumb]]<br> | |||
<br> | |||
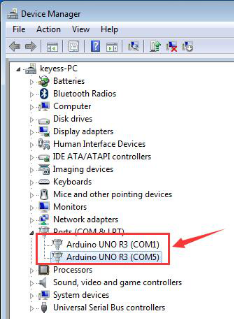
When the computer appears COM1 and COM5,COM5 is the UNO test of AD8232 board, so it shows '''Serial.list()[1],9600''', you can refer to the below figure: <br> | |||
<br>[[File:KS0261-5.png|700px|frameless|thumb]]<br> | |||
<br> | |||
Heart_Rate_Display.ino <br> | |||
Demo Program for AD8232 Heart Rate sensor. <br> | |||
<br> | |||
The AD8232 Heart Rate sensor is a low cost EKG/ECG sensor. This example shows how to create an ECG with real time display. The display is using '''Processing'''. <br> | |||
This sketch is based heavily on the Graphing Tutorial provided in the Arduino IDE. http://www.arduino.cc/en/Tutorial/Graph <br> | |||
Heart_Rate_Display.ino<br> | <br> | ||
Demo Program for AD8232 Heart Rate sensor.<br> | Resources: <br> | ||
The AD8232 Heart Rate sensor is a low cost EKG/ECG sensor. | |||
how to create an ECG with real time display. | |||
This sketch is based heavily on the Graphing Tutorial provided in the Arduino | |||
IDE. http://www.arduino.cc/en/Tutorial/Graph<br> | |||
Resources:<br> | |||
This program requires a Processing sketch to view the data in real time.<br> | This program requires a Processing sketch to view the data in real time.<br> | ||
<br> | |||
'''Development environment specifics:'''<br> | |||
* IDE: Arduino 1.0.5 <br> | |||
* Hardware Platform: Arduino Pro 3.3V/8MHz <br> | |||
* AD8232 Heart Monitor Version: 1.0 <br> | |||
<br> | |||
This code is beerware. If you've found our code helpful, please buy us a round! <br> | |||
import processing.serial.; <br> | |||
This code is beerware. If | |||
<pre> | <pre> | ||
Serial myPort; // The serial port | Serial myPort; // The serial port | ||
| Line 147: | Line 144: | ||
</pre> | </pre> | ||
<br> | |||
== Test Result == | == Test Result == | ||
Using the software [[File:KS0261-3.png|500px|frameless|thumb]] to open the program,click [[File:KS0261-7.png|500px|frameless|thumb]] key. Using three pads,R-end is stuck on the left chest, L-end is for the right chest, COM is stuck near the | Using the software [[File:KS0261-3.png|500px|frameless|thumb]] to open the program,click [[File:KS0261-7.png|500px|frameless|thumb]] key. Using three pads,R-end is stuck on the left chest, L-end is for the right chest, COM is stuck near the stomach. <br> | ||
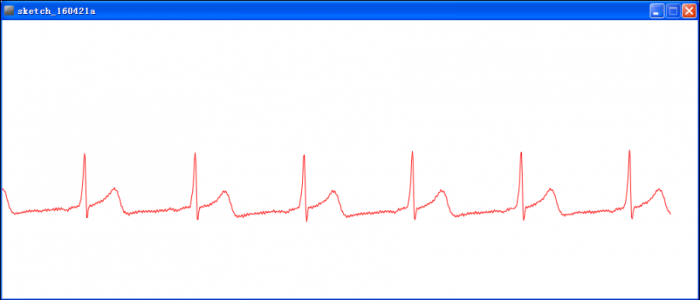
stomach. It will appear the following pattern, and the LED light on the PCB board will flash with the heartbeat. In this way,you can make sure that the board is available. | It will appear the following pattern, and the LED light on the PCB board will flash with the heartbeat. In this way,you can make sure that the board is available. <br> | ||
<br>[[File:KS0261-6.png| | <br>[[File:KS0261-6.png|700px|frameless|thumb]]<br> | ||
<br> | |||
== Resources == | == Resources == | ||
''' | |||
https:// | * '''Get Codes of All Project:'''<br> | ||
https://fs.keyestudio.com/KS0261 | |||
<br> | <br> | ||
<br> | <br> | ||
== Get One Now == | == Get One Now == | ||
*[https://www.keyestudio.com/keyestudio-ad8232-ecg-measurement-heart-monitor-sensor-module-for-arduino-uno-r3-p0466-p0466.html '''Official Website'''] | |||
*[https://www.aliexpress.com/store/product/Keyestudio-AD8232-ECG-Measurement-Heart-Monitor-Sensor-Module-for-Arduino-UNO-R3/1452162_32830624268.html?spm=2114.12010615.8148356.1.6b6faabcGZ6lXQ '''Shop on aliexpress''' ] | |||
[[Category: Module]] | [[Category: Module]] | ||
Latest revision as of 16:51, 8 January 2021
Introduction
The AD8232 is an integrated front end for signal conditioning of cardiac bioelectrical signals to monitor heart rate.
This is a low-power, single-lead and heart rate monitor front end for all types of vital signs.
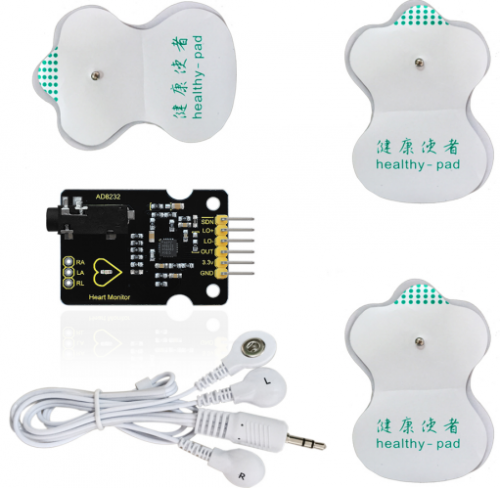
Specification
- Power voltage:DC 3.3V
- Output:analog output
- Interface(connect RA, LA, RL): 3PIN, 2.54PIN or earphone jack
- Working Temperature:-40℃ to +85℃
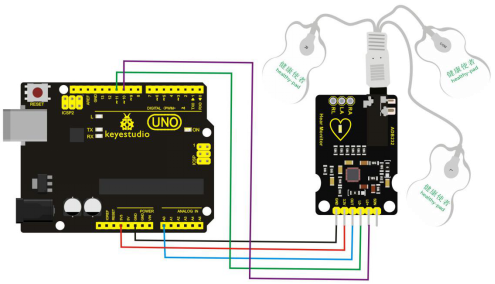
Connection Diagram
Sample Code
1> Burn the code to UNO board using arduino IDE
void setup() {
  // initialize the serial communication:
  Serial.begin(9600);
  pinMode(10, INPUT); // Setup for leads off detection LO +
  pinMode(11, INPUT); // Setup for leads off detection LO -

}

void loop() {

  if((digitalRead(10) == 1)||(digitalRead(11) == 1)){
    Serial.println('!');
  }
  else{
    // send the value of analog input 0:
      Serial.println(analogRead(A0));
  }
  //Wait for a bit to keep serial data from saturating
  delay(1);
}
2> Using processing software to find the program as below:
myPort = new Serial(this, Serial.list()[2], 9600);
This program,Serial.list()[2],9600,is to check the serial port of the computer you used,for example,the below figure shows only one port, so it is Serial.list()[0],9600.
When the computer appears COM1 and COM5,COM5 is the UNO test of AD8232 board, so it shows Serial.list()[1],9600, you can refer to the below figure:
Heart_Rate_Display.ino
Demo Program for AD8232 Heart Rate sensor.
The AD8232 Heart Rate sensor is a low cost EKG/ECG sensor. This example shows how to create an ECG with real time display. The display is using Processing.
This sketch is based heavily on the Graphing Tutorial provided in the Arduino IDE. http://www.arduino.cc/en/Tutorial/Graph
Resources:
This program requires a Processing sketch to view the data in real time.
Development environment specifics:
- IDE: Arduino 1.0.5
- Hardware Platform: Arduino Pro 3.3V/8MHz
- AD8232 Heart Monitor Version: 1.0
This code is beerware. If you've found our code helpful, please buy us a round!
import processing.serial.;
Serial myPort;        // The serial port
int xPos = 1;         // horizontal position of the graph
float height_old = 0;
float height_new = 0;
float inByte = 0;


void setup () {
  // set the window size:
  size(1000, 400);

  // List all the available serial ports
  println(Serial.list());
  // Open whatever port is the one you're using.
myPort = new Serial(this, Serial.list()[2], 9600);
  // don't generate a serialEvent() unless you get a newline character:
  myPort.bufferUntil('\n');
  // set inital background:
  background(0xff);
}

void draw () {
  // everything happens in the serialEvent()
}


void serialEvent (Serial myPort) {
  // get the ASCII string:
  String inString = myPort.readStringUntil('\n');

  if (inString != null) {
    // trim off any whitespace:
    inString = trim(inString);

    // If leads off detection is true notify with blue line
    if (inString.equals("!")) {
      stroke(0, 0, 0xff); //Set stroke to blue ( R, G, B)
      inByte = 512;  // middle of the ADC range (Flat Line)
    }
    // If the data is good let it through
    else {
      stroke(0xff, 0, 0); //Set stroke to red ( R, G, B)
      inByte = float(inString);
     }

     //Map and draw the line for new data point
     inByte = map(inByte, 0, 1023, 0, height);
     height_new = height - inByte;
     line(xPos - 1, height_old, xPos, height_new);
     height_old = height_new;

      // at the edge of the screen, go back to the beginning:
      if (xPos >= width) {
        xPos = 0;
        background(0xff);
      }
      else {
        // increment the horizontal position:
        xPos++;
      }
  }
}
Test Result
Using the software  to open the program,click
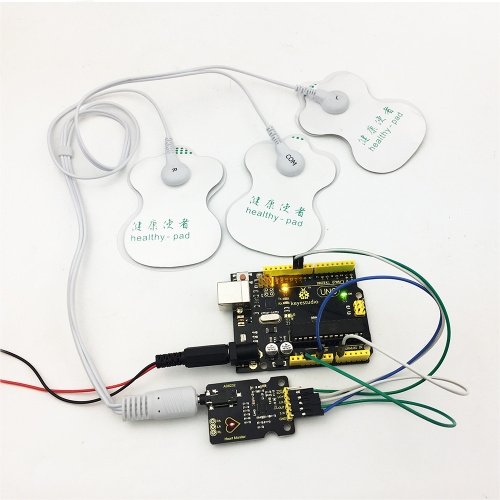
  key. Using three pads,R-end is stuck on the left chest, L-end is for the right chest, COM is stuck near the stomach.
It will appear the following pattern, and the LED light on the PCB board will flash with the heartbeat. In this way,you can make sure that the board is available.
Resources
- Get Codes of All Project:
https://fs.keyestudio.com/KS0261
