Ks0275 keyestudio Voltage Detection Module Voltage Sensor: Difference between revisions
Keyestudio (talk | contribs) |
Keyestudio (talk | contribs) |
||
| (4 intermediate revisions by the same user not shown) | |||
| Line 1: | Line 1: | ||
<br> | |||
== Introduction == | == Introduction == | ||
Since the electronic products are various, the voltage of the power supply is also different. It is indeed necessary to detect it with a suitable voltage detection module or controller. <br> | |||
Since the | The maximum input voltage of the controller’s analog interface is 5V, which means that the voltage greater than 5V will not be detected. <br> | ||
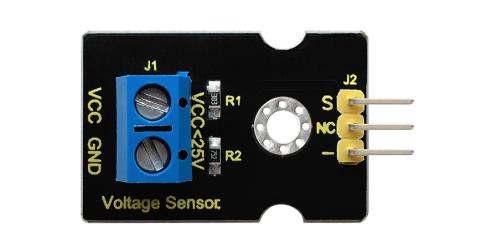
However, this voltage | However, this voltage detection module can achieve to detect the voltage greater than 5V. It is designed on the basis of resistive voltage divider principle, which can make the input voltage of bindingpost interface narrow 5 times, and the analog input voltage is up to 5V, thus the input voltage of voltage detection module is not greater than 5V * 5 = 25V (if using 3.3V system, the input voltage is not greater than 3.3V*5 = 16.5V). <br> | ||
The AVR chip is 10-bit AD, so the analog resolution of this module is 0.00489V (5V / 1023), and the minimum input voltage is 0.00489V * 5 = 0.02445V. <br> | |||
When connect this sensor to expansion board using 3Pin wire, it can not only easily detect the magnitude of the voltage power and monitor the electric quantity of battery for interactive media works or robot, but also can combine with IIC LCD1602 LCD module to display the voltage or make a voltage monitor.<br> | |||
<br>[[File:KS0275-.png|500px|frameless|thumb]]<br> | <br>[[File:KS0275-.png|500px|frameless|thumb]]<br> | ||
<br> | |||
==Specification == | ==Specification == | ||
* Working | * Working voltage:0V-25V DC | ||
* Signal type: analog signal | * Signal type: analog signal | ||
<br> | |||
==Connection Diagram == | ==Connection Diagram == | ||
<br>[[File:Ks0275.png|700px|frameless|thumb]]<br> | |||
<br> | <br> | ||
==Sample Code== | ==Sample Code== | ||
<pre> | <pre> | ||
int analogpin=0; | int analogpin=0; // Define analogpin as analog port 0 | ||
int val,val5; | int val,val5; //Define variables val,val5 | ||
int val2=0; | int val2=0; //Define variables val2 | ||
int val3=0; | int val3=0; //Define variables val3 | ||
int val4=0; | int val4=0; //Define variables val4 | ||
void setup() | void setup() | ||
| Line 31: | Line 35: | ||
int val,val5; | int val,val5; | ||
float val1; | float val1; | ||
val=analogRead(analogpin); | val=analogRead(analogpin); //Read the value of the analog port and assign it to the variable val | ||
val1=val/3.9; | val1=val/3.9; | ||
val5=(int)val1; | val5=(int)val1; | ||
| Line 37: | Line 41: | ||
val2=(val5%100)/10; | val2=(val5%100)/10; | ||
val4=val5%10; | val4=val5%10; | ||
Serial.print("$CLEAR\r\n"); | Serial.print("$CLEAR\r\n"); //clear the screen | ||
Serial.print("$GO 1 1\r\n"); | Serial.print("$GO 1 1\r\n"); | ||
Serial.print("$PRINT Voltage:\r\n"); | Serial.print("$PRINT Voltage:\r\n"); | ||
Serial.print("$GO 1 9\r\n"); | Serial.print("$GO 1 9\r\n"); | ||
Serial.print("$PRINT "); | Serial.print("$PRINT "); | ||
Serial.print(val3); | Serial.print(val3); //The serial port prints the value of the variable val3 | ||
Serial.print(val2); | Serial.print(val2); //The serial port prints the value of the variable val2 | ||
Serial.print("."); | Serial.print("."); //The serial port prints out a point"." | ||
Serial.print(val4); | Serial.print(val4); //The serial port prints the value of the variable val4 | ||
Serial.println("V"); | Serial.println("V"); //The serial port prints out capital “ V” | ||
delay(100); | delay(100); //delay 0.1 second | ||
} | } | ||
</pre> | </pre> | ||
<br> | |||
== Result == | == Result == | ||
Done as the above wiring, compile and upload the code, powered-on, then open the serial | Done as the above wiring, compile and upload the code, powered-on, then open the serial monitor, it will print out the detected voltage value shown below.<br> | ||
<br>[[File:Ks0275-.png| | <br>[[File:Ks0275-.png|600px|frameless|thumb]]<br> | ||
<br> | |||
== Resources == | == Resources == | ||
'''VIDEO:'''<br> | * '''Code:'''<br> | ||
http:// | |||
https://fs.keyestudio.com/KS0275 | |||
* '''VIDEO:'''<br> | |||
http://video.keyestudio.com/ks0275/ | |||
<br> | |||
== Get One Now == | == Get One Now == | ||
*[https://www.keyestudio.com/keyestudio-voltage-detection-module-voltage-sensor-electronic-blocks-for-arduino-uno-r3-p0166.html '''Official website''' ] | |||
*[https://www.aliexpress.com/store/product/Keyestudio-Voltage-detection-module-Voltage-sensor-Electronic-blocks-For-Arduino-UNO-R3/1452162_32679887585.html?spm=2114.12010615.8148356.1.23ae33683xQ27T '''Shop on aliexpress''' ] | |||
[[Category: Sensor]] | [[Category: Sensor]] | ||
Latest revision as of 12:13, 7 January 2021
Introduction
Since the electronic products are various, the voltage of the power supply is also different. It is indeed necessary to detect it with a suitable voltage detection module or controller.
The maximum input voltage of the controller’s analog interface is 5V, which means that the voltage greater than 5V will not be detected.
However, this voltage detection module can achieve to detect the voltage greater than 5V. It is designed on the basis of resistive voltage divider principle, which can make the input voltage of bindingpost interface narrow 5 times, and the analog input voltage is up to 5V, thus the input voltage of voltage detection module is not greater than 5V * 5 = 25V (if using 3.3V system, the input voltage is not greater than 3.3V*5 = 16.5V).
The AVR chip is 10-bit AD, so the analog resolution of this module is 0.00489V (5V / 1023), and the minimum input voltage is 0.00489V * 5 = 0.02445V.
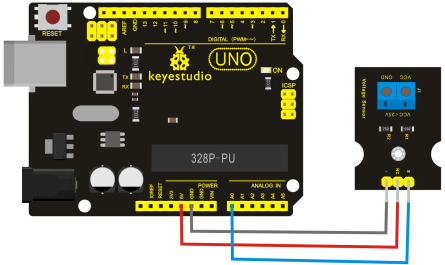
When connect this sensor to expansion board using 3Pin wire, it can not only easily detect the magnitude of the voltage power and monitor the electric quantity of battery for interactive media works or robot, but also can combine with IIC LCD1602 LCD module to display the voltage or make a voltage monitor.

Specification
- Working voltage:0V-25V DC
- Signal type: analog signal
Connection Diagram
Sample Code
int analogpin=0;     // Define analogpin as analog port 0
int val,val5;       //Define variables val,val5
int val2=0;      //Define variables val2
int val3=0;     //Define variables val3
int val4=0;    //Define variables val4

void setup()
{
    Serial.begin(9600);     //Set baud rate of 9600
}
void loop()
{
    int val,val5;
    float val1;
    val=analogRead(analogpin);     //Read the value of the analog port and assign it to the variable val
    val1=val/3.9;
    val5=(int)val1;
    val3=val5/100;
    val2=(val5%100)/10;
    val4=val5%10;
    Serial.print("$CLEAR\r\n");      //clear the screen
    Serial.print("$GO 1 1\r\n");
    Serial.print("$PRINT Voltage:\r\n");
    Serial.print("$GO 1 9\r\n");
    Serial.print("$PRINT ");
Serial.print(val3);        //The serial port prints the value of the variable val3
Serial.print(val2);      //The serial port prints the value of the variable val2
    Serial.print(".");               //The serial port prints out a point"."
    Serial.print(val4);         //The serial port prints the value of the variable val4
    Serial.println("V");          //The serial port prints out capital “ V”
    delay(100);      //delay 0.1 second
}
Result
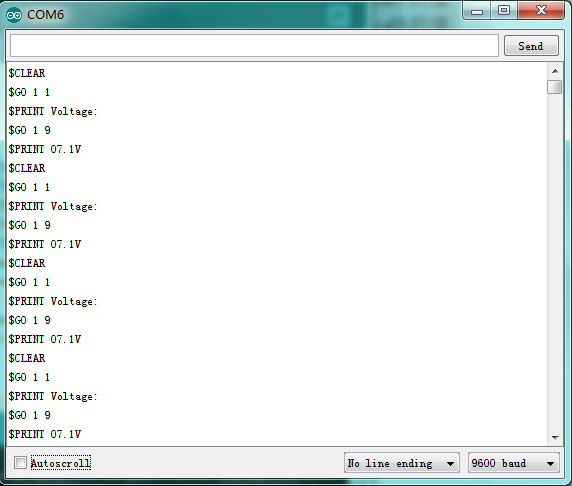
Done as the above wiring, compile and upload the code, powered-on, then open the serial monitor, it will print out the detected voltage value shown below.

Resources
- Code:
https://fs.keyestudio.com/KS0275
- VIDEO:
http://video.keyestudio.com/ks0275/
