|
|
| Line 66: |
Line 66: |
| <br>[[File:0497=21.png|500px|frameless|thumb]]<br> | | <br>[[File:0497=21.png|500px|frameless|thumb]]<br> |
|
| |
|
| == Testing == | | == Use OpenBuildsCONTROL to control the engraving machine == |
| | First, we need to install the grbl-1.1f.20170801 program on the control board. Note that the Arduino IDE version is above 1.8.5 when installed. |
|
| |
|
| Open Arduino IDE, compile and upload the below code to keyestudio CNC GRBL V0.9, then wire it up as above connection diagram, you can check every interface function.
| | <br>[[File:KS0288-1.png|500px|frameless|thumb]]<br> |
|
| |
|
| '''Code:'''
| | Then install the OpenBuildsCONTROL software. |
| <pre>
| |
|
| |
|
| #define Light1 13
| | After the installation, open the software and select the correct COM port. |
| #define Light2 A1
| |
| #define Light3 A2
| |
| #define Light4 A3
| |
| #define Light5 A4
| |
| #define Light6 A5
| |
|
| |
|
| #define EN1 8
| | <br>[[File:0288-33.png|500px|frameless|thumb]]<br> |
| #define X_DIR 5 //X axis direction control of stepper motor
| |
| #define Y_DIR 6 //y axis direction control of stepper motor
| |
| #define Z_DIR 7 //z axis direction control of stepper motor
| |
| #define X_STP 2 //x axis stepper control
| |
| #define Y_STP 3 //y axis stepper control
| |
| #define Z_STP 4 //z axis stepper control
| |
| #define X_LIMIT 9 //X limit
| |
| #define Y_LIMIT 10 //Y limit
| |
| #define Laser 11 //motor or laser controlling pin
| |
| #define Z_LIMIT 12 //Z limit
| |
| #define E_LIMIT A0 //E limit
| |
| const int Button_A7 = A7;
| |
| const int Button_A6 = A6;
| |
| int Button_value_A7 = 0;
| |
| int Button_value_A6 = 0;
| |
| int Button_valueX = 0;
| |
| int Button_valueY = 0;
| |
| int Button_valueZ = 0;
| |
| int Button_valueE = 0;
| |
|
| |
|
| void setup() {
| | Connecting successfully, we can make various settings on the interface, such as |
| pinMode(Light1, OUTPUT); pinMode(Light2, OUTPUT);
| |
| pinMode(Light3, OUTPUT); pinMode(Light4, OUTPUT);
| |
| pinMode(Light5, OUTPUT); pinMode(Light6, OUTPUT);
| |
|
| |
| pinMode(EN1, OUTPUT);
| |
| pinMode(X_DIR, OUTPUT);
| |
| pinMode(Y_DIR, OUTPUT);
| |
| pinMode(Z_DIR, OUTPUT);
| |
| pinMode(X_STP, OUTPUT);
| |
| pinMode(Y_STP, OUTPUT);
| |
| pinMode(Z_STP, OUTPUT);
| |
| pinMode(Button_A7, INPUT);
| |
| pinMode(Button_A6, INPUT);
| |
| pinMode(E_LIMIT, INPUT);
| |
| pinMode(X_LIMIT, INPUT);
| |
| pinMode(Y_LIMIT, INPUT);
| |
| pinMode(Z_LIMIT, INPUT);
| |
| Serial.begin(9600);
| |
| }
| |
|
| |
|
| void EN()
| | setting the laser interface power voltage on Tool on and Tool off.<br> |
| {
| |
| digitalWrite(EN1, LOW);
| |
| }
| |
| //stepper motor turns and reverse
| |
| void turn(boolean dir, int steps)
| |
| {
| |
| EN();
| |
| digitalWrite(X_DIR,dir);
| |
| digitalWrite(Y_DIR,dir);
| |
| digitalWrite(Z_DIR,dir);
| |
| delay(100);
| |
| for(int i=0;i<steps;i++)
| |
| {
| |
| digitalWrite(X_STP, HIGH);
| |
| digitalWrite(Y_STP, HIGH);
| |
| digitalWrite(Z_STP, HIGH);
| |
| delayMicroseconds(100);
| |
| digitalWrite(X_STP, LOW);
| |
| digitalWrite(Y_STP, LOW);
| |
| digitalWrite(Z_STP, LOW);
| |
| delayMicroseconds(100);
| |
| }
| |
| }
| |
| //laser is on
| |
| void Laser_ON()
| |
| {
| |
| digitalWrite(Laser, HIGH);
| |
| delay(500);
| |
| //digitalWrite(Laser, LOW);
| |
| //delay(500);
| |
| }
| |
| //laser is off
| |
| void Laser_OFF()
| |
| {
| |
| digitalWrite(Laser, LOW);
| |
| delay(500);
| |
| //digitalWrite(Laser, LOW);
| |
| //delay(500);
| |
| }
| |
|
| |
|
| void loop()
| | <br>[[File:0288-34.png|500px|frameless|thumb]]<br> |
| {
| |
|
| |
| Button_valueX = digitalRead(X_LIMIT);
| |
| if(Button_valueX == LOW)
| |
| {
| |
| digitalWrite(Light3, HIGH);
| |
| turn(true, 4000);
| |
| }
| |
| else
| |
| {
| |
| digitalWrite(Light3, LOW);
| |
| }
| |
| Serial.print("Button_valueX = ");
| |
| Serial.println(Button_valueX);
| |
|
| |
| Button_valueY = digitalRead(Y_LIMIT);
| |
| if(Button_valueY == LOW)
| |
| {
| |
| digitalWrite(Light4, HIGH);
| |
| turn(false, 4000);
| |
| }
| |
| else digitalWrite(Light4, LOW);
| |
| Serial.print("Button_valueY = ");
| |
| Serial.println(Button_valueY);
| |
|
| |
| Button_valueZ = digitalRead(Z_LIMIT);
| |
| if(Button_valueZ == LOW) digitalWrite(Light5, HIGH);
| |
| else digitalWrite(Light5, LOW);
| |
| Serial.print("Button_valueZ = ");
| |
| Serial.println(Button_valueZ);
| |
|
| |
| Button_value_A7 = analogRead(Button_A7);
| |
| if(Button_value_A7 == 0) digitalWrite(Light1, HIGH);
| |
| else digitalWrite(Light1, LOW);
| |
| Serial.print("Button_value_A7 = ");
| |
| Serial.println(Button_value_A7);
| |
|
| |
| Button_value_A6 = analogRead(Button_A6);
| |
| if(Button_value_A6 == 0) digitalWrite(Light2, HIGH);
| |
| else digitalWrite(Light2, LOW);
| |
| Serial.print("Button_value_A6 = ");
| |
| Serial.println(Button_value_A6);
| |
|
| |
| Button_valueE = analogRead(E_LIMIT);
| |
| if(Button_valueE == 0)
| |
| {
| |
| digitalWrite(Light6, HIGH);
| |
| Laser_ON();
| |
| }
| |
| else
| |
| {
| |
| digitalWrite(Light6, LOW);
| |
| Laser_OFF();
| |
| }
| |
| Serial.print("Button_valueE = ");
| |
| Serial.println(Button_valueE);
| |
| }
| |
|
| |
|
| </pre>
| |
|
| |
|
| | If the black DC head connects to DC 12V voltage. According to the figure below, when 100% is selected, the blue terminal or Laser interface power supply on the control panel is 12V. When 50% is selected, the voltage of the two interfaces is 6V.<br> |
| | Click on icon below, the blue terminal or the laser interface power supply on the control panel is 0V. <br> |
|
| |
|
| | <br>[[File:0288-35.png|500px|frameless|thumb]]<br> |
|
| |
|
| ===Install Firmware and Grbl Controller===
| | At the same time, we can input/send control commands on the following interface to control the status of the control panel. The control command settings can be found at the following URL. |
|
| |
|
| '''a. Write test program to keyestudio UNO R3''' <br>
| | https://github.com/gnea/grbl/wiki/Grbl-v1.1-Commands |
| copy the folder GRBL_ Arduino_Library_keyes in the data packet and paste it to the folder libraries in your Arduino IDE document installation.<br>
| |
|
| |
|
| '''Code:'''
| | When we are working, there are two modes, one for the laser mode and another one for spindle mode. The default mode is the spindle mode,when the control panel starts. We need to change to the laser mode when we start engraving. The change method is: input/send $32=1 in the following interface, and input/send $32=0 in the spindle mode. |
| <pre>
| |
| #include <grblmain.h>
| |
| void setup(){
| |
| startGrbl();
| |
| }
| |
| void loop(){}
| |
| //Burn the code above to keyestudio UNO R3 | |
| </pre>
| |
|
| |
|
| <br>
| | <br>[[File:0288-36.png|500px|frameless|thumb]]<br> |
| '''b. Install GrblController361 Software'''<br>
| |
| Grbl Controller is a piece of software which is used to send GCode to CNC Machines. Run Grbl Controller361 Setup in your installation packet, the interface below will come out:<br>
| |
| Click Next to continue.
| |
| <br>[[File:94 4-1.png|500px|frameless|thumb]]<br> | |
|
| |
|
| For a license agreement, please check I accept the agreement and click Next. | | For details, please refer to the links below. |
| <br>[[File:94 4-2.png|500px|frameless|thumb]]<br>
| |
|
| |
|
| When you are ready to continue with Setup, click Next.
| | <br>[[File:0288-37.png|500px|frameless|thumb]]<br> |
| <br>[[File:94 4-3.png|500px|frameless|thumb]]<br> | |
|
| |
|
| To continue, click Next. If you would like to select a different folder to install, click Browse.
| | https://github.com/gnea/grbl/wiki/Grbl-v1.1-Laser-Mode |
| <br>[[File:94 4-4.png|500px|frameless|thumb]]<br>
| |
|
| |
|
| To continue, click Next. If you would like to select a different folder to place program’s shortcuts, click Browse.
| |
| <br>[[File:94 4-5.png|500px|frameless|thumb]]<br>
| |
|
| |
|
| Select the additional tasks you would like Setup to perform while installing Grbl Controller, then click Next.
| | == Reference Download == |
| <br>[[File:94 4-6.png|500px|frameless|thumb]]<br>
| |
|
| |
|
| Click Install to continue with the installation.
| | https://drive.google.com/drive/folders/1UR3X9ZXmy_-bBTqhLOH1insBts5SyEsJ |
| <br>[[File:94 4-7.png|500px|frameless|thumb]]<br>
| |
| | |
| Click Next.
| |
| <br>[[File:94 4-8.png|500px|frameless|thumb]]<br>
| |
| | |
| At last, click ”Finish” to finish the installation.
| |
| <br>[[File:94 4-9.png|500px|frameless|thumb]]<br>
| |
| At last, click ”Finish” to finish the installation.
| |
| | |
| <br>
| |
| '''c. Test G-Code on Grbl Controller'''<br>
| |
| Power the main board using a USB cable and connect correctly all your external devices, then run Grbl Controller.<br>
| |
| Choose Port name the same as IDE COM port and click “Open” to open the series port, connecting CNC Machines with computer.<br>
| |
| <br>[[File:94 4-10.png|500px|frameless|thumb]]<br>
| |
| | |
| After opening the series port, the “Open” button change into “Close/Reset” and get red! <br>
| |
| At this time you can click the X axis、Y axis、Z axis as shown in below diagram to adjust the motion direction of motors.<br>
| |
| <br>[[File:94 4-11.png|500px|frameless|thumb]]<br>
| |
| | |
| '''Note:''' after adjusting the axies, before beginning G-Code file, you must close and open again.<br>
| |
| Now, it is time to have a try! Click ”Choose file” to choose one G-Code file named '''cn.''' to test in the data packet for a beginner, and the interface will come out: <br>
| |
| '''GrblController'''
| |
| <br>[[File:94 4-12.png|500px|frameless|thumb]]<br>
| |
| | |
| Click “Begin” , and you can see how the motors move on coordinates.
| |
| | |
| <br>
| |
|
| |
|
| == Documents == | | == Documents == |
Introduction
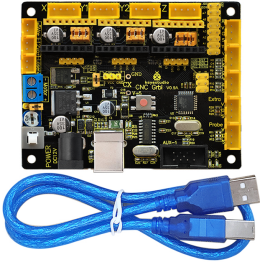
Keyestudio CNC GRBL V0.9 is a motherboard developed for various robots such as laser engraving, CNC, writing robot and so on. It has complete interfaces with cheap price, and can connect external drive, very suitable for DIY or factory use.
The driver chip of this board is CH340, which is not compatible with mac system computer.
Specification
- Microprocessor:MEGA328p
- Input voltage: DC 12V
- File supporting format:Gcode
- Supporting machine structure:CNC,laser engraving,writing robot.
Pin Explanation
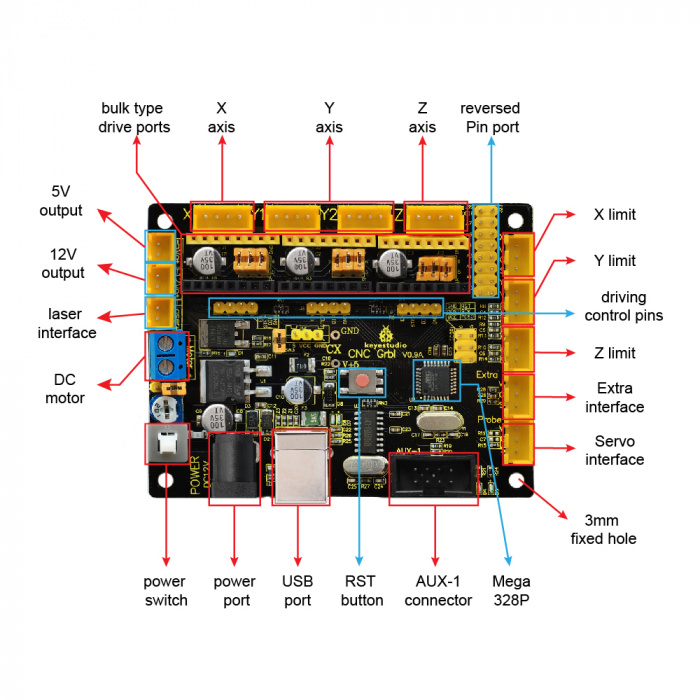
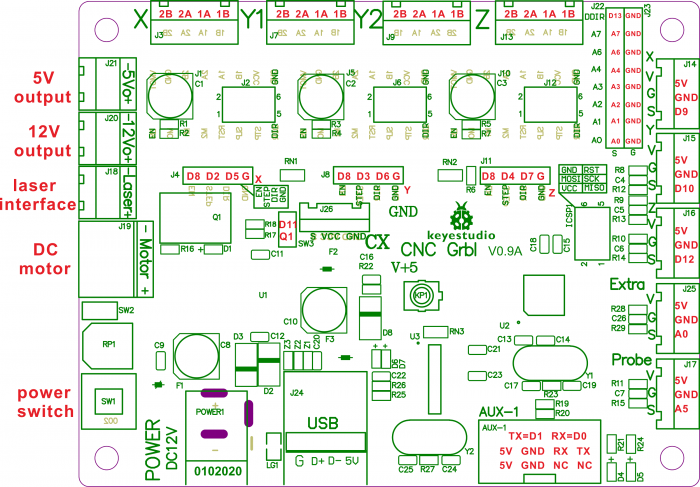
Install Driver and Development Environment Software IDE
(1)Install Driver Software
For different operating system, there may be slight difference in installation method. Below is an example in WIN 7.
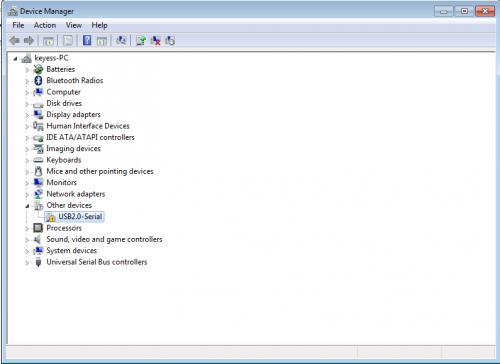
a.When you connect Keyestudio CNC GRBL V0.9 to your computer at the first time, right click “Computer” —>“Properties”—> “Device manager”, you can see “USB2.0-Serial”. Shown below.
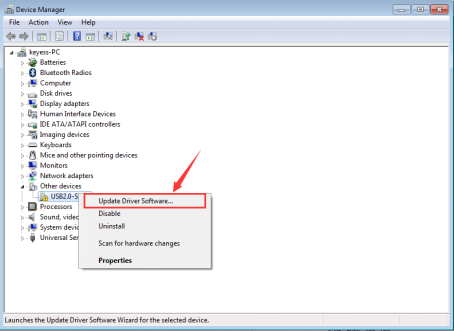
b.Click “USB2.0-Serial”, select “Update Driver software”.
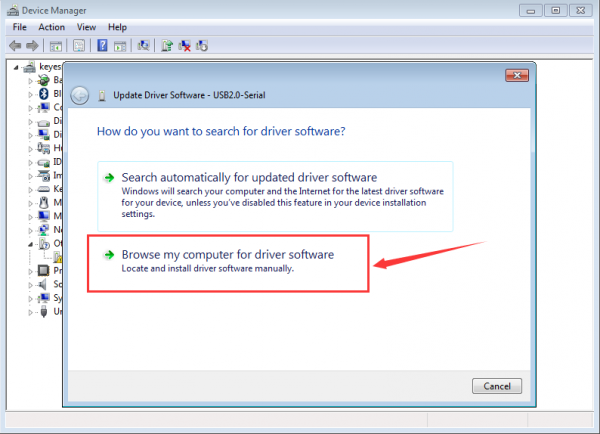
c.Then, click “Browse my computer for driver software”.
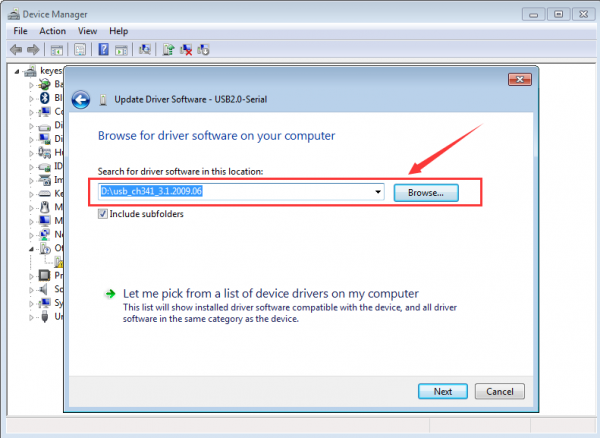
d.Find the “usb_ch341_3.1.2009.06” file.
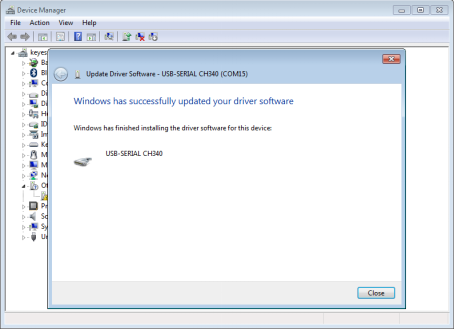
e.Click “Next”,Installation completed; click “Close”.
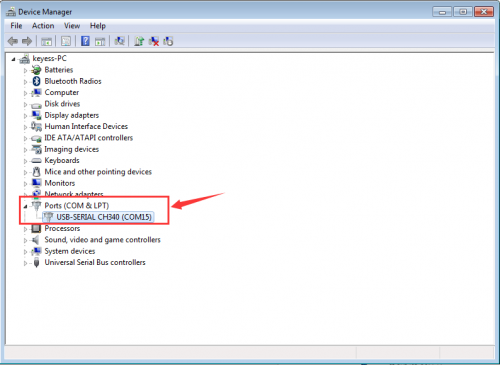
f.After driver is installed, go to “Device manager” again. right click “Computer” —> “Properties”—> “Device manager”, you can see the Board and Com port as below figure shown.
(2) Install Development Environment Software IDE
When getting this control board, we need to install Arduino IDE
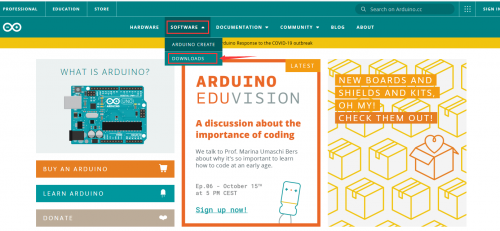
Enter the website https://www.arduino.cc/, click  and
and 
Select the version you want to download, the latest version could be downloaded.
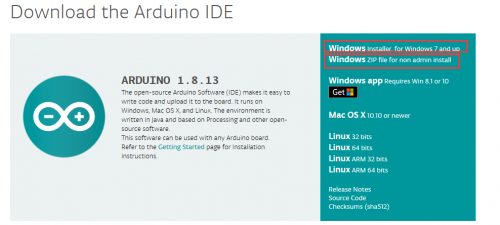
Alternatively, you could select previous release.
In this project, we use 1.8.7 version.

Click to view the below page

Click  to download an installer of Arduino 1.8.7version,which needs to be installed manually. When you tap
  ,a zip file of Arduino 1.8.7 version will be directly downloaded, and you only need to unzip it to finish installation.

Use OpenBuildsCONTROL to control the engraving machine
First, we need to install the grbl-1.1f.20170801 program on the control board. Note that the Arduino IDE version is above 1.8.5 when installed.
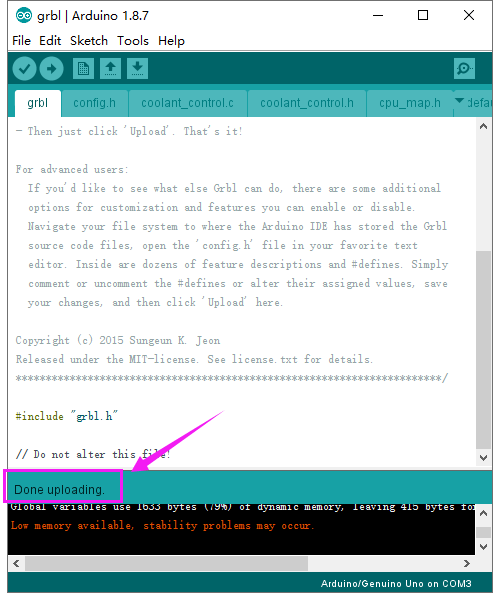
Then install the OpenBuildsCONTROL software.
After the installation, open the software and select the correct COM port.
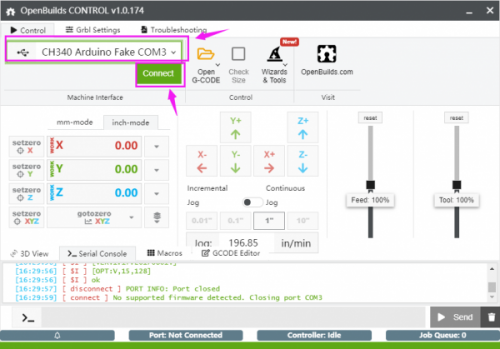
Connecting successfully, we can make various settings on the interface, such as
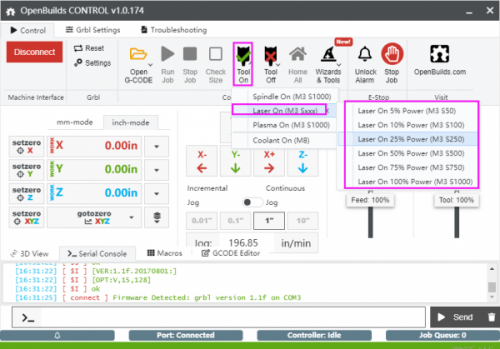
setting the laser interface power voltage on Tool on and Tool off.
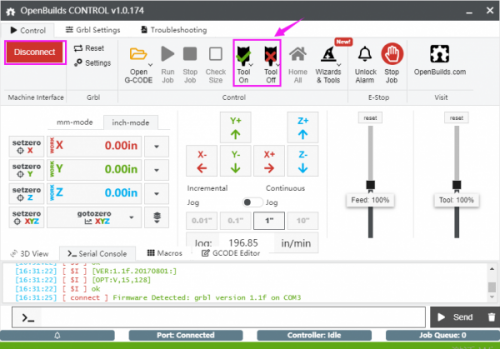
If the black DC head connects to DC 12V voltage. According to the figure below, when 100% is selected, the blue terminal or Laser interface power supply on the control panel is 12V. When 50% is selected, the voltage of the two interfaces is 6V.
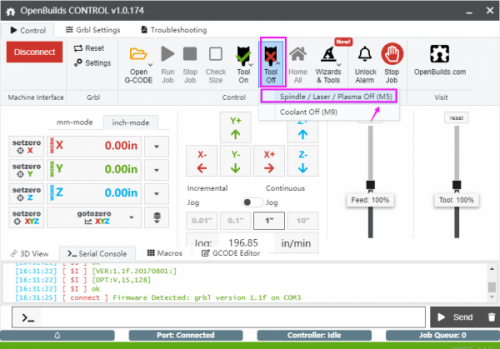
Click on icon below, the blue terminal or the laser interface power supply on the control panel is 0V.
At the same time, we can input/send control commands on the following interface to control the status of the control panel. The control command settings can be found at the following URL.
https://github.com/gnea/grbl/wiki/Grbl-v1.1-Commands
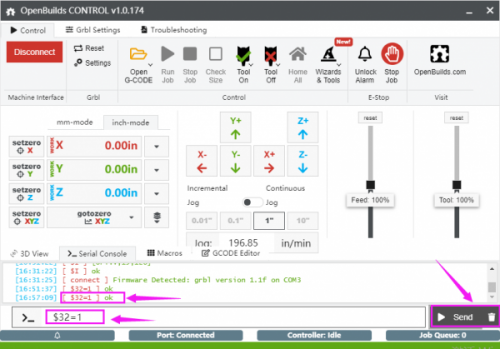
When we are working, there are two modes, one for the laser mode and another one for spindle mode. The default mode is the spindle mode,when the control panel starts. We need to change to the laser mode when we start engraving. The change method is: input/send $32=1 in the following interface, and input/send $32=0 in the spindle mode.
For details, please refer to the links below.
https://github.com/gnea/grbl/wiki/Grbl-v1.1-Laser-Mode
Reference Download
https://drive.google.com/drive/folders/1UR3X9ZXmy_-bBTqhLOH1insBts5SyEsJ
Documents
Download Related Sources:
https://drive.google.com/drive/folders/1UR3X9ZXmy_-bBTqhLOH1insBts5SyEsJ
Buy From


![]() and
and ![]()
![]() to download an installer of Arduino 1.8.7version,which needs to be installed manually. When you tap
to download an installer of Arduino 1.8.7version,which needs to be installed manually. When you tap ![]() ,a zip file of Arduino 1.8.7 version will be directly downloaded, and you only need to unzip it to finish installation.
,a zip file of Arduino 1.8.7 version will be directly downloaded, and you only need to unzip it to finish installation.
