Ks0122 keyestudio EASY plug PIR Motion Sensor: Difference between revisions
Keyestudio (talk | contribs) |
Keyestudio (talk | contribs) No edit summary |
||
| Line 1: | Line 1: | ||
[[image:ks0122图.jpg|thumb|600px|right|EASY plug Flame Sensor Module]] | |||
==Introduction== | ==Introduction== | ||
Pyroelectric infrared | PIR stands for Pyroelectric Infrared (many times, they are also referred as Passive Infrared sensors). This is because their principle of operation is based on the detection of infrared energy emitted by a moving body.<br> | ||
Note: this module | The PIR sensor can detect infrared signals from a moving person or moving animal, outputting switching signals. <br> | ||
One important thing to mention is that when motion is detected, the output will stay high for 2.3 to 3 seconds after the motion stops.<br> | |||
Regarding the power supply, it can work with voltages of both 3.3V and 5V. The device has a detection range of 7 meters and a detection angle of 100º.<br> | |||
<span style="color: red">'''Note: ''' this module should be used together with EASY plug control board.<br> | |||
<br> | |||
==Specification== | ==Specification== | ||
* | * Connector: Easy plug | ||
* Input Voltage: 3.3 ~ 5V, 6V | * Input Voltage: 3.3 ~ 5V, Maximum 6V | ||
* Working Current: 15uA | * Working Current: 15uA | ||
* Working Temperature: -20 ~ | * Working Temperature: -20 ~ 85℃ | ||
* Output Voltage: High 3V, | * Output Voltage: High 3V, Low 0V | ||
* Output Delay Time (High Level): | * Output Delay Time (High Level): about 2.3 to 3 Seconds | ||
* Detection angle: | * Detection angle: 100° | ||
* Detection distance: 7 meters | * Detection distance: 7 meters | ||
* Output Indicator LED (When output HIGH, it will be ON) | * Output Indicator LED (When output HIGH, it will be ON) | ||
* Pin limit current: 100mA | * Pin limit current: 100mA | ||
<br> | |||
==Technical Details== | |||
* Dimensions: 38mm*20mm*18mm | |||
* Weight: 5.6g | |||
<br> | |||
==Connect It Up== | |||
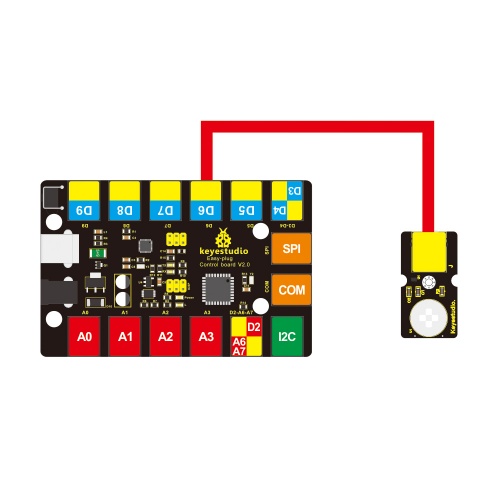
Connect the EASY Plug PIR Motion sensor to control board using an RJ11 cable. Then connect the control board to your PC with a USB cable. | |||
<br>[[File:ks0122.jpg|500px|frameless|thumb]]<br> | |||
== | <br> | ||
==Upload the Code== | |||
Copy and paste below code to [http://wiki.keyestudio.com/index.php/How_to_Download_Arduino_IDE Arduino IDE] and upload. | |||
<pre> | <pre> | ||
byte sensorPin = | byte sensorPin = 6; | ||
byte indicator = 13; | byte indicator = 13; | ||
void setup() | void setup() | ||
{ | { | ||
pinMode(sensorPin,INPUT); | |||
pinMode(indicator,OUTPUT); | |||
Serial.begin(9600); | |||
} | } | ||
void loop() | void loop() | ||
{ | { | ||
byte state = digitalRead(sensorPin); | |||
digitalWrite(indicator,state); | |||
if(state == 1)Serial.println("Somebody is in this area!"); | |||
else if(state == 0)Serial.println("No one!"); | |||
delay(500); | |||
} | } | ||
</pre> | </pre> | ||
<br> | |||
==What You Should See== | |||
Done uploading the code, open the serial monitor and set the baud rate to 9600. If the sensor detects someone moving nearby, you should see the "Somebody is in this area!" is displayed on the monitor. Otherwise, it will display "No one!". | |||
<br>[[File:ks0122 Result.gif|500px|frameless|thumb]]<br> | |||
<br> | |||
==Resources == | ==Resources == | ||
'''PDF''' | '''PDF''' | ||
https://drive.google.com/open?id=1_EXnBPMfjKHLdmLGqJJjqX_041nNH912 | https://drive.google.com/open?id=1_EXnBPMfjKHLdmLGqJJjqX_041nNH912 | ||
<br> | |||
==Buy from == | ==Buy from == | ||
'''Official Website''' | '''Official Website'''<br> | ||
http://www.keyestudio.com/keyestudio-easy-plug-pir-motion-sensor-module-for-arduino.html | |||
[[category:EASY Plug]] | [[category:EASY Plug]] | ||
Revision as of 09:26, 23 November 2018
Introduction
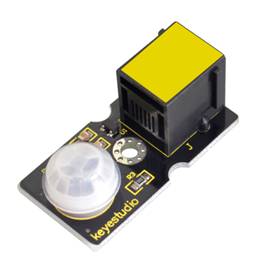
PIR stands for Pyroelectric Infrared (many times, they are also referred as Passive Infrared sensors). This is because their principle of operation is based on the detection of infrared energy emitted by a moving body.
The PIR sensor can detect infrared signals from a moving person or moving animal, outputting switching signals.
One important thing to mention is that when motion is detected, the output will stay high for 2.3 to 3 seconds after the motion stops.
Regarding the power supply, it can work with voltages of both 3.3V and 5V. The device has a detection range of 7 meters and a detection angle of 100º.
Note: this module should be used together with EASY plug control board.
Specification
- Connector: Easy plug
- Input Voltage: 3.3 ~ 5V, Maximum 6V
- Working Current: 15uA
- Working Temperature: -20 ~ 85℃
- Output Voltage: High 3V, Low 0V
- Output Delay Time (High Level): about 2.3 to 3 Seconds
- Detection angle: 100°
- Detection distance: 7 meters
- Output Indicator LED (When output HIGH, it will be ON)
- Pin limit current: 100mA
Technical Details
- Dimensions: 38mm*20mm*18mm
- Weight: 5.6g
Connect It Up
Connect the EASY Plug PIR Motion sensor to control board using an RJ11 cable. Then connect the control board to your PC with a USB cable.

Upload the Code
Copy and paste below code to Arduino IDE and upload.
byte sensorPin = 6;
byte indicator = 13;
void setup()
{
pinMode(sensorPin,INPUT);
pinMode(indicator,OUTPUT);
Serial.begin(9600);
}
void loop()
{
byte state = digitalRead(sensorPin);
digitalWrite(indicator,state);
if(state == 1)Serial.println("Somebody is in this area!");
else if(state == 0)Serial.println("No one!");
delay(500);
}
What You Should See
Done uploading the code, open the serial monitor and set the baud rate to 9600. If the sensor detects someone moving nearby, you should see the "Somebody is in this area!" is displayed on the monitor. Otherwise, it will display "No one!".

Resources
PDF https://drive.google.com/open?id=1_EXnBPMfjKHLdmLGqJJjqX_041nNH912
Buy from
Official Website
http://www.keyestudio.com/keyestudio-easy-plug-pir-motion-sensor-module-for-arduino.html
