Ks0134 keyestudio EASY plug BMP180 Barometric Pressure Sensor: Difference between revisions
Keyestudio (talk | contribs) No edit summary |
Keyestudio (talk | contribs) No edit summary |
||
| Line 1: | Line 1: | ||
[[image: | [[image:Ks0134-.png|thumb|600px|right|EASY plug BMP180 Barometric Pressure Sensor ]] | ||
==Introduction== | ==Introduction== | ||
| Line 26: | Line 26: | ||
==Connect It Up== | ==Connect It Up== | ||
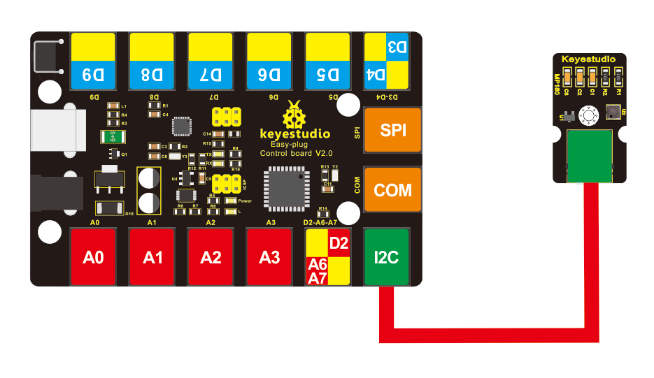
Connect the EASY Plug BMP180 sensor to control board using an RJ11 cable. Then connect the control board to your PC with a USB cable. | Connect the EASY Plug BMP180 sensor to control board using an RJ11 cable. Then connect the control board to your PC with a USB cable. | ||
<br>[[File: | <br>[[File:Ks0134-4.png|700px|frameless|thumb]]<br> | ||
<br> | <br> | ||
| Line 233: | Line 233: | ||
==What You Should See== | ==What You Should See== | ||
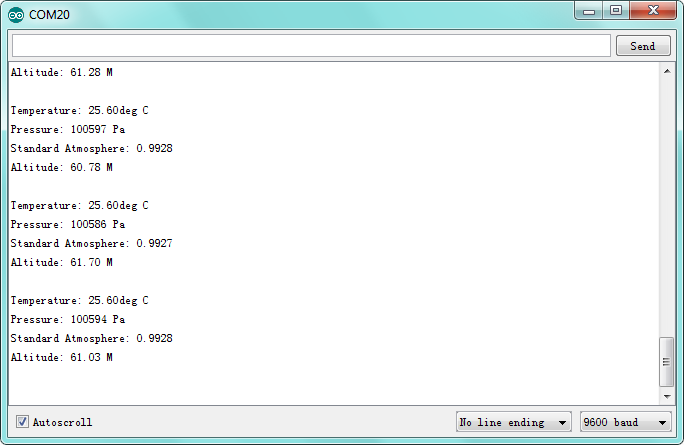
Done uploading the test code, open the serial monitor and set the baud rate to 9600, you should be able to see the detailed information. | Done uploading the test code, open the serial monitor and set the baud rate to 9600, you should be able to see the detailed information. | ||
<br>[[File: | <br>[[File:Ks0134 result.png|700px|frameless|thumb]] <br> | ||
<br> | <br> | ||
| Line 246: | Line 246: | ||
==Buy from == | ==Buy from == | ||
*'''Official Website:''' http://www.keyestudio.com/ | *'''Official Website:''' http://www.keyestudio.com/ks0134.html | ||
*[https://www.aliexpress.com/store/product/ | *[https://www.aliexpress.com/store/product/NEW-Keyestudio-EASY-plug-BMP180-Barometric-Pressure-Sensor-for-arduino-starter/1452162_32647751024.html?spm=2114.12010612.8148356.2.7ebe24eaisLLLf Shop on aliexpress ] | ||
[[category:EASY Plug]] | [[category:EASY Plug]] | ||
Revision as of 10:33, 28 November 2018
Introduction
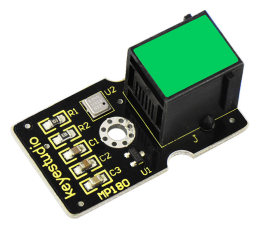
BMP180 is a pressure sensor with high precision, compact design and low power consumption. Minimum absolute accuracy reaches 0.03hpa with only 3uA power consumption.
With the ultra low power and voltage design, the BMP180 is ideal for mobile phones, GPS and other mobile devices.
The sensor is excellent for environmental sensing or as a precision altimeter.
Note: this module should be used together with EASY plug control board.
Parameters
- Pressure range: 300~1100hPa (Altitude 9000M~-500M)
- Supply voltage: 1.8V~3.6V (VDDA), 1.62V~3.6V(VDDD)
- Low power consumption: 0.5uA, standard mode
- I2C interface
- With temperature output
- Standby current: 0.1uA
- Leadless, complying with RoHS
Technical Details
- Dimensions: 35mm*20mm*18mm
- Weight: 4.2g
Connect It Up
Connect the EASY Plug BMP180 sensor to control board using an RJ11 cable. Then connect the control board to your PC with a USB cable.

Upload the Code
Copy and paste below code to Arduino IDE and upload.
#include <Wire.h>  // place file “Wire.h” under the directory “library” of Arduino
#define BMP085_ADDRESS 0x77  // I2C address of BMP085
const unsigned char OSS = 0;  // Oversampling Setting
// Calibration values
int ac1;
int ac2;
int ac3;
unsigned int ac4;
unsigned int ac5;
unsigned int ac6;
int b1;
int b2;
int mb;
int mc;
int md;
// b5 is calculated in bmp085GetTemperature(...), this variable is also used in bmp085GetPressure(...)
// so ...Temperature(...) must be called before ...Pressure(...).
long b5;
void setup(){
  Serial.begin(9600);
  Wire.begin();
  bmp085Calibration();
}

void loop()
{
  float temperature = bmp085GetTemperature(bmp085ReadUT()); //MUST be called first
  float pressure = bmp085GetPressure(bmp085ReadUP());
  float atm = pressure / 101325; // "standard atmosphere"
  float altitude = calcAltitude(pressure); //Uncompensated caculation - in Meters
  Serial.print("Temperature: ");
  Serial.print(temperature, 2); //display 2 decimal places
  Serial.println("deg C");
  Serial.print("Pressure: ");
  Serial.print(pressure, 0); //whole number only.
  Serial.println(" Pa");
  Serial.print("Standard Atmosphere: ");
  Serial.println(atm, 4); //display 4 decimal places
  Serial.print("Altitude: ");
  Serial.print(altitude, 2); //display 2 decimal places
  Serial.println(" M");
  Serial.println();//line break
  delay(1000); //wait a second and get values again.
}

// Stores all of the bmp085's calibration values into global variables
// Calibration values are required to calculate temp and pressure
// This function should be called at the beginning of the program
void bmp085Calibration()
{
  ac1 = bmp085ReadInt(0xAA);
  ac2 = bmp085ReadInt(0xAC);
  ac3 = bmp085ReadInt(0xAE);
  ac4 = bmp085ReadInt(0xB0);
  ac5 = bmp085ReadInt(0xB2);
  ac6 = bmp085ReadInt(0xB4);
  b1 = bmp085ReadInt(0xB6);
  b2 = bmp085ReadInt(0xB8);
  mb = bmp085ReadInt(0xBA);
  mc = bmp085ReadInt(0xBC);
  md = bmp085ReadInt(0xBE);
}

// Calculate temperature in deg C
float bmp085GetTemperature(unsigned int ut){
  long x1, x2;
  x1 = (((long)ut - (long)ac6)*(long)ac5) >> 15;
  x2 = ((long)mc << 11)/(x1 + md);
  b5 = x1 + x2;
  float temp = ((b5 + 8)>>4);
  temp = temp /10;
  return temp;
}
// Calculate pressure given up
// calibration values must be known
// b5 is also required so bmp085GetTemperature(...) must be called first.
// Value returned will be pressure in units of Pa.
long bmp085GetPressure(unsigned long up){
  long x1, x2, x3, b3, b6, p;
  unsigned long b4, b7;
  b6 = b5 - 4000;
  // Calculate B3
  x1 = (b2 * (b6 * b6)>>12)>>11;
  x2 = (ac2 * b6)>>11;
  x3 = x1 + x2;
  b3 = (((((long)ac1)*4 + x3)<<OSS) + 2)>>2;
  // Calculate B4
  x1 = (ac3 * b6)>>13;
  x2 = (b1 * ((b6 * b6)>>12))>>16;
  x3 = ((x1 + x2) + 2)>>2;
  b4 = (ac4 * (unsigned long)(x3 + 32768))>>15;
  b7 = ((unsigned long)(up - b3) * (50000>>OSS));
  if (b7 < 0x80000000)
    p = (b7<<1)/b4;
  else
    p = (b7/b4)<<1;
  x1 = (p>>8) * (p>>8);
  x1 = (x1 * 3038)>>16;
  x2 = (-7357 * p)>>16;
  p += (x1 + x2 + 3791)>>4;
  long temp = p;
  return temp;
}
// Read 1 byte from the BMP085 at 'address'
char bmp085Read(unsigned char address)
{
  unsigned char data;
  Wire.beginTransmission(BMP085_ADDRESS);
  Wire.write(address);
  Wire.endTransmission();
  Wire.requestFrom(BMP085_ADDRESS, 1);
  while(!Wire.available())
    ;
  return Wire.read();
}

// Read 2 bytes from the BMP085
// First byte will be from 'address'
// Second byte will be from 'address'+1
int bmp085ReadInt(unsigned char address)
{
  unsigned char msb, lsb;

  Wire.beginTransmission(BMP085_ADDRESS);
  Wire.write(address);
  Wire.endTransmission();
  Wire.requestFrom(BMP085_ADDRESS, 2);
  while(Wire.available()<2)
    ;
  msb = Wire.read();
  lsb = Wire.read();
  return (int) msb<<8 | lsb;
}
// Read the uncompensated temperature value
unsigned int bmp085ReadUT(){
  unsigned int ut;
  // Write 0x2E into Register 0xF4
  // This requests a temperature reading
  Wire.beginTransmission(BMP085_ADDRESS);
  Wire.write(0xF4);
  Wire.write(0x2E);
  Wire.endTransmission();
  // Wait at least 4.5ms
  delay(5);
  // Read two bytes from registers 0xF6 and 0xF7
  ut = bmp085ReadInt(0xF6);
  return ut;
}
// Read the uncompensated pressure value
unsigned long bmp085ReadUP(){
  unsigned char msb, lsb, xlsb;
  unsigned long up = 0;
  // Write 0x34+(OSS<<6) into register 0xF4
  // Request a pressure reading w/ oversampling setting
  Wire.beginTransmission(BMP085_ADDRESS);
  Wire.write(0xF4);
  Wire.write(0x34 + (OSS<<6));
  Wire.endTransmission();
  // Wait for conversion, delay time dependent on OSS
  delay(2 + (3<<OSS));
  // Read register 0xF6 (MSB), 0xF7 (LSB), and 0xF8 (XLSB)
  msb = bmp085Read(0xF6);
  lsb = bmp085Read(0xF7);
  xlsb = bmp085Read(0xF8);
  up = (((unsigned long) msb << 16) | ((unsigned long) lsb << 8) | (unsigned long) xlsb) >> (8-OSS);
  return up;
}
void writeRegister(int deviceAddress, byte address, byte val) {
  Wire.beginTransmission(deviceAddress); // start transmission to device
  Wire.write(address);       // send register address
  Wire.write(val);         // send value to write
  Wire.endTransmission();     // end transmission
}
int readRegister(int deviceAddress, byte address){
  int v;
  Wire.beginTransmission(deviceAddress);
  Wire.write(address); // register to read
  Wire.endTransmission();

  Wire.requestFrom(deviceAddress, 1); // read a byte

  while(!Wire.available()) {
    // waiting
  }
  v = Wire.read();
  return v;
}
float calcAltitude(float pressure){
  float A = pressure/101325;
  float B = 1/5.25588;
  float C = pow(A,B);
  C = 1 - C;
  C = C /0.0000225577;
  return C;
}
What You Should See
Done uploading the test code, open the serial monitor and set the baud rate to 9600, you should be able to see the detailed information.

Resources
Download the PDF:
https://drive.google.com/open?id=18KvRqj_AdeugZOYtHy37wv2uTH_lMW-W
Download the Code:
https://drive.google.com/open?id=1UNkLh-9mgglkhnOdmHxxUOskxzzkqG4-
Buy from
- Official Website: http://www.keyestudio.com/ks0134.html
