KS0369 EASY plug 4-Digit LED Display: Difference between revisions
Keyestudio (talk | contribs) |
Keyestudio (talk | contribs) |
||
| Line 86: | Line 86: | ||
'''Download the libraries:'''<br> | '''Download the libraries:'''<br> | ||
https://drive.google.com/open?id=1F7LbjsK0600YRM4OClhy8xd-BGc1Gmc2 | https://drive.google.com/open?id=1F7LbjsK0600YRM4OClhy8xd-BGc1Gmc2 | ||
<br> | <br> | ||
Revision as of 15:38, 28 November 2018
Introduction
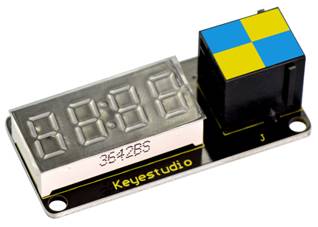
This is a 4-digit 0.36’’ Common Anode LED display module, a 12-pin display module with score points.
The driver chip used in the matrices is TM1637, using only two signal cables to make the microcontroller control the 4-digit LED display.
The four pins of LED display are GND、VCC、DIO、CLK. (GND is ground, VCC is for power supply, DIO is data IO pin, CLK is clock signal pin.)
The module pins are extended into Registered jack, so you can easily connect it to EASY Plug control board using a RJ11 cable.
Note: this module should be used together with EASY plug control board.
Parameters
- Operating Voltage: DC5V
- Operating Temperature Range: -40~+85℃
- Property: ROHS
Technical Details
- Dimensions: 50mm*23mm*18mm
- Weight: 9g
Connect It Up
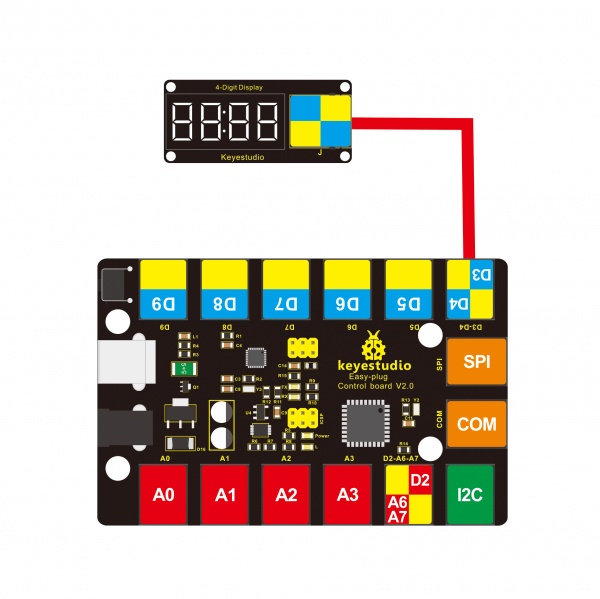
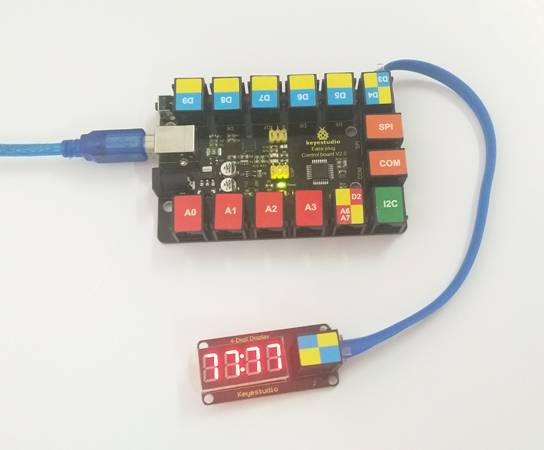
Connect the EASY Plug 4-Digit LED display to control board using an RJ11 cable. Then connect the control board to your PC with a USB cable.

Upload the Code
Copy and paste below code to Arduino IDE and upload.
Note: before compile the code, do remember to place the necessary libraries inside the libraries directory of Arduino IDE.
You can download the libraries from the link:
https://drive.google.com/open?id=1F7LbjsK0600YRM4OClhy8xd-BGc1Gmc2
#include "TM1637.h"
#define CLK 4//pins definitions for TM1637 and can be changed to other ports
#define DIO 3
TM1637 tm1637(CLK,DIO);
void setup()
{
  tm1637.init();
  tm1637.set(BRIGHT_TYPICAL);//BRIGHT_TYPICAL = 2,BRIGHT_DARKEST = 0,BRIGHTEST = 7;
}
void loop()
{
  //int8_t NumTab[] = {0,1,2,3,4,5,6,7,8,9,10,11,12,13,14,15};//0~9,A,b,C,d,E,F
  int8_t NumTab[] = {0,1,2,3,4,5,6,7,8,9};//0~9,A,b,C,d,E,F
  int8_t ListDisp[4];
  unsigned char i = 0;
  unsigned char count = 0;
  delay(150);
  while(1)
  {
    i = count;
    count ++;
    if(count == sizeof(NumTab)) count = 0;
    for(unsigned char BitSelect = 0;BitSelect < 4;BitSelect ++)
    {
      ListDisp[BitSelect] = NumTab[i];
      i ++;
      if(i == sizeof(NumTab)) i = 0;

    tm1637.display(0,ListDisp[0]);
    tm1637.display(1,ListDisp[0]);
    tm1637.display(2,ListDisp[0]);
    tm1637.display(3,ListDisp[0]);
    tm1637.point(POINT_ON);
    delay(100);
    }
  }
}
What You Should See
After uploading the code, you should see the 4-digit LED display jump the number from 0 to 9.

Resources
Download the PDF:
https://drive.google.com/open?id=1XnoZiAUFd7R9szdJAM8j47OxiaaaGnWy
Download the Code:
https://drive.google.com/open?id=1Vd35rEqSXbxxTWSNfoAdTiSCp91sKQOQ
Download the libraries:
https://drive.google.com/open?id=1F7LbjsK0600YRM4OClhy8xd-BGc1Gmc2
Buy from
- Official Website: http://www.keyestudio.com/ks0369.html
