Ks0259 keyestudio PN532 NFC/RFID Controller Shield: Difference between revisions
Keyestudio (talk | contribs) No edit summary |
Keyestudio (talk | contribs) |
||
| (12 intermediate revisions by the same user not shown) | |||
| Line 1: | Line 1: | ||
[[image:KS0259.png|thumb| | [[image:KS0259.png|thumb|800px|right|keyestudio PN532 NFC/RFID Controller Shield]] | ||
| Line 18: | Line 18: | ||
*Working Current (read mode): 120 mA | *Working Current (read mode): 120 mA | ||
*Pointer: PWR | *Pointer: PWR | ||
*The longest effective communication distance is | *The longest effective communication distance is 2.4 cm | ||
*Support SPI, IIC, UART interface switching. | *Support SPI, IIC, UART interface switching. | ||
*Can be used for 13.56M non-contact communication. | *Can be used for 13.56M non-contact communication. | ||
| Line 24: | Line 24: | ||
<br> | <br> | ||
==Details== | ==Details== | ||
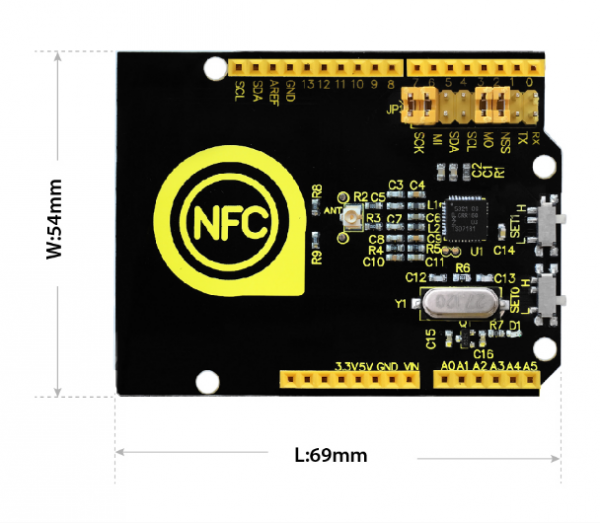
*'''Dimensions:''' 69mm x 54mm x 24mm | *'''Dimensions:''' 69mm x 54mm x 24mm | ||
| Line 35: | Line 36: | ||
<br> | <br> | ||
== Interface Control == | == Interface Control == | ||
There are two slide switches on the shield for you to select the interface mode: | |||
{| class="wikitable" border="1" | {| class="wikitable" border="1" | ||
|- | |- | ||
| Line 57: | Line 60: | ||
<br> | <br> | ||
== Simple Hookup== | == Simple Hookup== | ||
Simply stack the shield onto [http://wiki.keyestudio.com/index.php/Ks0001_keyestudio_UNO_R3_BOARD UNO R3 board ]. <br> | Simply stack the shield onto [http://wiki.keyestudio.com/index.php/Ks0001_keyestudio_UNO_R3_BOARD UNO R3 board ]. <br> | ||
| Line 64: | Line 68: | ||
<br> | <br> | ||
== Sample Code == | == Sample Code == | ||
*Copy and paste the code below to [ | *Copy and paste the code below to [http://wiki.keyestudio.com/index.php/How_to_Download_Arduino_IDE Arduino IDE ]. <br> | ||
*Or [https://drive.google.com/open?id=1_iMEuSfUs63LtBlmL5ZnWWNIwk95Yyns click here ]to download the code. <br> | *Or [https://drive.google.com/open?id=1_iMEuSfUs63LtBlmL5ZnWWNIwk95Yyns click here ]to download the code. <br> | ||
*[https://drive.google.com/open?id=1sP1TKdzJ1Ia_kCsPey7d7aFXGOIj8F2q Click here] to download the libraries PN532.h and SPI.h | *[https://drive.google.com/open?id=1sP1TKdzJ1Ia_kCsPey7d7aFXGOIj8F2q Click here] to download the libraries ''PN532.h and SPI.h'' | ||
'''Note:''' Before compile the code, do remember to add the libraries inside the libraries folder of Arduino IDE. | |||
<pre> | <pre> | ||
//This example reads a MIFARE memory block. It is tested with a new MIFARE 1K cards. Uses default keys. | //This example reads a MIFARE memory block. It is tested with a new MIFARE 1K cards. Uses default keys. | ||
| Line 148: | Line 153: | ||
'''Note:''' Before compile the code above, do remember to add the libraries inside the libraries folder of Arduino IDE. | '''Note:''' Before compile the code above, do remember to add the libraries inside the libraries folder of Arduino IDE. | ||
<br>[[File:KS0259 - libraries.png| | <br>[[File:KS0259 - libraries.png|600px|frameless|thumb]]<br> | ||
<br> | <br> | ||
== Test Result == | == Test Result == | ||
Done uploading the above code, open the serial monitor. | Done uploading the above code, open the serial monitor. | ||
<br>[[File:Ks0259- upload.png| | <br>[[File:Ks0259- upload.png|600px|frameless|thumb]]<br> | ||
<br>[[File:Ks0259- monitor 1.png| | <br>[[File:Ks0259- monitor 1.png|600px|frameless|thumb]]<br> | ||
<br> | <br> | ||
Then respectively use S50 white card and key chain to test the shield, you will get the information shown below. | Then respectively use S50 white card and key chain to test the shield, you will get the information shown below. | ||
<br>[[File:KS0259-3.png| | <br>[[File:KS0259-3.png|600px|frameless|thumb]]<br> | ||
<br> | <br> | ||
==Resources == | ==Resources == | ||
'''Download the code:'''<br> | '''Download the code and libraries:'''<br> | ||
https://fs.keyestudio.com/KS0259 | |||
https:// | |||
<br> | |||
==Get One Now == | ==Get One Now == | ||
'''Official Website:''' | *[https://www.keyestudio.com/keyestudio-pn532-nfc-rfid-controller-shield-for-arduino-uno-r3-p0147.html '''Official Website''' ] | ||
*[https://www.amazon.com/KEYESTUDIO-PN532-Controller-Shield-Arduino/dp/B0797J7M6P '''Shop on Amazon'''] | |||
*[https://www.ebay.com/itm/Keyestudio-PN532-NFC-RFID-IC-Card-Reader-Module-13-56MHz-for-Arduino-UNO-R3/132514819532?hash=item1eda7fadcc:g:npUAAOSwC-JbLj8i '''Shop on eBay'''] | |||
*[https://www.aliexpress.com/store/product/Keyestudio-PN532-NFC-RFID-Controller-Shield-for-arduino-uno-r3/1452162_32832270205.html?spm=2114.12010612.8148356.60.1e99276fKkye4P '''Shop on Aliexpress'''] | |||
[[Category: Shield]] | [[Category: Shield]] | ||
Latest revision as of 14:24, 6 January 2021
Introduction
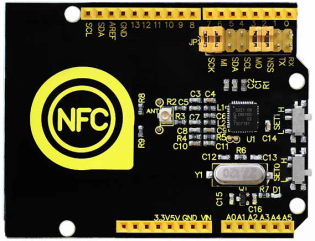
Keyestudio PN532 NFC/RFID Controller Shield based on PN532 chip is used for field communication close to 13.56MHz. This shield is equipped with an antenna onboard, so there is no external antenna coil. It is compatible with SPI, IIC, UART interface to communicate. When using it, directly stack it onto UNO R3 control board.
Specifications
- Chip:NXP PN532
- Working Voltage:3.3V
- Power Voltage:3.3~5.5V
- Max Power Current:150mA
- Working Current (standby mode): 100 mA
- Working Current (write mode): 120 mA
- Working Current (read mode): 120 mA
- Pointer: PWR
- The longest effective communication distance is 2.4 cm
- Support SPI, IIC, UART interface switching.
- Can be used for 13.56M non-contact communication.
- Compatible with ISO14443 TYPE A and B standard.
Details
- Dimensions: 69mm x 54mm x 24mm
- Weight: 18.3g
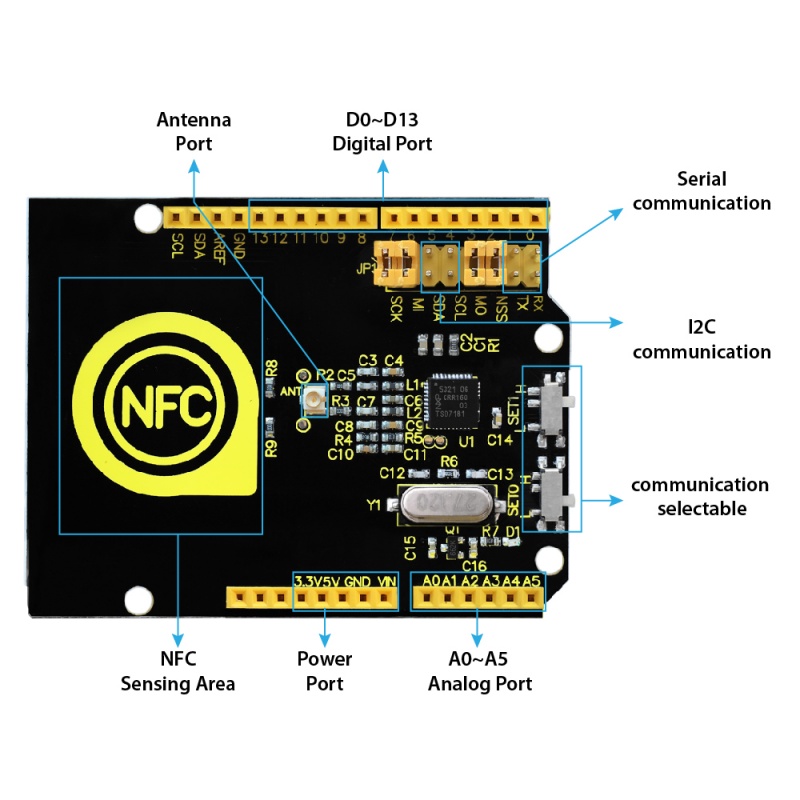
Interface Explanation
Interface Control
There are two slide switches on the shield for you to select the interface mode:
| SET0 | SET1 | |
|---|---|---|
| UART | L | L |
| SPI | L | H |
| IIC | H | L |
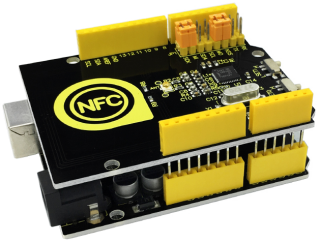
Simple Hookup
Simply stack the shield onto UNO R3 board .
It uses SPI communication. Connect SCK, MI, MO and NSS on the shield with jumper cap. Then slide SET0 to L, SET1 to H.
Sample Code
- Copy and paste the code below to Arduino IDE .
- Or click here to download the code.
- Click here to download the libraries PN532.h and SPI.h
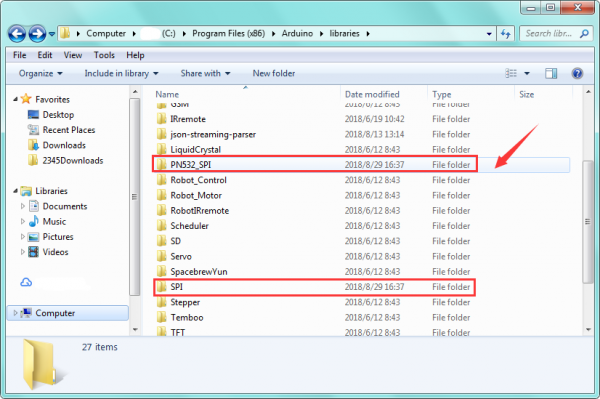
Note: Before compile the code, do remember to add the libraries inside the libraries folder of Arduino IDE.
//This example reads a MIFARE memory block. It is tested with a new MIFARE 1K cards. Uses default keys.
//Contributed by Seeed Technology Inc (www.seeedstudio.com)

#include <PN532.h>
#include <SPI.h>

/*Chip select pin can be connected to D10 or D9 which is hareware optional*/
/*if you the version of NFC Shield from SeeedStudio is v2.0.*/
#define PN532_CS 10

PN532 nfc(PN532_CS);
#define  NFC_DEMO_DEBUG 1

void setup(void) {
#ifdef NFC_DEMO_DEBUG
  Serial.begin(9600);
  Serial.println("Hello!");
#endif
  nfc.begin();

  uint32_t versiondata = nfc.getFirmwareVersion();
  if (! versiondata) {
#ifdef NFC_DEMO_DEBUG
    Serial.print("Didn't find PN53x board");
#endif
    while (1); // halt
  }
#ifdef NFC_DEMO_DEBUG
  // Got ok data, print it out!
  Serial.print("Found chip PN5");
  Serial.println((versiondata>>24) & 0xFF, HEX);
  Serial.print("Firmware ver. ");
  Serial.print((versiondata>>16) & 0xFF, DEC);
  Serial.print('.');
  Serial.println((versiondata>>8) & 0xFF, DEC);
  Serial.print("Supports ");
  Serial.println(versiondata & 0xFF, HEX);
#endif
  // configure board to read RFID tags and cards
  nfc.SAMConfig();
}

void loop(void) {
  uint32_t id;
  // look for MiFare type cards
  id = nfc.readPassiveTargetID(PN532_MIFARE_ISO14443A);

  if (id != 0)
  {
#ifdef NFC_DEMO_DEBUG
    Serial.print("Read card #");
    Serial.println(id);
#endif
    uint8_t keys[]= { 0xFF,0xFF,0xFF,0xFF,0xFF,0xFF };
    if(nfc.authenticateBlock(1, id ,0x08,KEY_A,keys)) //authenticate block 0x08
    {
      //if authentication successful
      uint8_t block[16];
      //read memory block 0x08
      if(nfc.readMemoryBlock(1,0x08,block))
      {
#ifdef NFC_DEMO_DEBUG
        //if read operation is successful
        for(uint8_t i=0;i<16;i++)
        {
          //print memory block
          Serial.print(block[i],HEX);
          Serial.print(" ");
        }
        Serial.println();
#endif
      }
    }
  }
 delay(500);
}
Note: Before compile the code above, do remember to add the libraries inside the libraries folder of Arduino IDE.
Test Result
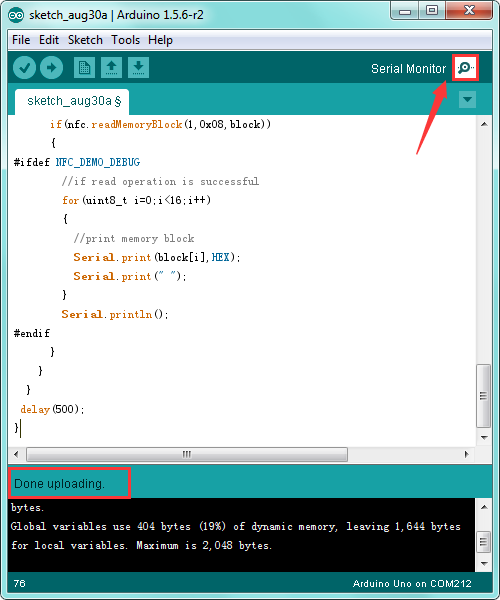
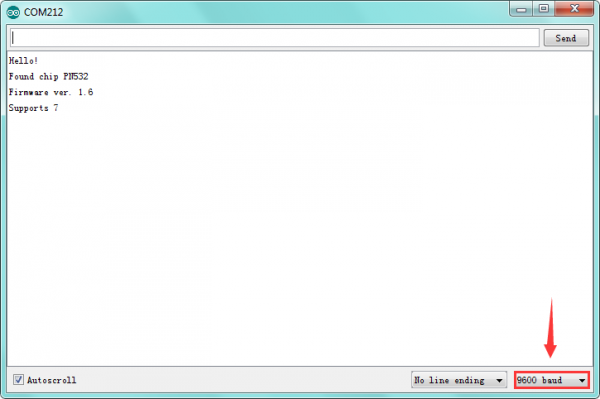
Done uploading the above code, open the serial monitor.
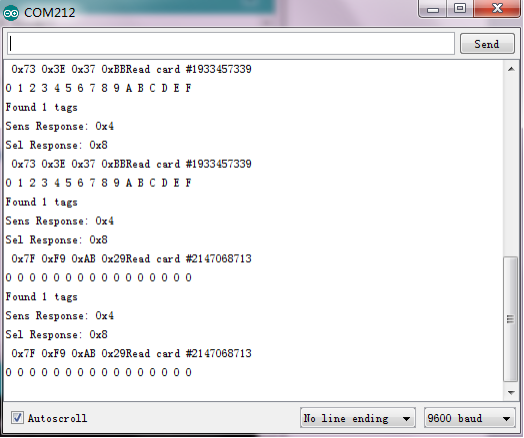
Then respectively use S50 white card and key chain to test the shield, you will get the information shown below.
Resources
Download the code and libraries:
https://fs.keyestudio.com/KS0259
