Ks0107 keyestudio EASY plug Water Sensor: Difference between revisions
Keyestudio (talk | contribs) |
Keyestudio (talk | contribs) |
||
| (19 intermediate revisions by the same user not shown) | |||
| Line 1: | Line 1: | ||
[[image:ks0107图.jpg|thumb|600px|right|Keyestudio EASY plug Water Sensor]] | |||
==Introduction== | ==Introduction== | ||
This sensor is easy-to-use, portable and particularly designed to identify and detect water level and water drop. <br> | |||
It can measure the volume of water drop and water quantity through an array of traces of exposed parallel line. <br> | |||
This sensor is small and equipped with the following features:<br> | |||
* smooth conversion between water quantity and analog quantity;<br> | |||
* strong flexibility, outputting analog value;<br> | |||
* low power consumption and high sensitivity;<br> | |||
* directly connected to microprocessor or other logic circuits, suitable for a variety of development boards and controllers such as Arduino controller, STC single-chip microcomputer, AVR single-chip microcomputer, etc.<br> | |||
== | <span style=color:red> '''Special Note:''' <br> | ||
* | The sensor/module is equipped with the RJ11 6P6C interface, compatible with our keyestudio EASY plug Control Board with RJ11 6P6C interface. <br> If you have the control board of other brands, it is also equipped with the RJ11 6P6C interface but has different internal line sequence, can’t be used compatibly with our sensor/module. </span><br> | ||
<br> | |||
==Features == | |||
* Connector: Easy plug | |||
* Operating voltage: DC5V | * Operating voltage: DC5V | ||
* Operating current: <20mA | * Operating current: <20mA | ||
| Line 18: | Line 24: | ||
* Detection area: 40mm x16mm | * Detection area: 40mm x16mm | ||
* Production process: FR4 double-side tinned | * Production process: FR4 double-side tinned | ||
* Operating temperature: 10%~90% without condensation | * Operating temperature: 10%~90% without condensation | ||
* | * Production process: FR4 double-side tinned | ||
* Weight: | |||
<br> | |||
==Technical Details== | |||
* Dimensions: 68mm*20mm*18mm | |||
* Weight: 5.7g | |||
<br> | |||
==Connect It Up == | |||
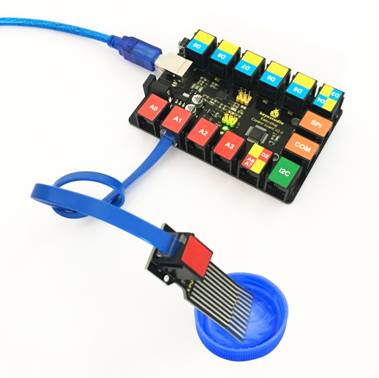
Connect the EASY Plug water level sensor to control board using an RJ11 cable. Then connect the control board to your PC with a USB cable. | |||
<br>[[File:ks0107.jpg|500px|frameless|thumb]]<br> | |||
<br> | |||
==Upload the Code== | |||
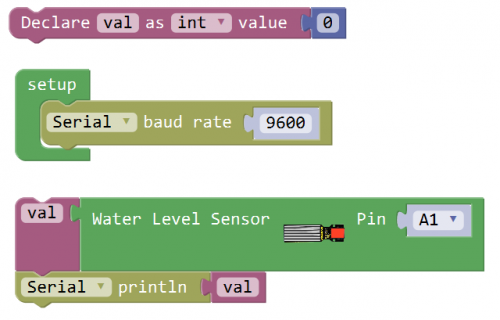
Below is an example code. Open or drag below code to [https://wiki.keyestudio.com/Getting_Started_with_Mixly Mixly Blocks] and upload. <br> | |||
<br>[[File:ks0397 18.1.png|500px|frameless|thumb]]<br> | |||
<br> | |||
==What You Should See== | |||
<br>[[File:ks0397 18-1.png|600px|frameless|thumb]]<br> | |||
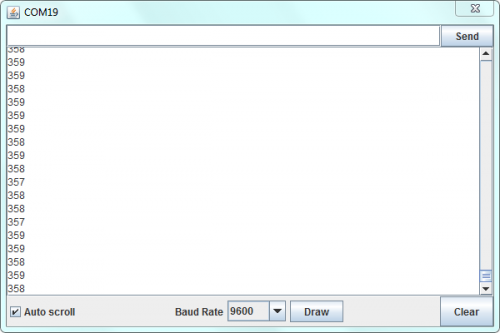
Hook it up and upload well the code, you will see the led light on the water sensor light up, then open the serial monitor, you will see the analog value.<br> | |||
When place the sensing area of sensor into the water, you can see the data change. The deeper the sensor’s sensing area into water, the greater the value. | |||
<br>[[File:ks0107 Result.jpg|500px|frameless|thumb]] [[File:ks0397 18-2.png|500px|frameless|thumb]]<br> | |||
<br> | |||
==Extension Experiment== | |||
<span style=color:brown> <big>'''Adding LCD Display'''</big> </span><br> | |||
<br> | |||
'''Hookup Guide'''<br> | |||
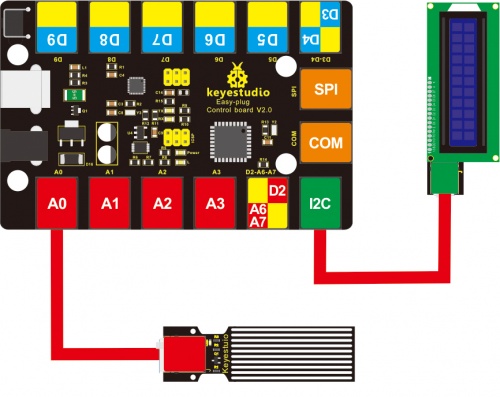
Connect the EASY Plug water level sensor and LED module to control board using an RJ11 cable. <br> | |||
<br>[[File:water.jpg|500px|frameless|thumb]]<br> | |||
<br> | |||
'''Test Code'''<br> | |||
Below is an example code. | |||
<br>[[File:ks0397 18.2.png|600px|frameless|thumb]]<br> | |||
<br> | |||
'''What You Should See'''<br> | |||
<br>[[File:ks0397 18-3.png|600px|frameless|thumb]]<br> | |||
<br> | |||
Upload success, you should be able to see the analog value is showed on the LCD screen. | |||
<br>[[File:ks0397 18-4.png|600px|frameless|thumb]]<br> | |||
= | <br> | ||
<br>[[File: | <span style="color: red">'''Little Knowledge:'''</span> <br> | ||
* Remember you can adjust the contrast by rotating a blue potentiometer on the LCD back if you can’t make out the words clearly. | |||
<br>[[File:ks0397 14-6.png|500px|frameless|thumb]]<br> | |||
<br> | |||
< | |||
==Resources == | ==Resources == | ||
https://fs.keyestudio.com/KS0107 | |||
<br> | |||
==Buy from == | ==Buy from == | ||
'''Official Website''' | *[https://www.keyestudio.com/keyestudio-easy-plug-water-sensor-module-for-arduino-steam-p0077-p0077.html '''Official Website''' ] | ||
*[https://www.aliexpress.com/store/product/2016-New-Keyestudio-EASY-plug-Water-Sensor-Module-for-Arduino/1452162_32638908834.html?spm=2114.12010612.8148356.36.24f04ba7BzGy0M '''Shop on Aliexpress'''] | |||
[[category:EASY Plug]] | [[category:EASY Plug]] | ||
Latest revision as of 15:57, 7 January 2021
Introduction
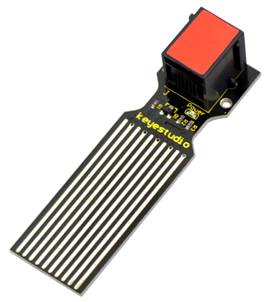
This sensor is easy-to-use, portable and particularly designed to identify and detect water level and water drop.
It can measure the volume of water drop and water quantity through an array of traces of exposed parallel line.
This sensor is small and equipped with the following features:
- smooth conversion between water quantity and analog quantity;
- strong flexibility, outputting analog value;
- low power consumption and high sensitivity;
- directly connected to microprocessor or other logic circuits, suitable for a variety of development boards and controllers such as Arduino controller, STC single-chip microcomputer, AVR single-chip microcomputer, etc.
Special Note:
The sensor/module is equipped with the RJ11 6P6C interface, compatible with our keyestudio EASY plug Control Board with RJ11 6P6C interface.
If you have the control board of other brands, it is also equipped with the RJ11 6P6C interface but has different internal line sequence, can’t be used compatibly with our sensor/module.
Features
- Connector: Easy plug
- Operating voltage: DC5V
- Operating current: <20mA
- Sensor type: Analog
- Detection area: 40mm x16mm
- Production process: FR4 double-side tinned
- Operating temperature: 10%~90% without condensation
- Production process: FR4 double-side tinned
Technical Details
- Dimensions: 68mm*20mm*18mm
- Weight: 5.7g
Connect It Up
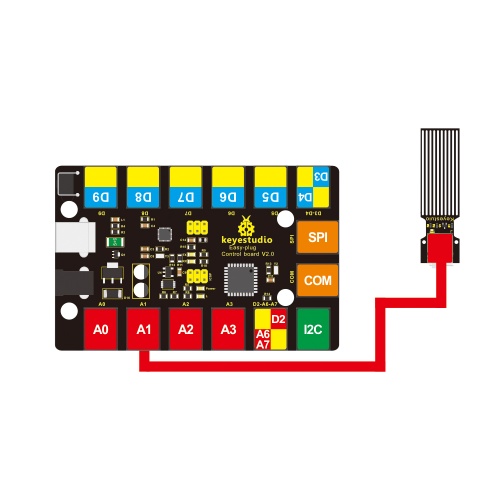
Connect the EASY Plug water level sensor to control board using an RJ11 cable. Then connect the control board to your PC with a USB cable.
Upload the Code
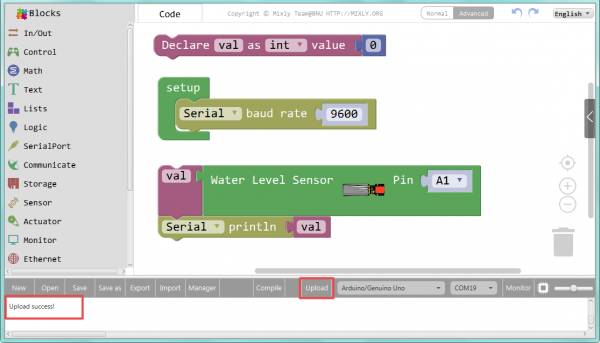
Below is an example code. Open or drag below code to Mixly Blocks and upload.
What You Should See
Hook it up and upload well the code, you will see the led light on the water sensor light up, then open the serial monitor, you will see the analog value.
When place the sensing area of sensor into the water, you can see the data change. The deeper the sensor’s sensing area into water, the greater the value.
Extension Experiment
Adding LCD Display
Hookup Guide
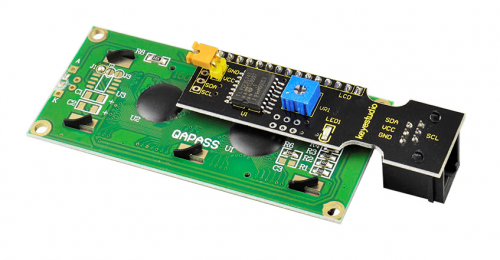
Connect the EASY Plug water level sensor and LED module to control board using an RJ11 cable.
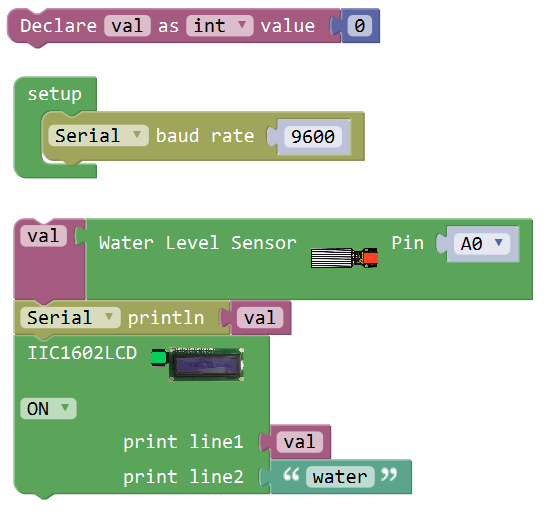
Test Code
Below is an example code.
What You Should See
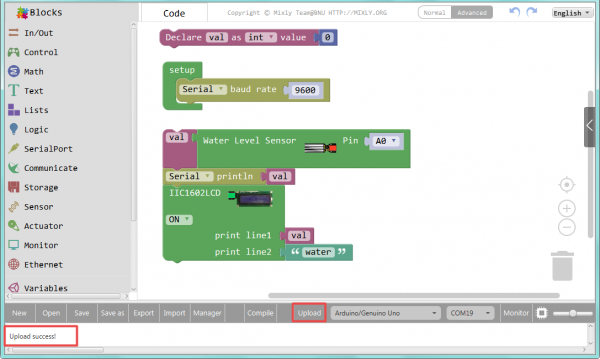
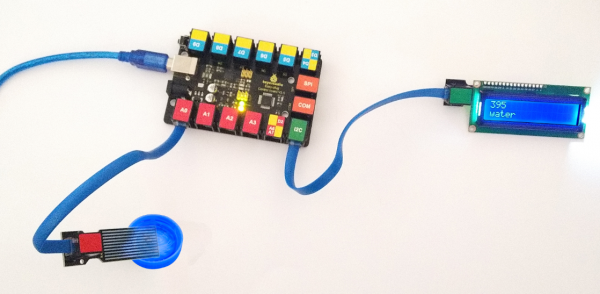
Upload success, you should be able to see the analog value is showed on the LCD screen.
Little Knowledge:
- Remember you can adjust the contrast by rotating a blue potentiometer on the LCD back if you can’t make out the words clearly.
Resources
https://fs.keyestudio.com/KS0107
