Ks0120 keyestudio EASY plug Infrared Obstacle Avoidance Sensor: Difference between revisions
Keyestudio (talk | contribs) No edit summary |
Keyestudio (talk | contribs) |
||
| (11 intermediate revisions by the same user not shown) | |||
| Line 1: | Line 1: | ||
[[image:ks0120图.jpg|thumb|600px|right|EASY plug Obstacle Avoidance Sensor]] | |||
==Introduction== | ==Introduction== | ||
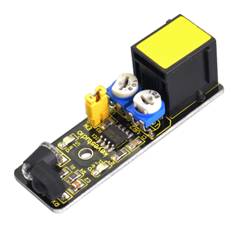
Infrared obstacle avoidance sensor is equipped with distance adjustment function and is especially designed for wheeled robots. This sensor has strong adaptability to ambient light and is of high precision. It has a pair of infrared transmitting and receiving tube. When infrared ray launched by the transmitting tube encounters an obstacle (its reflector), the infrared ray is reflected to the receiving tube, | Infrared obstacle avoidance sensor is equipped with distance adjustment function and is especially designed for wheeled robots.<br> | ||
This sensor has strong adaptability to ambient light and is of high precision. It has a pair of infrared transmitting and receiving tube. <br> | |||
When infrared ray launched by the transmitting tube encounters an obstacle (its reflector), the infrared ray is reflected to the receiving tube, after a comparator circuit processing, the indicator will light up. <br> | |||
You can adjust the detection distance by rotating the potentiometer knob, the effective distance range of 2~40cm. <br> | |||
They can be widely used in robot obstacle avoidance, avoidance car, line count, and black and white line tracking and many other occasions.<br> | |||
This module should be used together with EASY plug control board. | |||
<span style=color:red> '''Special Note:''' <br> | |||
The sensor/module is equipped with the RJ11 6P6C interface, compatible with our keyestudio EASY plug Control Board with RJ11 6P6C interface. <br> If you have the control board of other brands, it is also equipped with the RJ11 6P6C interface but has different internal line sequence, can’t be used compatibly with our sensor/module. </span><br> | |||
<br> | |||
==Specification== | ==Specification== | ||
* Working voltage: DC 3.3V-5V | * Working voltage: DC 3.3V-5V | ||
* Working current: ≥20mA | * Working current: ≥20mA | ||
* Working temperature: | * Working temperature: -10℃ to+50℃ | ||
* Detection distance: 2 | * Detection distance: 2~40cm | ||
* Output signal: TTL voltage | * Output signal: TTL voltage | ||
* Effective Angle: 35° | * Effective Angle: 35° | ||
* | <br> | ||
* Weight: | |||
==Technical Details== | |||
* Dimensions: 52mm*17mm*18mm | |||
* Weight: 6.2g | |||
<br> | |||
==Connect It Up== | |||
Connect the EASY Plug obstacle detector sensor and LED module to control board using RJ11 cables. Then connect the control board to your PC with a USB cable. | |||
<br>[[File:避障灯.jpg|600px|frameless|thumb]]<br> | |||
<br> | |||
==Test Code== | |||
Below is an example code. Open or drag below code to [https://wiki.keyestudio.com/Getting_Started_with_Mixly Mixly Blocks] and upload. <br> | |||
<br>[[File:ks0398 9.1.png|600px|frameless|thumb]]<br> | |||
<br> | |||
==What You Should See== | |||
<br>[[File:ks0398 9-1.png|600px|frameless|thumb]]<br> | |||
<br> | |||
Done uploading the code, when the sensor detects an obstacle, the led is turned on. | |||
<br>[[File:ks0398 9-2.png|600px|frameless|thumb]]<br> | |||
== | <br> | ||
<br>[[File: | ==Controlling Motor == | ||
<br> | |||
In the previous section, we use the obstacle detector sensor to control the LED on and off. Now, let’s try another play, controlling the motor rotating. | |||
<br> | |||
'''Hookup Guide'''<br> | |||
<br>[[File:避障电机.jpg|600px|frameless|thumb]]<br> | |||
<br> | |||
'''Test Code'''<br> | |||
<br>[[File:ks0398 9.2.png|600px|frameless|thumb]]<br> | |||
<br> | |||
< | '''What You Should See'''<br> | ||
Done uploading the code, when the sensor detects an obstacle, the fan motor rotates. Otherwise, fan motor stops. | |||
<br>[[File:ks0398 9-3.png|600px|frameless|thumb]]<br> | |||
<br> | |||
</ | <span style="color: red">'''Troubleshooting:'''</span> <br> | ||
* '''Compiling Fails ?'''<br> | |||
This happens sometimes, the most likely case is a library file not added. You should be sure that all the libraries are added to the libraries directory of Arduino-1.8.5. Shown below.<br> | |||
<br>[[File:ks0398 9-4.png|600px|frameless|thumb]]<br> | |||
<br>[[File:ks0398 9-5.png|600px|frameless|thumb]]<br> | |||
* '''Program Not Uploading?'''<br> | |||
This happens sometimes, the most likely case is a confused Board and serial port, you should firstly select your proper board and port. | |||
<br>[[File:ks0398 9-6.png|600px|frameless|thumb]]<br> | |||
<br> | |||
<br> | |||
==Resources == | ==Resources == | ||
https://fs.keyestudio.com/KS0120 | |||
<br> | |||
==Buy from == | |||
*[https://www.keyestudio.com/new-keyestudio-rj11-easy-plug-infrared-obstacle-avoidance-sensor-module-for-arduino-starter-steam-p0095-p0095.html '''Official Website'''] | |||
*[https://www.aliexpress.com/store/product/New-Keyestudio-EASY-plug-Infrared-Obstacle-Avoidance-Sensor-Module-for-Arduino-Starter/1452162_32643747472.html?spm=2114.12010612.8148356.48.56374ba78C0BNr Shop on aliexpress ] | |||
[[category:EASY Plug]] | |||
[[category: | |||
Latest revision as of 16:22, 7 January 2021
Introduction
Infrared obstacle avoidance sensor is equipped with distance adjustment function and is especially designed for wheeled robots.
This sensor has strong adaptability to ambient light and is of high precision. It has a pair of infrared transmitting and receiving tube.
When infrared ray launched by the transmitting tube encounters an obstacle (its reflector), the infrared ray is reflected to the receiving tube, after a comparator circuit processing, the indicator will light up.
You can adjust the detection distance by rotating the potentiometer knob, the effective distance range of 2~40cm.
They can be widely used in robot obstacle avoidance, avoidance car, line count, and black and white line tracking and many other occasions.
This module should be used together with EASY plug control board.
Special Note:
The sensor/module is equipped with the RJ11 6P6C interface, compatible with our keyestudio EASY plug Control Board with RJ11 6P6C interface.
If you have the control board of other brands, it is also equipped with the RJ11 6P6C interface but has different internal line sequence, can’t be used compatibly with our sensor/module.
Specification
- Working voltage: DC 3.3V-5V
- Working current: ≥20mA
- Working temperature: -10℃ to+50℃
- Detection distance: 2~40cm
- Output signal: TTL voltage
- Effective Angle: 35°
Technical Details
- Dimensions: 52mm*17mm*18mm
- Weight: 6.2g
Connect It Up
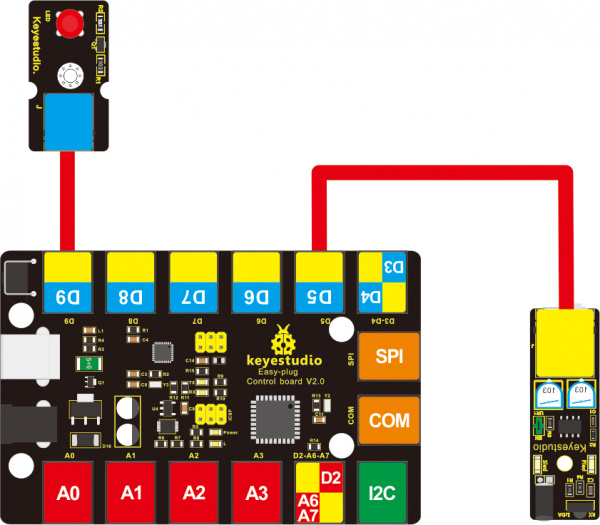
Connect the EASY Plug obstacle detector sensor and LED module to control board using RJ11 cables. Then connect the control board to your PC with a USB cable.
Test Code
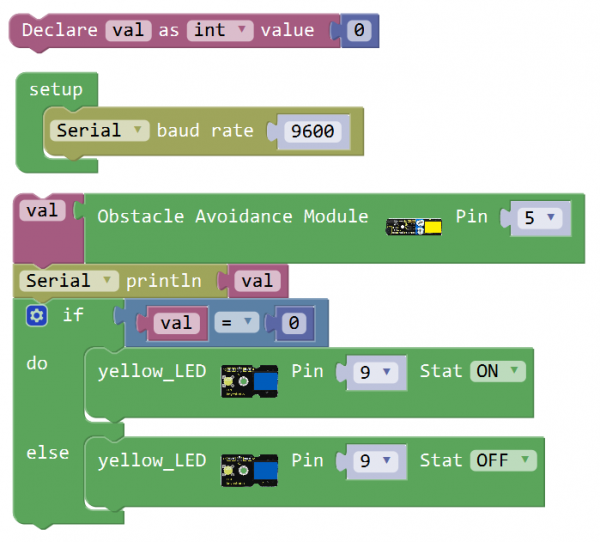
Below is an example code. Open or drag below code to Mixly Blocks and upload.
What You Should See
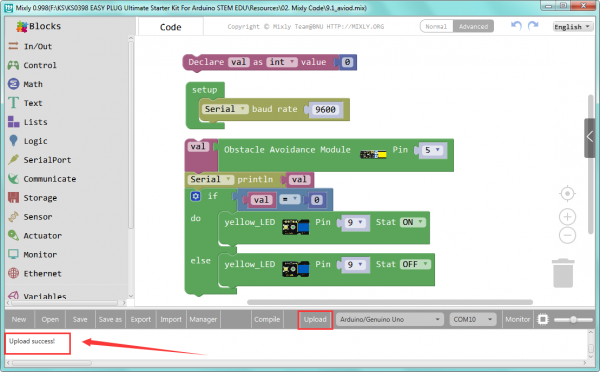
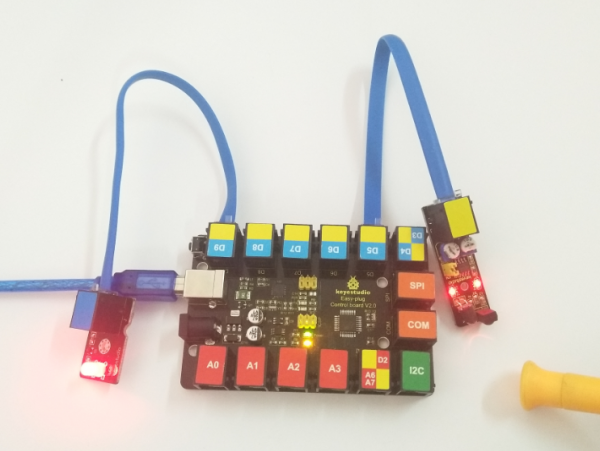
Done uploading the code, when the sensor detects an obstacle, the led is turned on.
Controlling Motor
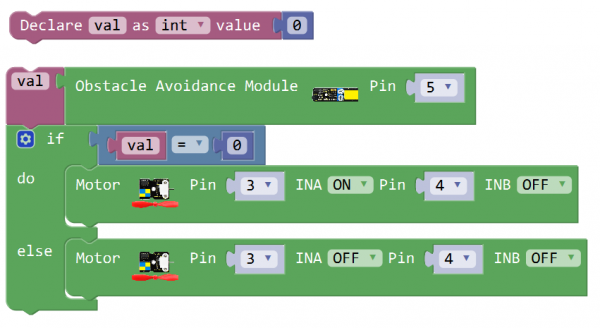
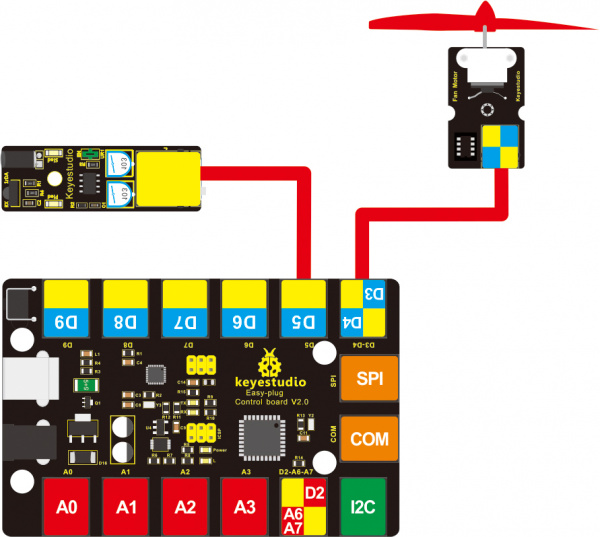
In the previous section, we use the obstacle detector sensor to control the LED on and off. Now, let’s try another play, controlling the motor rotating.
Hookup Guide
What You Should See
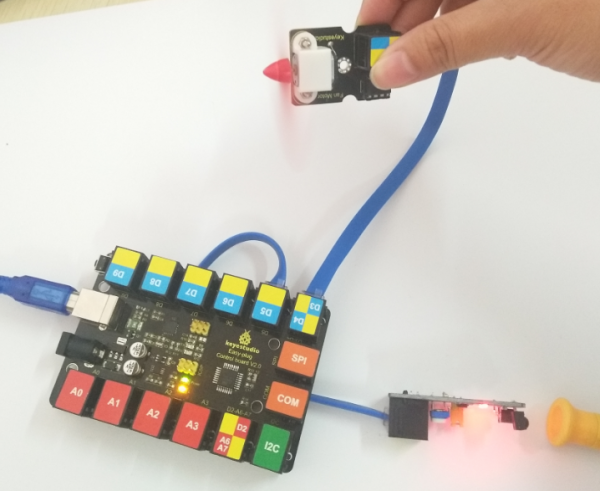
Done uploading the code, when the sensor detects an obstacle, the fan motor rotates. Otherwise, fan motor stops.
Troubleshooting:
- Compiling Fails ?
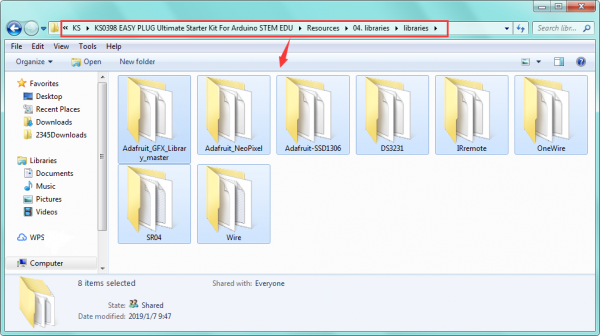
This happens sometimes, the most likely case is a library file not added. You should be sure that all the libraries are added to the libraries directory of Arduino-1.8.5. Shown below.

- Program Not Uploading?
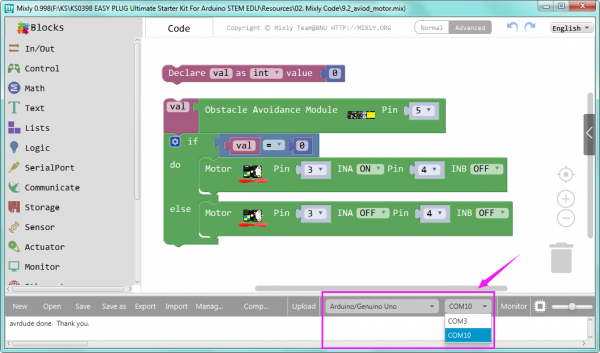
This happens sometimes, the most likely case is a confused Board and serial port, you should firstly select your proper board and port.
Resources
https://fs.keyestudio.com/KS0120
