Ks0124 keyestudio EASY plug DS18B20 Temperature Sensor: Difference between revisions
Keyestudio (talk | contribs) No edit summary |
Keyestudio (talk | contribs) |
||
| (10 intermediate revisions by the same user not shown) | |||
| Line 2: | Line 2: | ||
==Introduction== | ==Introduction== | ||
The DS18B20 temperature sensor is exactly what it sounds like - a sensor used to measure ambient temperature. | The DS18B20 temperature sensor is exactly what it sounds like - a sensor used to measure ambient temperature.<br> | ||
The usable temperature ranges from -55°C to +125°C. It also supports multi-point mesh networking. | The usable temperature ranges from -55°C to +125°C. It also supports multi-point mesh networking. <br> | ||
While there are many types of temperature sensors available in the market, the DS18B20 temperature sensor is the best choice in applications which require high accuracy and high reliability.<br> | |||
For electronic enthusiasts and hobbyists, the DS18B20 is a good start for learning and developing temperature-dependent prototypes. <br> | |||
This module should be used together with EASY plug control board. | |||
<span style=color:red> '''Special Note:''' <br> | |||
The sensor/module is equipped with the RJ11 6P6C interface, compatible with our keyestudio EASY plug Control Board with RJ11 6P6C interface. <br> If you have the control board of other brands, it is also equipped with the RJ11 6P6C interface but has different internal line sequence, can’t be used compatibly with our sensor/module. </span><br> | |||
<br> | <br> | ||
==Specification== | ==Specification== | ||
| Line 17: | Line 20: | ||
* Interface: Digital | * Interface: Digital | ||
<br> | |||
==Technical Details== | ==Technical Details== | ||
* Dimensions: 38mm*20mm*18mm | * Dimensions: 38mm*20mm*18mm | ||
* Weight: 4.4g | * Weight: 4.4g | ||
<br> | |||
==Connect It Up == | ==Connect It Up == | ||
Connect the EASY Plug DS18B20 temperature sensor to control board using an RJ11 cable. Then connect the control board to your PC with a USB cable. | Connect the EASY Plug DS18B20 temperature sensor to control board using an RJ11 cable. Then connect the control board to your PC with a USB cable. | ||
<br>[[File:ks0124. | <br>[[File:ks0124.jpg|500px|frameless|thumb]]<br> | ||
<br> | |||
==Upload the Code== | ==Upload the Code== | ||
Below is an example code. Open or drag below code to [https://wiki.keyestudio.com/Getting_Started_with_Mixly Mixly Blocks] and upload. <br> | |||
< | <br>[[File:ks0398 20.1.png|500px|frameless|thumb]]<br> | ||
<br> | |||
==What You Should See== | |||
<br>[[File:ks0398 20-1.png|500px|frameless|thumb]]<br> | |||
<br> | |||
Done uploading the code, open the serial monitor, on the window will print out the Celsius and Fahrenheit value. | |||
<br>[[File:ks0398 20-2.png|500px|frameless|thumb]]<br> | |||
<br> | |||
== Adding OLED Display == | |||
<br> | |||
'''Hookup Guide'''<br> | |||
<br>[[File:18B20 OLED.jpg|500px|frameless|thumb]]<br> | |||
<br> | |||
'''Test Code'''<br> | |||
<br>[[File:ks0398 20.2.png|500px|frameless|thumb]]<br> | |||
< | |||
<br> | |||
'''What You Should See'''<br> | |||
Upload success, you should be able to see the Celsius and Fahrenheit value are printed out on the OLED screen. | |||
<br>[[File:ks0398 20-6.png|500px|frameless|thumb]]<br> | |||
= | <br> | ||
<span style="color: red"><big>'''Troubleshooting:'''</big> </span> <br> | |||
<br>[[File: | * '''OLED Not Lighting Up?'''<br> | ||
If upload the code successfully, but LED still not lights up. Make sure your board and OLED module are connected correctly. <br> | |||
<br> | |||
* '''Upload Failed ?'''<br> | |||
This happens sometimes, the most likely case is a confused Board and serial port, you should firstly select your proper board and port. <br> | |||
Or check whether add the library or not.<br> | |||
<br>[[File:ks0398 20-3.png|500px|frameless|thumb]]<br> | |||
<br>[[File:Ks0398 9-4.png|500px|frameless|thumb]]<br> | |||
<br>[[File:ks0398 9-5.png|500px|frameless|thumb]]<br> | |||
<br> | |||
<br> | |||
==Resources == | ==Resources == | ||
https://fs.keyestudio.com/KS0124 | |||
https:// | |||
<br> | |||
<br> | |||
==Buy from == | ==Buy from == | ||
'''Official Website''' | *[https://www.keyestudio.com/new-keyestudio-easy-plug-ds18b20-temperature-sensor-for-arduino-steam-p0068-p0068.html '''Official Website''' ] | ||
*[https://www.aliexpress.com/store/product/New-Keyestudio-EASY-Plug-DS18B20-Temperature-Sensor-for-Arduino/1452162_32642758650.html?spm=2114.12010612.8148356.18.7da057f6bcAapG Shop on aliexpress ] | |||
[[category:EASY Plug]] | [[category:EASY Plug]] | ||
Latest revision as of 16:27, 7 January 2021
Introduction
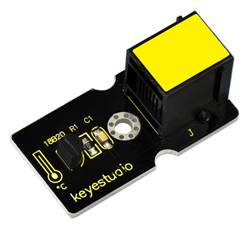
The DS18B20 temperature sensor is exactly what it sounds like - a sensor used to measure ambient temperature.
The usable temperature ranges from -55°C to +125°C. It also supports multi-point mesh networking.
While there are many types of temperature sensors available in the market, the DS18B20 temperature sensor is the best choice in applications which require high accuracy and high reliability.
For electronic enthusiasts and hobbyists, the DS18B20 is a good start for learning and developing temperature-dependent prototypes.
This module should be used together with EASY plug control board.
Special Note:
The sensor/module is equipped with the RJ11 6P6C interface, compatible with our keyestudio EASY plug Control Board with RJ11 6P6C interface.
If you have the control board of other brands, it is also equipped with the RJ11 6P6C interface but has different internal line sequence, can’t be used compatibly with our sensor/module.
Specification
- Connector: Easy plug
- Supply Voltage: 3.3V to 5V
- Temperature range: -55°C to +125°C
- Interface: Digital
Technical Details
- Dimensions: 38mm*20mm*18mm
- Weight: 4.4g
Connect It Up
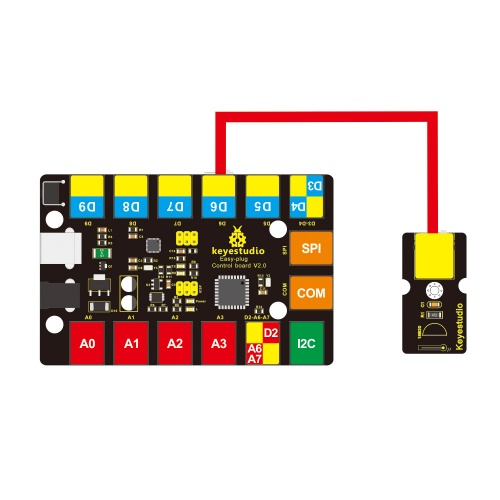
Connect the EASY Plug DS18B20 temperature sensor to control board using an RJ11 cable. Then connect the control board to your PC with a USB cable.
Upload the Code
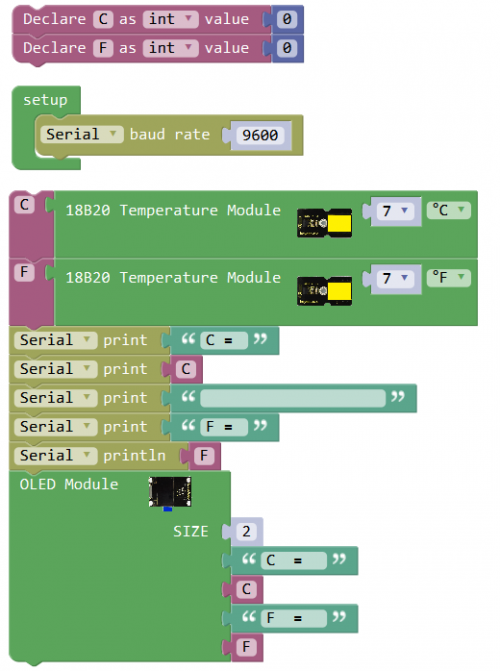
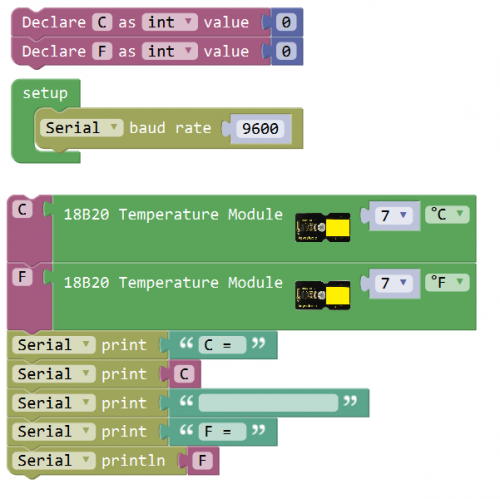
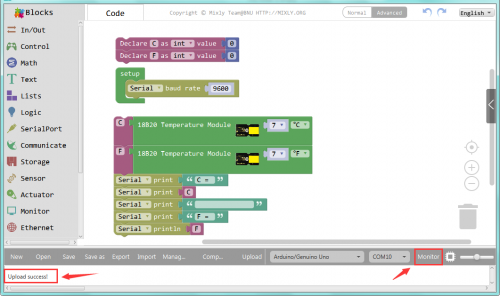
Below is an example code. Open or drag below code to Mixly Blocks and upload.
What You Should See
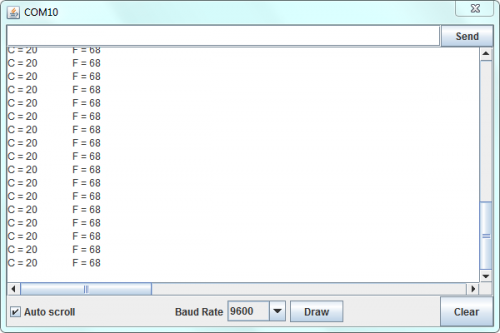
Done uploading the code, open the serial monitor, on the window will print out the Celsius and Fahrenheit value.
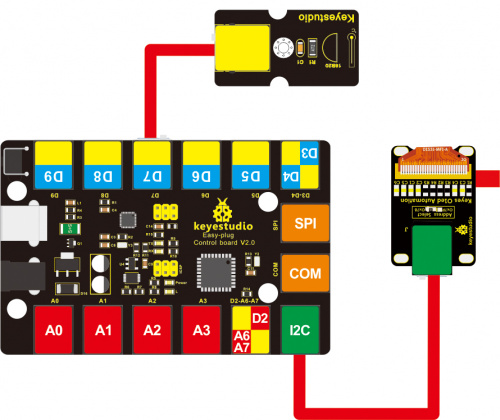
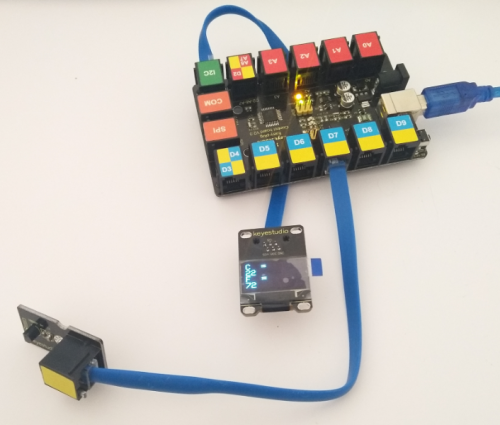
Adding OLED Display
What You Should See
Upload success, you should be able to see the Celsius and Fahrenheit value are printed out on the OLED screen.
Troubleshooting:
- OLED Not Lighting Up?
If upload the code successfully, but LED still not lights up. Make sure your board and OLED module are connected correctly.
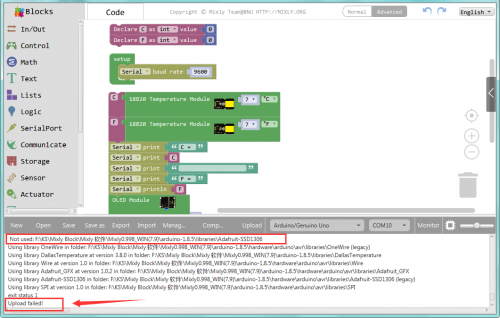
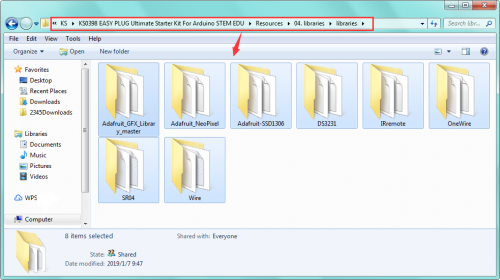
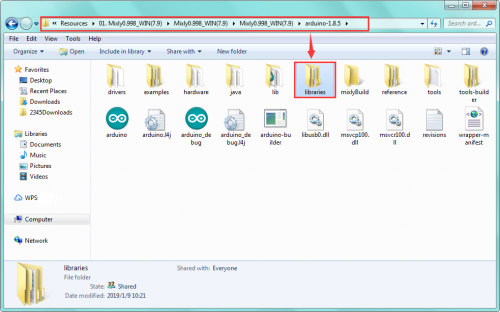
- Upload Failed ?
This happens sometimes, the most likely case is a confused Board and serial port, you should firstly select your proper board and port.
Or check whether add the library or not.
Resources
https://fs.keyestudio.com/KS0124
