Ks0125 keyestudio EASY plug IR Receiver Module: Difference between revisions
Keyestudio (talk | contribs) No edit summary |
Keyestudio (talk | contribs) |
||
| (12 intermediate revisions by the same user not shown) | |||
| Line 1: | Line 1: | ||
[[image:ks0125图.jpg|thumb|600px|right|EASY plug IR Receiver Module]] | |||
==Introduction== | ==Introduction== | ||
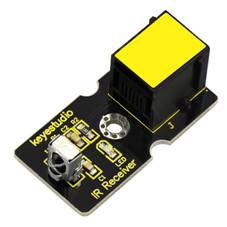
Infrared receiver is a component with functions of reception, amplification, and demodulation. | Infrared receiver is a component with functions of reception, amplification, and demodulation. The internal IC has already been demodulated so that can directly output digital signal. <br> | ||
Well, it will be also easy to make your own IR controller using IR transmitter. <br> | |||
This module should be used together with EASY plug control board.<br> | |||
<span style=color:red> '''Special Note:''' <br> | |||
The sensor/module is equipped with the RJ11 6P6C interface, compatible with our keyestudio EASY plug Control Board with RJ11 6P6C interface. <br> If you have the control board of other brands, it is also equipped with the RJ11 6P6C interface but has different internal line sequence, can’t be used compatibly with our sensor/module. </span><br> | |||
<br> | |||
==Specification== | ==Specification== | ||
* | * Connector: Easy plug | ||
* Power Supply: 5V | * Power Supply: 5V | ||
* Interface:Digital | * Interface:Digital | ||
* Modulate Frequency: 38Khz | * Modulate Frequency: 38Khz | ||
<br> | |||
==Technical Details== | |||
* Dimensions: 38mm*20mm*18mm | |||
* Weight: 5g | |||
== | <br> | ||
<br>[[File:ks0125 | ==Connect It Up == | ||
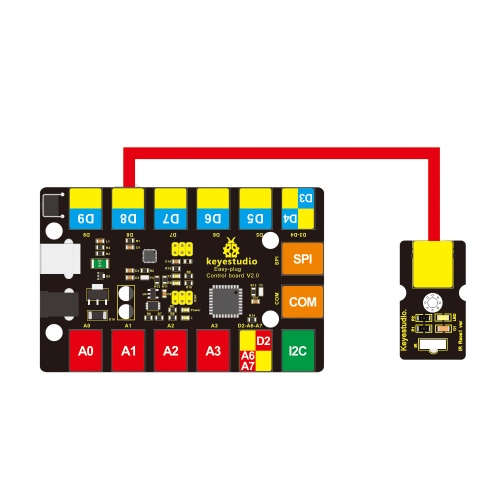
Connect the EASY Plug Infrared receiver sensor to control board using an RJ11 cable. Then connect the control board to your PC with a USB cable. | |||
<br>[[File:ks0125.jpg|500px|frameless|thumb]]<br> | |||
<br> | |||
==Upload the Code== | |||
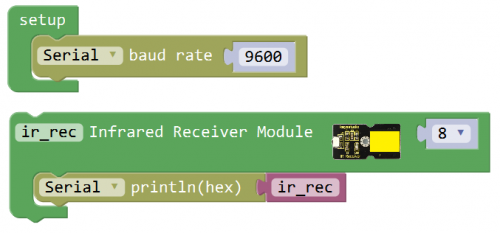
Below is an example code. Open or drag below code to [https://wiki.keyestudio.com/Getting_Started_with_Mixly Mixly Blocks] and upload. <br> | |||
<br>[[File:ks0398 22.1.png|500px|frameless|thumb]]<br> | |||
<br> | |||
== | ==What You Should See== | ||
< | <br>[[File:ks0398 22-1.png|600px|frameless|thumb]]<br> | ||
<br> | |||
Done uploading the code, when aiming at the IR receiver, press down the key on an IR remote controller, you should see the key decoding is displayed on the serial monitor. If long press the key, it will appear wrong code FFFFFFFF. | |||
<br>[[File:ks0125 Result.png|600px|frameless|thumb]]<br> | |||
<br>[[File:ks0398 22-2.png|600px|frameless|thumb]]<br> | |||
<br> | |||
<span style="color: red">'''Little Knowledge:'''</span> <br> | |||
This test can record all your remote control key decoding. So you can apply them to the next experiment to control LED lights. | |||
<br> | |||
<br> | |||
==Remote Controlled Light== | |||
<br> | |||
'''Hookup Guide'''<br> | |||
</ | Connect the EASY Plug Infrared receiver module and LED module to control board using RJ11 cables. | ||
<br>[[File:红外接收灯.jpg|500px|frameless|thumb]]<br> | |||
<br> | |||
'''Test Code'''<br> | |||
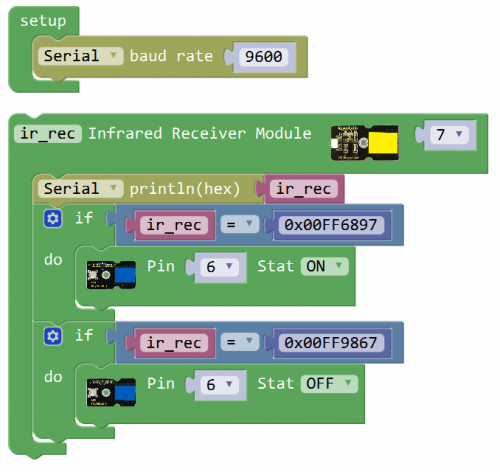
<br>[[File:ks0398 22.2.png|500px|frameless|thumb]]<br> | |||
<br> | |||
'''What You Should See'''<br> | |||
Upload success, press the key 1 on your remote controller, LED lights up. Then press the key 2, LED is turned off. | |||
<br>[[File:ks0398 22-4.png|600px|frameless|thumb]]<br> | |||
<br> | |||
<span style="color: red">'''Little Knowledge:'''</span> <br> | |||
If you want to change another remote control key, you should be able to change your remote key decoding. Shown below. | |||
<br>[[File:ks0398 22-3.png|600px|frameless|thumb]]<br> | |||
<br> | |||
After that, upload the code again and have a try. | |||
<br> | |||
==Resources == | ==Resources == | ||
https://fs.keyestudio.com/KS0125 | |||
<br> | |||
==Buy from == | ==Buy from == | ||
*[https://www.keyestudio.com/new-keyestudio-easy-plug-ir-infrared-receiver-module-for-arduino-starter-steam-p0071-p0071.html '''Official Website''' ] | |||
*[https://www.aliexpress.com/store/product/New-Keyestudio-EASY-Plug-IR-Infrared-Receiver-Module-for-Arduino-Starter/1452162_32644168169.html?spm=2114.12010612.8148356.10.7da057f6FuVkis Shop on aliexpress ] | |||
[[category: | [[category:EASY Plug]] | ||
Latest revision as of 16:35, 7 January 2021
Introduction
Infrared receiver is a component with functions of reception, amplification, and demodulation. The internal IC has already been demodulated so that can directly output digital signal.
Well, it will be also easy to make your own IR controller using IR transmitter.
This module should be used together with EASY plug control board.
Special Note:
The sensor/module is equipped with the RJ11 6P6C interface, compatible with our keyestudio EASY plug Control Board with RJ11 6P6C interface.
If you have the control board of other brands, it is also equipped with the RJ11 6P6C interface but has different internal line sequence, can’t be used compatibly with our sensor/module.
Specification
- Connector: Easy plug
- Power Supply: 5V
- Interface:Digital
- Modulate Frequency: 38Khz
Technical Details
- Dimensions: 38mm*20mm*18mm
- Weight: 5g
Connect It Up
Connect the EASY Plug Infrared receiver sensor to control board using an RJ11 cable. Then connect the control board to your PC with a USB cable.
Upload the Code
Below is an example code. Open or drag below code to Mixly Blocks and upload.
What You Should See
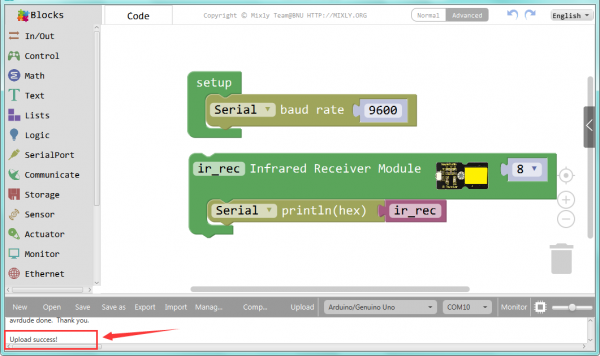
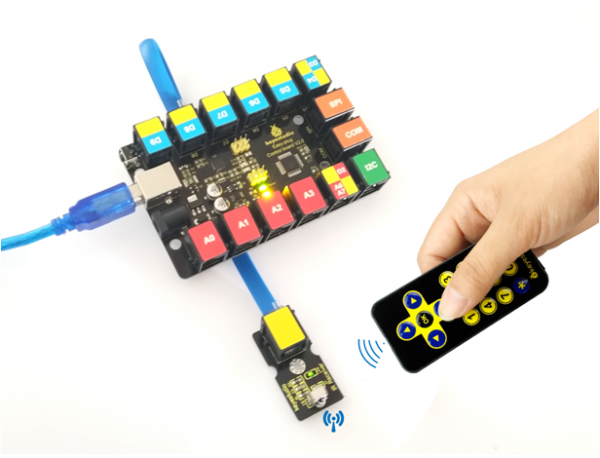
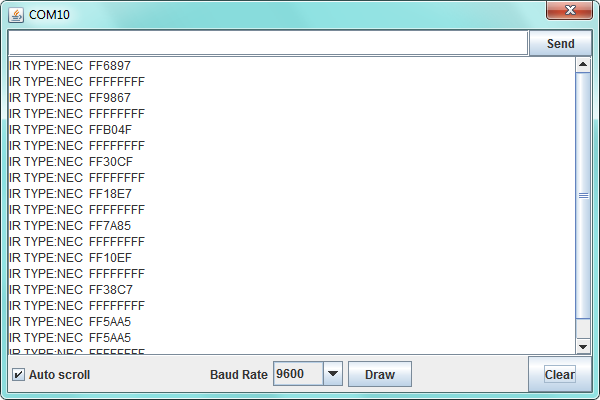
Done uploading the code, when aiming at the IR receiver, press down the key on an IR remote controller, you should see the key decoding is displayed on the serial monitor. If long press the key, it will appear wrong code FFFFFFFF.
Little Knowledge:
This test can record all your remote control key decoding. So you can apply them to the next experiment to control LED lights.
Remote Controlled Light
Hookup Guide
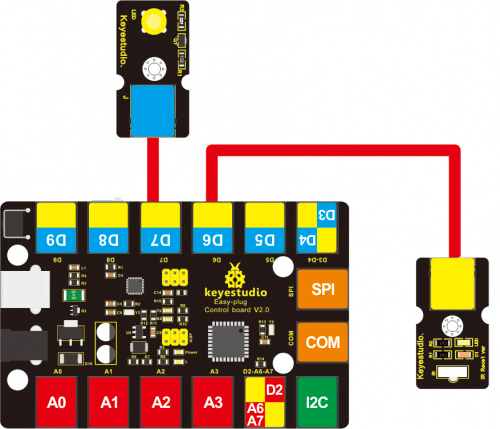
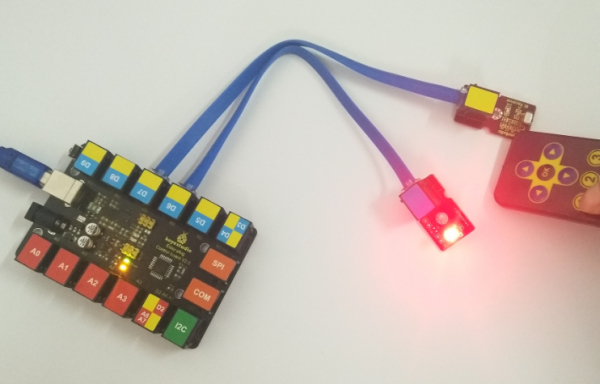
Connect the EASY Plug Infrared receiver module and LED module to control board using RJ11 cables.
What You Should See
Upload success, press the key 1 on your remote controller, LED lights up. Then press the key 2, LED is turned off.
Little Knowledge:
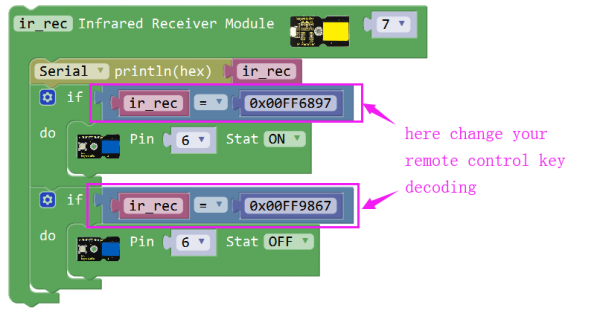
If you want to change another remote control key, you should be able to change your remote key decoding. Shown below.
After that, upload the code again and have a try.
Resources
https://fs.keyestudio.com/KS0125
