Ks0244 keyestudio EASY plug TEMT6000 Ambient Light Sensor: Difference between revisions
Keyestudio (talk | contribs) No edit summary |
Keyestudio (talk | contribs) |
||
| (20 intermediate revisions by the same user not shown) | |||
| Line 1: | Line 1: | ||
[[image:ks0244图.jpg|thumb|600px|right|EASY plug TEMT6000 Ambient Light Sensor ]] | |||
==Introduction== | |||
Light sensors are probably one of the most common sensors in life. They can be found in your laptop, phone or home lighting system. <br> | |||
A light sensor measures the level of light in a room or ambient light in a space. <br> | |||
This EASY plug TEMT6000 light sensor uses a special ambient light detector (TEMT6000) with spectral response that closely emulates the human eye.<br> | |||
It does react well to very small changes in a wide range of brightness, however, it does not react well to IR or UV light. The sensor can help you to to detect the light density.<br> | |||
This module should be used together with EASY plug control board.<br> | |||
<span style=color:red> '''Special Note:''' <br> | |||
The sensor/module is equipped with the RJ11 6P6C interface, compatible with our keyestudio EASY plug Control Board with RJ11 6P6C interface. <br> If you have the control board of other brands, it is also equipped with the RJ11 6P6C interface but has different internal line sequence, can’t be used compatibly with our sensor/module. </span><br> | |||
<br> | |||
==Specification== | ==Specification== | ||
* Supply Voltage: + | * Connector: Easy plug | ||
* | * Supply Voltage: +5V DC 50mA | ||
* | * Interface:Analog Input | ||
* Near Human Eye Spectral Response and Very Low IR Sensitivity | |||
== | <br> | ||
==Technical Details== | |||
* Dimensions: 30mm*20mm*18mm | |||
* Weight: 3.5g | |||
== | <br> | ||
==Connect It Up== | |||
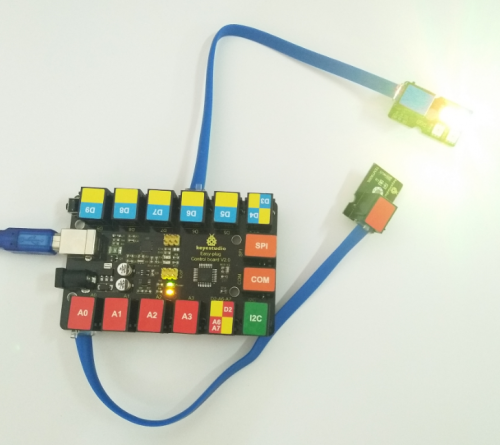
< | Connect the EASY Plug TEMT6000 sensor and an LED module to control board using an RJ11 cable. <br> | ||
Then connect the control board to your PC with a USB cable. | |||
<br>[[File:环境光灯.jpg|500px|frameless|thumb]]<br> | |||
< | |||
== | <br> | ||
==Upload the Code== | |||
<br>[[File: | Below is an example code. Open or drag below code to [https://wiki.keyestudio.com/Getting_Started_with_Mixly Mixly Blocks] and upload. <br> | ||
<br>[[File:ks0398 15.1.png|500px|frameless|thumb]]<br> | |||
<br> | |||
==What You Should See== | |||
<br>[[File:ks0398 15-1.png|500px|frameless|thumb]]<br> | |||
<br> | |||
Done uploading the code, open the serial monitor and set the baud rate to 9600, you should be able to see the printed analog value. <br> | |||
When the sensor detects different light intensity, the brightness of LED will change.<br> | |||
<br>[[File:ks0398 15-2.png|500px|frameless|thumb]]<br> | |||
<br>[[File:ks0398 15-3.png|500px|frameless|thumb]]<br> | |||
<br> | |||
==Controlling RGB Flash== | |||
<br> | |||
'''Hookup Guide:'''<br> | |||
<br>[[File:环境光RGB.jpg|500px|frameless|thumb]]<br> | |||
<br> | |||
'''Test Code:'''<br> | |||
<br>[[File:ks0398 15.2.png|600px|frameless|thumb]]<br> | |||
<br> | |||
'''What You Should See:'''<br> | |||
Upload the code successfully, when the measured light intensity is less than 50, RGB lights are turned on. <br> | |||
Light 1 flashes in red, light 2 flashes in green, light 3 flashes in blue, light 4 flashes in white, with a delay time 500ms. <br> | |||
<br>[[File:ks0398 15-4.png|500px|frameless|thumb]]<br> | |||
<br>[[File:ks0398 15-5.png|500px|frameless|thumb]]<br> | |||
<br> | |||
<br> | |||
==Resources == | ==Resources == | ||
https://fs.keyestudio.com/KS0244 | |||
<br> | |||
==Buy from == | ==Buy from == | ||
*[https://www.keyestudio.com/keyestudio-easy-plug-temt6000-ambient-light-sensor-module-for-arduino-interface-type-rj11-p0461-p0461.html '''Official Website'''] | |||
*[https://www.aliexpress.com/store/product/Keyestudio-EASY-plug-TEMT6000-Ambient-light-sensor-module-for-arduino-Interface-Type-RJ11/1452162_32819765092.html?spm=2114.12010612.8148356.72.60624ba7tvibrt Shop on aliexpress ] | |||
[[category: | [[category:EASY Plug]] | ||
Latest revision as of 08:38, 8 January 2021
Introduction
Light sensors are probably one of the most common sensors in life. They can be found in your laptop, phone or home lighting system.
A light sensor measures the level of light in a room or ambient light in a space.
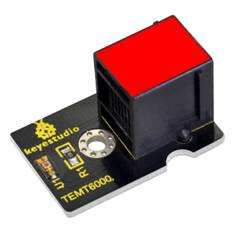
This EASY plug TEMT6000 light sensor uses a special ambient light detector (TEMT6000) with spectral response that closely emulates the human eye.
It does react well to very small changes in a wide range of brightness, however, it does not react well to IR or UV light. The sensor can help you to to detect the light density.
This module should be used together with EASY plug control board.
Special Note:
The sensor/module is equipped with the RJ11 6P6C interface, compatible with our keyestudio EASY plug Control Board with RJ11 6P6C interface.
If you have the control board of other brands, it is also equipped with the RJ11 6P6C interface but has different internal line sequence, can’t be used compatibly with our sensor/module.
Specification
- Connector: Easy plug
- Supply Voltage: +5V DC 50mA
- Interface:Analog Input
- Near Human Eye Spectral Response and Very Low IR Sensitivity
Technical Details
- Dimensions: 30mm*20mm*18mm
- Weight: 3.5g
Connect It Up
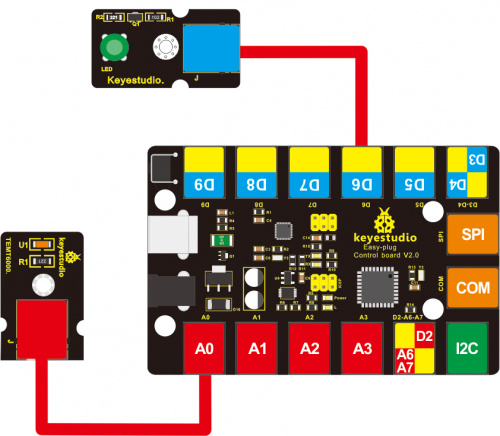
Connect the EASY Plug TEMT6000 sensor and an LED module to control board using an RJ11 cable.
Then connect the control board to your PC with a USB cable.
Upload the Code
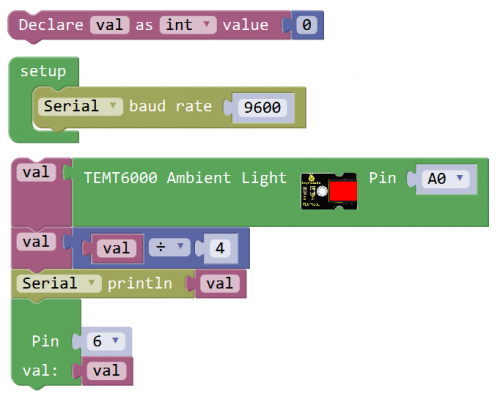
Below is an example code. Open or drag below code to Mixly Blocks and upload.
What You Should See
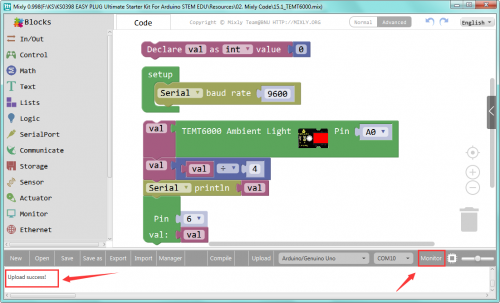
Done uploading the code, open the serial monitor and set the baud rate to 9600, you should be able to see the printed analog value.
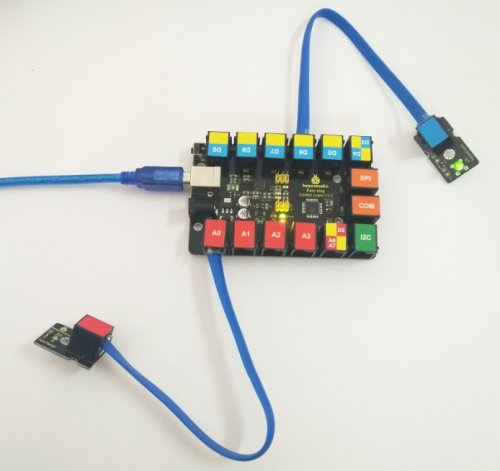
When the sensor detects different light intensity, the brightness of LED will change.

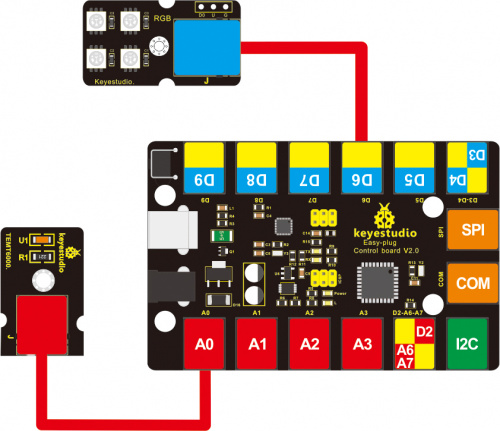
Controlling RGB Flash
What You Should See:
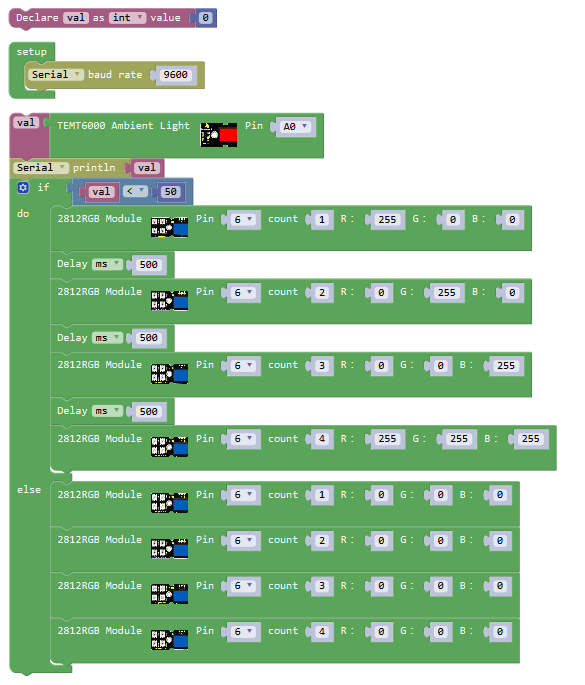
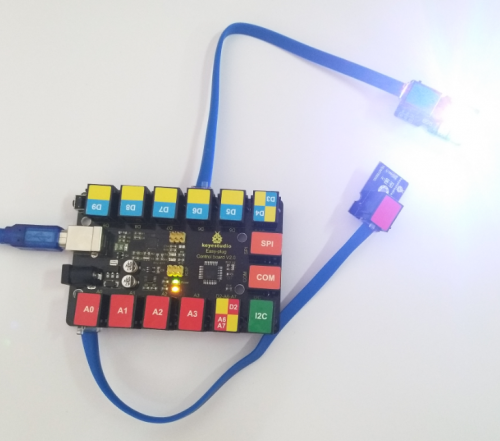
Upload the code successfully, when the measured light intensity is less than 50, RGB lights are turned on.
Light 1 flashes in red, light 2 flashes in green, light 3 flashes in blue, light 4 flashes in white, with a delay time 500ms.
Resources
https://fs.keyestudio.com/KS0244
