KS0373 EASY plug Slide Potentiometer: Difference between revisions
Keyestudio (talk | contribs) |
Keyestudio (talk | contribs) |
||
| (10 intermediate revisions by the same user not shown) | |||
| Line 7: | Line 7: | ||
There are 6 pad interfaces on the module. So you can solder two 3pin headers with a pitch of 2.54mm on the module. <br> | There are 6 pad interfaces on the module. So you can solder two 3pin headers with a pitch of 2.54mm on the module. <br> | ||
It can be used to connect with other MCUs. The signal terminal outputs two analog values. The sum of the two analog values is 1023.<br> | It can be used to connect with other MCUs. The signal terminal outputs two analog values. The sum of the two analog values is 1023.<br> | ||
This module should be used together with EASY plug control board.<br> | |||
<span style=color:red> '''Special Note:''' <br> | |||
The sensor/module is equipped with the RJ11 6P6C interface, compatible with our keyestudio EASY plug Control Board with RJ11 6P6C interface. <br> If you have the control board of other brands, it is also equipped with the RJ11 6P6C interface but has different internal line sequence, can’t be used compatibly with our sensor/module. </span><br> | |||
<br> | <br> | ||
==Parameters== | ==Parameters== | ||
* Operating Voltage: DC 3.3V-5V | * Operating Voltage: DC 3.3V-5V | ||
* Resistance: | * Resistance: 5K | ||
* Port: analog quantity | * Port: analog quantity | ||
* Property: ROHS | * Property: ROHS | ||
| Line 24: | Line 27: | ||
==Connect It Up== | ==Connect It Up== | ||
Connect the EASY Plug Slide Potentiometer to control board using an RJ11 cable. Then connect the control board to your PC with a USB cable. | Connect the EASY Plug Slide Potentiometer to control board using an RJ11 cable. Then connect the control board to your PC with a USB cable. | ||
<br>[[File: | <br>[[File:0373-1.png|500px|frameless|thumb]]<br> | ||
<br> | <br> | ||
==Upload the Code== | ==Upload the Code== | ||
Below is an example code. Open or drag below code to [https://wiki.keyestudio.com/Getting_Started_with_Mixly Mixly Blocks] and upload. <br> | Below is an example code. Open or drag below code to [https://wiki.keyestudio.com/Getting_Started_with_Mixly Mixly Blocks] and upload. <br> | ||
<br>[[File: | <br>[[File:0373-2.png|600px|frameless|thumb]]<br> | ||
<br> | <br> | ||
==What You Should See== | ==What You Should See== | ||
<br>[[File: | <br>[[File:KS0373-3.png|600px|frameless|thumb]]<br> | ||
<br> | <br> | ||
After uploading the code, open the serial monitor and set the baud rate to 9600; <br> | After uploading the code, open the serial monitor and set the baud rate to 9600; <br> | ||
you should be able to see the analog value of analog pin | you should be able to see the analog value of analog pin A6,A7. If slide the slider, the value will change. | ||
If slide the slider, the value will change. | <br>[[File:KS0373-4.png|600px|frameless|thumb]]<br> | ||
<br>[[File: | |||
<br> | <br> | ||
| Line 47: | Line 49: | ||
<br> | <br> | ||
'''Hookup Guide'''<br> | '''Hookup Guide'''<br> | ||
<br>[[File: | <br>[[File:KS0373-5.png|500px|frameless|thumb]]<br> | ||
<br> | <br> | ||
'''Test Code'''<br> | '''Test Code'''<br> | ||
Below is an example code. Open or drag below code to [https://wiki.keyestudio.com/Getting_Started_with_Mixly Mixly Blocks] and upload. <br> | Below is an example code. Open or drag below code to [https://wiki.keyestudio.com/Getting_Started_with_Mixly Mixly Blocks] and upload. <br> | ||
<br>[[File: | <br>[[File:KS0373-6.png|500px|frameless|thumb]]<br> | ||
<br> | <br> | ||
'''What You Should See'''<br> | '''What You Should See'''<br> | ||
After uploading the code, slide the potentiometer, the brightness of LED will change. | After uploading the code, slide the potentiometer, the brightness of LED will change. | ||
<br> | <br> | ||
<br> | |||
==Controlling Servo Angle== | ==Controlling Servo Angle== | ||
'''Hookup Guide'''<br> | '''Hookup Guide'''<br> | ||
<br>[[File: | <br>[[File:KS0373-8.png|600px|frameless|thumb]]<br> | ||
<br> | <br> | ||
'''Test Code'''<br> | '''Test Code'''<br> | ||
<br>[[File: | Below is an example code. Open or drag below code to [https://wiki.keyestudio.com/Getting_Started_with_Mixly Mixly Blocks] and upload. <br> | ||
<br>[[File:KS0373-9.png|800px|frameless|thumb]]<br> | |||
<br> | <br> | ||
'''What You Should See'''<br> | '''What You Should See'''<br> | ||
After uploading the code, slide the potentiometer, the servo motor will rotate to a certain angle. | After uploading the code, slide the potentiometer, the servo motor will rotate to a certain angle. | ||
<br> | |||
<br> | <br> | ||
==Resources == | ==Resources == | ||
https://fs.keyestudio.com/KS0373 | |||
https:// | |||
<br> | <br> | ||
Latest revision as of 08:47, 8 January 2021
Introduction
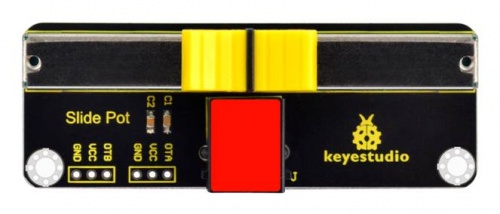
The EASY plug slide potentiometer uses high-quality sliding appliances for stable and reliable performance. It is a dual analog output that outputs a 0-VCC analog voltage signal.
The module pins are extended into Registered jack, so you can easily connect it to EASY Plug control board using a RJ11 cable.
There are 6 pad interfaces on the module. So you can solder two 3pin headers with a pitch of 2.54mm on the module.
It can be used to connect with other MCUs. The signal terminal outputs two analog values. The sum of the two analog values is 1023.
This module should be used together with EASY plug control board.
Special Note:
The sensor/module is equipped with the RJ11 6P6C interface, compatible with our keyestudio EASY plug Control Board with RJ11 6P6C interface.
If you have the control board of other brands, it is also equipped with the RJ11 6P6C interface but has different internal line sequence, can’t be used compatibly with our sensor/module.
Parameters
- Operating Voltage: DC 3.3V-5V
- Resistance: 5K
- Port: analog quantity
- Property: ROHS
Technical Details
- Dimensions: 28mm*76.7mm*31.3mm
- Weight: 17g
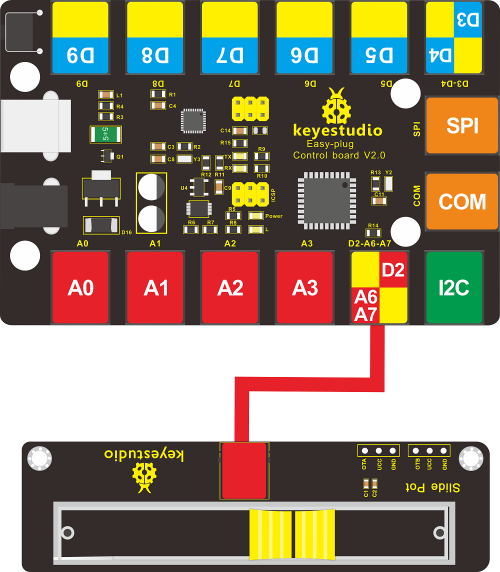
Connect It Up
Connect the EASY Plug Slide Potentiometer to control board using an RJ11 cable. Then connect the control board to your PC with a USB cable.
Upload the Code
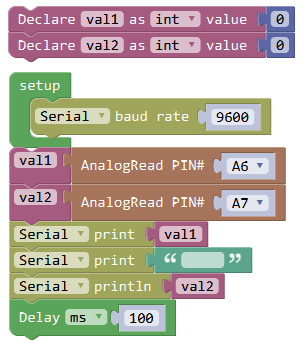
Below is an example code. Open or drag below code to Mixly Blocks and upload.
What You Should See
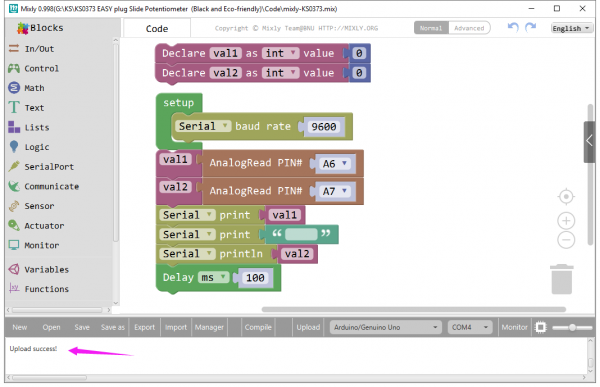
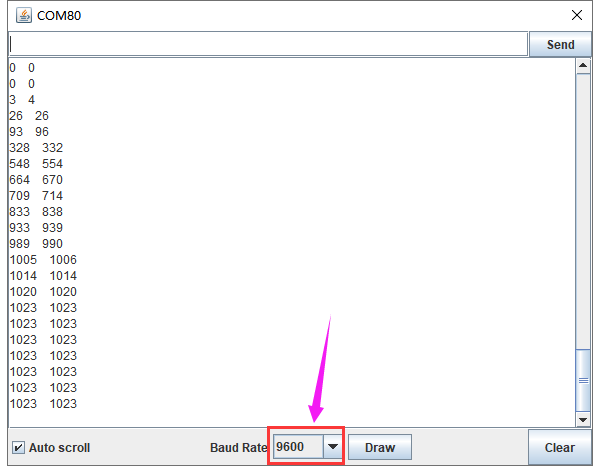
After uploading the code, open the serial monitor and set the baud rate to 9600;
you should be able to see the analog value of analog pin A6,A7. If slide the slider, the value will change.
Controlling LED Brightness
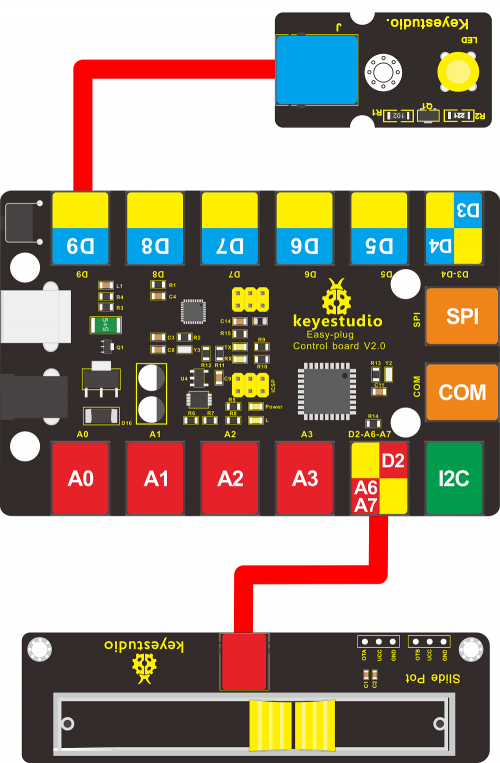
Except from reading the analog value of slide potentiometer, you are able to use the slide potentiometer to control the brightness of LED.
Hookup Guide
Test Code
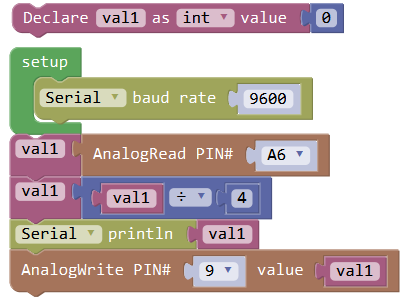
Below is an example code. Open or drag below code to Mixly Blocks and upload.
What You Should See
After uploading the code, slide the potentiometer, the brightness of LED will change.
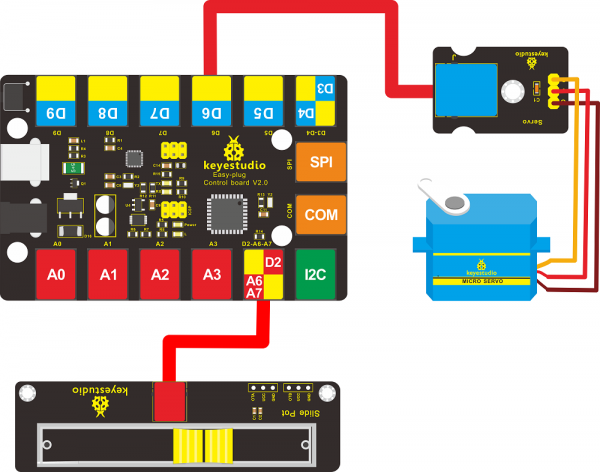
Controlling Servo Angle
Test Code
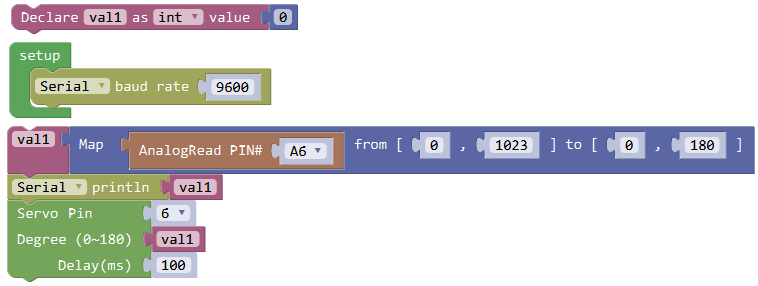
Below is an example code. Open or drag below code to Mixly Blocks and upload.
What You Should See
After uploading the code, slide the potentiometer, the servo motor will rotate to a certain angle.
Resources
https://fs.keyestudio.com/KS0373
