Ks0171 keyestudio XD-58C Pulse Sensor Module: Difference between revisions
Keyestudio (talk | contribs) |
Keyestudio (talk | contribs) |
||
| (8 intermediate revisions by the same user not shown) | |||
| Line 1: | Line 1: | ||
<br> | |||
==Introduction== | ==Introduction== | ||
keyestudio XD-58C pulse sensor module is used to measure heart rates. It’s widely applied for students, artists, athletes, inventors, games or mobile terminal developers to develop heart rate related interactive works. <br> | keyestudio XD-58C pulse sensor module is used to measure heart rates. <br> | ||
It’s widely applied for students, artists, athletes, inventors, games or mobile terminal developers to develop heart rate related interactive works. <br> | |||
You can wear the sensor on your finger or earlobe and connect it to Arduino. It also has an open source APP program that can display your heart rate real-time in graph. It’s in short, a heart rate sensor integrated with optical amplifier and noise elimination circuit. <br> | You can wear the sensor on your finger or earlobe and connect it to Arduino. It also has an open source APP program that can display your heart rate real-time in graph. It’s in short, a heart rate sensor integrated with optical amplifier and noise elimination circuit. <br> | ||
<br>[[File:ks0171.png|500px|frameless|thumb]]<br> | |||
<br> | |||
==Specification== | ==Specification== | ||
* LED peak wavelength: 515nm | * LED peak wavelength: 515nm | ||
| Line 13: | Line 15: | ||
* Output signal: 0~3.3 (at 3.3V power supply) / 0~5V (at 5V power supply) | * Output signal: 0~3.3 (at 3.3V power supply) / 0~5V (at 5V power supply) | ||
<br> | |||
== Circuit Connection == | == Circuit Connection == | ||
<br>[[File:Ks0171-.png| | <br>[[File:Ks0171-1.png|700px|frameless|thumb]]<br> | ||
<br> | |||
== Program Upload == | == Program Upload == | ||
Download the program and the software | Download the program and the software here[http://113.96.161.76/7326097.s21d-7.faiusrd.com/0/ABUIABAAGAAghuDAuQUoiKyy5QU?f=XD-58C+pulse+sensor+module.zip&v=1462775840&wsiphost=local] | ||
<br>[[File:KS0171-1.png|500px|frameless|thumb]]<br> | <br>[[File:KS0171-1.png|500px|frameless|thumb]]<br> | ||
<br> | |||
== User Instruction == | == User Instruction == | ||
1.install “processing software” from the downloaded file.<br> | '''1.'''install “processing software” from the downloaded file.<br> | ||
2.Open “processing”, click menu “file”- “open”, find the folder named “PulseSensorAmpd_Processing_1dot1”, select the file. | |||
'''2.'''Open “processing”, click menu “file”- “open”, find the folder named “PulseSensorAmpd_Processing_1dot1”, select the file. | |||
<br>[[File:KS0171-2.png|500px|frameless|thumb]]<br> | <br>[[File:KS0171-2.png|500px|frameless|thumb]]<br> | ||
<br> | |||
3.When only 1 COM port of the computer is connected, click “run”. The software will self-identify the COM port and display as below picture shown. | '''3.'''When only 1 COM port of the computer is connected, click “run”. The software will self-identify the COM port and display as below picture shown. | ||
<br>[[File:KS0171-3.png|500px|frameless|thumb]]<br> | <br>[[File:KS0171-3.png|500px|frameless|thumb]]<br> | ||
<br> | |||
'''4.'''If multiple COM port is connected to the computer, click “run”. The software will self-identify the COM port and display as below picture shown. | |||
<br>[[File:KS0171-4.png|500px|frameless|thumb]]<br> | |||
We change the serial port No. In the code correspondingly. | We change the serial port No. In the code correspondingly. | ||
<br>[[File:KS0171-5.png|500px|frameless|thumb]]<br> | <br>[[File:KS0171-5.png|500px|frameless|thumb]]<br> | ||
Here, 0 in “Serial.list()[0]” stands for the first one COM2, 1 in Serial.list()[1] stands for the second one COM6. | Here, 0 in “Serial.list()[0]” stands for the first one COM2, 1 in Serial.list()[1] stands for the second one COM6. | ||
<br> | |||
5. Place the sensor on your finger or your earlobe, you can measure your pulse rate as below picture shown. | |||
'''5.''' Place the sensor on your finger or your earlobe, you can measure your pulse rate as below picture shown. | |||
<br>[[File:KS0171-6.png|500px|frameless|thumb]]<br> | <br>[[File:KS0171-6.png|500px|frameless|thumb]]<br> | ||
<br> | |||
== Resources == | == Resources == | ||
* '''Program'''<br> | |||
https://fs.keyestudio.com/KS0171 | |||
<br> | |||
== Buy From == | == Buy From == | ||
*[https://www.keyestudio.com/u_file/1811/products/16/db62c86f6c.jpg.240x240.jpg '''Official Website'''] | |||
*[https://www.aliexpress.com/store/product/Fre-shipping-XD-58C-pulsesensor-pulse-heart-rate-sensor/1452162_2052907460.html?spm=2114.12010615.8148356.3.324a5b1bJAgycj '''Shop on aliexprss'''] | |||
[[Category:Module]] | [[Category:Module]] | ||
Latest revision as of 16:45, 8 January 2021
Introduction
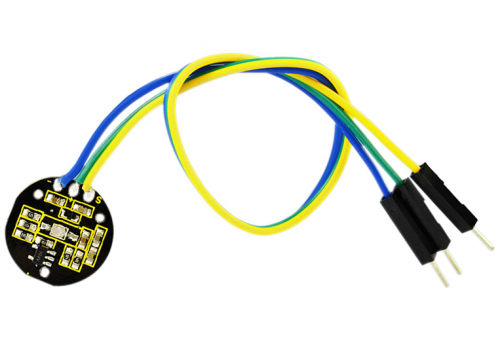
keyestudio XD-58C pulse sensor module is used to measure heart rates.
It’s widely applied for students, artists, athletes, inventors, games or mobile terminal developers to develop heart rate related interactive works.
You can wear the sensor on your finger or earlobe and connect it to Arduino. It also has an open source APP program that can display your heart rate real-time in graph. It’s in short, a heart rate sensor integrated with optical amplifier and noise elimination circuit.
Specification
- LED peak wavelength: 515nm
- Power supply: 3.3V/5V
- Output type: analog
- Output signal: 0~3.3 (at 3.3V power supply) / 0~5V (at 5V power supply)
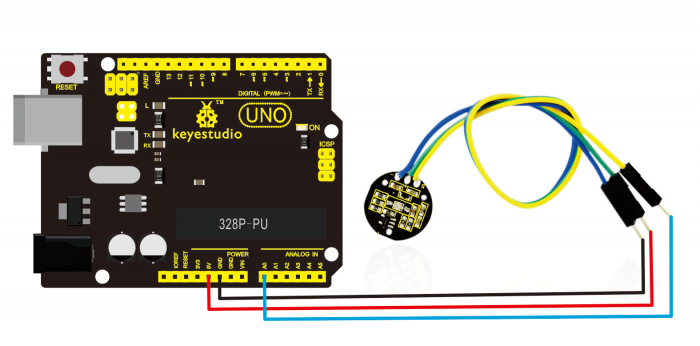
Circuit Connection
Program Upload
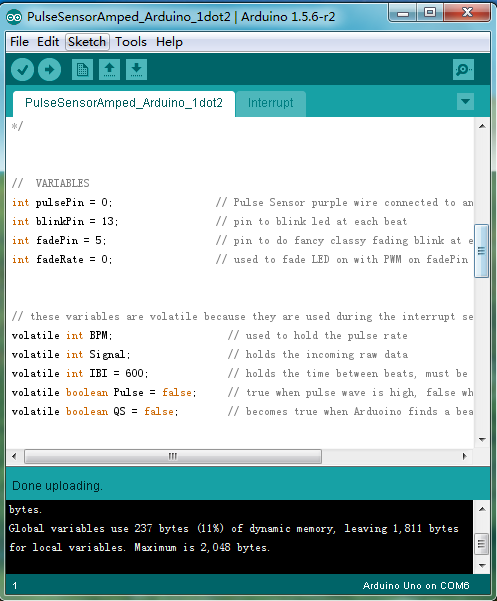
Download the program and the software here[1]
User Instruction
1.install “processing software” from the downloaded file.
2.Open “processing”, click menu “file”- “open”, find the folder named “PulseSensorAmpd_Processing_1dot1”, select the file.

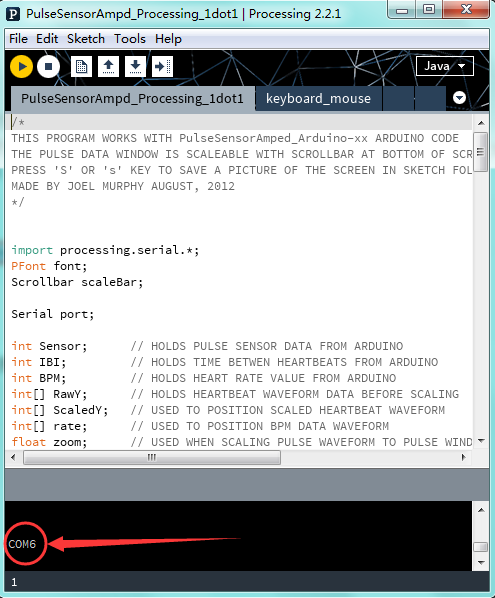
3.When only 1 COM port of the computer is connected, click “run”. The software will self-identify the COM port and display as below picture shown.
4.If multiple COM port is connected to the computer, click “run”. The software will self-identify the COM port and display as below picture shown.
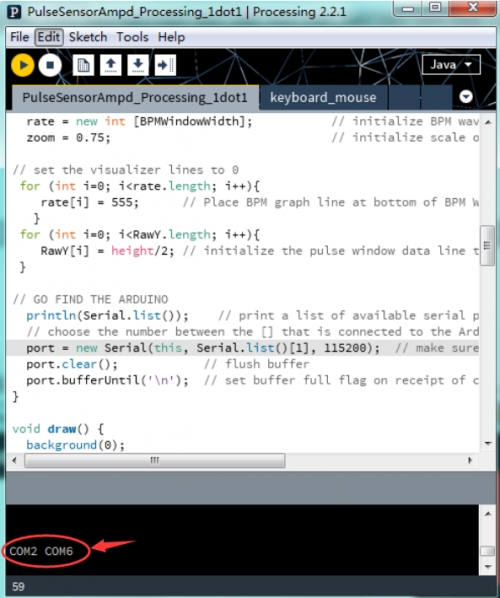
We change the serial port No. In the code correspondingly.

Here, 0 in “Serial.list()[0]” stands for the first one COM2, 1 in Serial.list()[1] stands for the second one COM6.
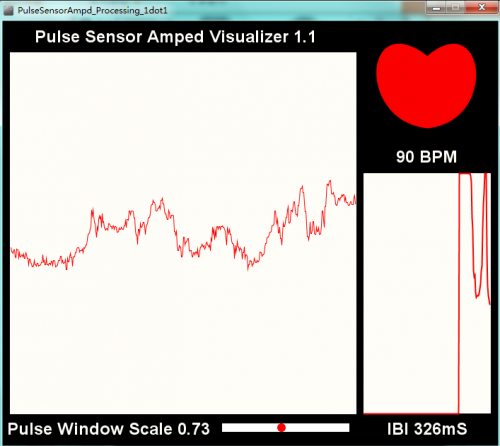
5. Place the sensor on your finger or your earlobe, you can measure your pulse rate as below picture shown.
Resources
- Program
https://fs.keyestudio.com/KS0171
