Ks0029 keyestudio Digital Push Button: Difference between revisions
Jump to navigation
Jump to search
Keyestudio (talk | contribs) No edit summary |
Keyestudio (talk | contribs) |
||
| Line 1: | Line 1: | ||
==Introduction== | ==Introduction== | ||
This is a basic application module. You can simply plug it into an IO shield to have your first | This is a basic application module. You can simply plug it into an IO shield to have your first try of Arduino. <br> | ||
Advantages: | Advantages: | ||
Wide voltage range from 3.3V to 5V | * Wide voltage range from 3.3V to 5V | ||
Standard assembling structure (two 3mm diameter holes with multiple of 5mm as distance from center) | * Standard assembling structure (two 3mm diameter holes with multiple of 5mm as distance from center) | ||
Easily recognizable interfaces of sensors ("A" for analog and "D" for digital) | * Easily recognizable interfaces of sensors ("A" for analog and "D" for digital) | ||
Icons illustrate sensor function clearly | * Icons illustrate sensor function clearly | ||
High quality connector | * High quality connector | ||
Immersion gold surface | * Immersion gold surface | ||
<br>[[File:291.png|500px|frameless|thumb]]<br> | <br>[[File:291.png|500px|frameless|thumb]]<br> | ||
==Specification== | ==Specification== | ||
Revision as of 15:10, 23 September 2017
Introduction
This is a basic application module. You can simply plug it into an IO shield to have your first try of Arduino.
Advantages:
- Wide voltage range from 3.3V to 5V
- Standard assembling structure (two 3mm diameter holes with multiple of 5mm as distance from center)
- Easily recognizable interfaces of sensors ("A" for analog and "D" for digital)
- Icons illustrate sensor function clearly
- High quality connector
- Immersion gold surface
Specification
- Supply Voltage: 3.3V to 5V
- Easy to 'plug and operate'
- Large button keypad and high-quality first-class cap
- Achieve interesting and interactive work
- Interface: Digital
- Size: 30*20mm
- Weight: 4g
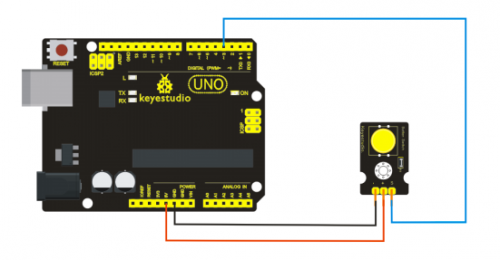
Connection Diagram
Sample Code
/* # When you push the digital button, the Led 13 on the board will turn on. Otherwise,the led turns off.
*/
int ledPin = 13;                // choose the pin for the LED
int inputPin = 3;               // Connect sensor to input pin 3
void setup() {
  pinMode(ledPin, OUTPUT);      // declare LED as output
  pinMode(inputPin, INPUT);     // declare pushbutton as input
}
void loop(){
  int val = digitalRead(inputPin);  // read input value
  if (val == HIGH) {            // check if the input is HIGH
    digitalWrite(ledPin, LOW);  // turn LED OFF
  } else {
    digitalWrite(ledPin, HIGH); // turn LED ON
}
Resources
Video
http://www.keyestudio.com/wp/2016/05/ks0029-keyestudio-digital-push-button-module/
Datasheet
http://www.keyestudio.com/files/index/download/id/1463649986/
Buy from
http://www.keyestudio.com/keyestudio-digital-push-button-for-arduino.html

