Ks0188 ARDUINO Touch key USB Board-2 Kit: Difference between revisions
Keyestudio (talk | contribs) No edit summary |
Keyestudio (talk | contribs) No edit summary |
||
| Line 309: | Line 309: | ||
'''Code Explanation:'''<br> | '''Code Explanation:'''<br> | ||
Among above projects, we just change codes of A0-A5 to simulate various keys on keyboard. In fact, mainly set codes in UsbKeyboard.sendKeyStroke(XXXX). For example, in Project 3, if we set A0 to simulate S Key, the code should be UsbKeyboard.sendKeyStroke(22); //S or UsbKeyboard.sendKeyStroke(KEY_S); //S. 22 corresponds to S Key, and we can find other keys corresponding to UsbKeyboard.h. | Among above projects, we just change codes of A0-A5 to simulate various keys on keyboard. In fact, mainly set codes in UsbKeyboard.sendKeyStroke(XXXX). For example, in Project 3, if we set A0 to simulate S Key, the code should be UsbKeyboard.sendKeyStroke(22); //S or UsbKeyboard.sendKeyStroke(KEY_S); //S. 22 corresponds to S Key, and we can find other keys corresponding to UsbKeyboard.h. | ||
== Resource == | |||
'''Video''' | |||
http://www.keyestudio.com/wp/2016/11/ks0188-keyestudio-maker-touch-starter-kit/ | |||
http://www.keyestudio.com/wp/2016/11/ks0188-play-games-with-anything/ | |||
'''PDF''' | |||
https://drive.google.com/open?id=1tfTGyNcDw5ydFOj0_EOQZFrH4CYDlW8B | |||
'''Libraries''' | |||
https://drive.google.com/open?id=1CwJBxoXhGQPivVE-_Be9_L39lLGwRwDV | |||
== Get One Now == | == Get One Now == | ||
Revision as of 11:15, 20 November 2017
keyestudio Maker Touch Starter Kit
1. Introduction
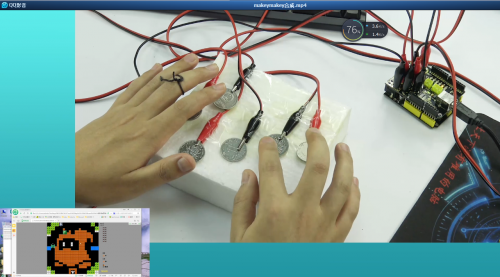
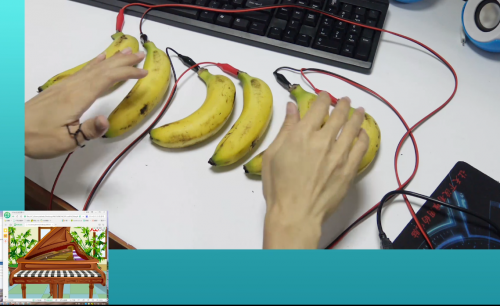
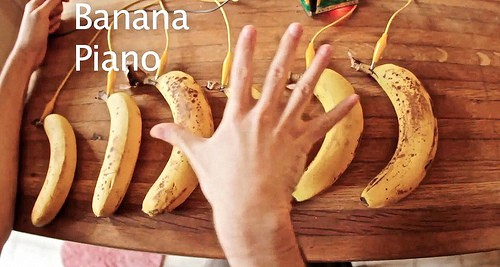
Maker Touch is a very simple circuit board and combined with open-source ARDUINO control board to make any object a compute input device. That is to say, it can make stairway into a piano, bananas into a keyboard , plasticine into a joystick and even your families into a musical synthesizer.
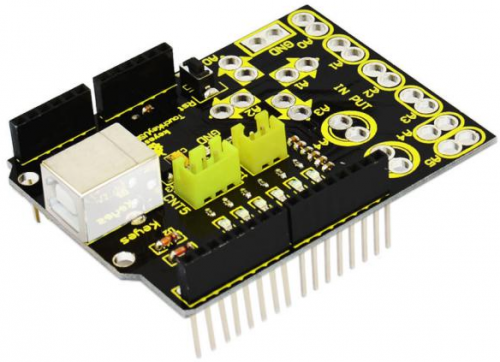
Maker Touch is developed by KEYSTUDIO. Its volume is very small(similar to Arduino Uno). It has a USB interface connected to computer and a alligator clip connected to other objects.
Maker Touch’s meaning lies in using a very simple way to create art by artists. You need neither installing driver nor encoding. If you want to encode, it can also work as Arduino. When connected to bananas, it becomes a banana piano; when connected to plasticine, it becomes a joystick. Besides, you can draw buttons on a piece of paper with a pencil , the paper becomes a controller of a game, Pacman.
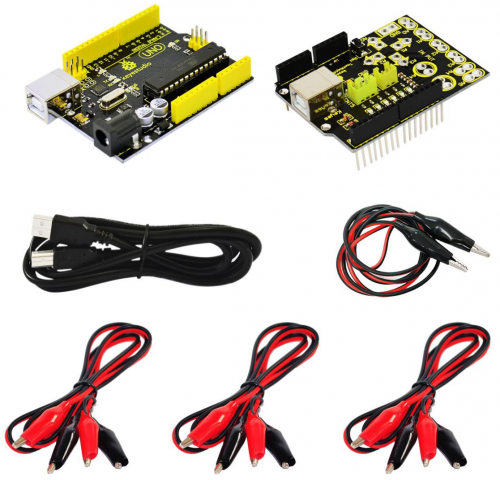
2. Kit Contents
Project 1  LED BlinkingSimulating Keyboard
Project 2  Playing Typical 90 Tank Game with Coins
Project 3  Playing Piano with Bananas
3. Work Principle
As long as objects conduct, Maker Touch can work on it. If no response, just sprinkle water on objects. So even stone, it works the same. It uses ARDUINO microcontroller to simulate a keyboard, and leads out several keys replaced by switches as touch switch. Maker Touch employs touch input , namely, a double-contact switch, and lead out touch port and ground connected to two touch electrodes. Because of body-resistor, when you touch the two electrodes, there is certain current flowing through between them. Detect the current to know touch events. The same way as Makey Makey.
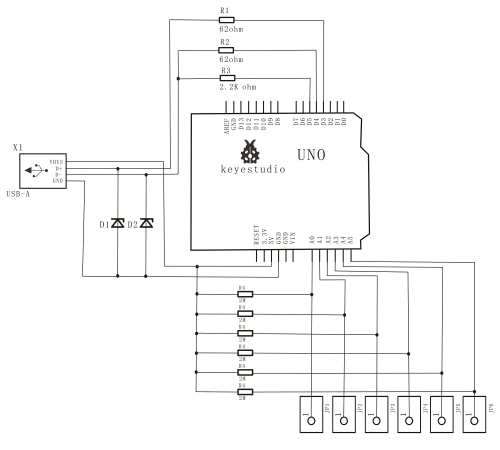
Because the touch part is sensitive to electromagnetic interference around, the touch board and Arduino cable must use shielding line. The cored wire of six shielding lines connects to A0~A5, shielding layer to positive side of power supply(+5v).
In this project, we use a external pull-up resistor of 2MΩ, and input port is high voltage in normal state. So the default of AD converting value is 1023. Touch GND and A0~A5 to decrease input voltage, and as a result, change the AD input value. When the value decreases to some extent(determined by variable, TouchSensitivity), there should be responds of events on the touch board. If the touch sensitivity is not suitable, adjust the value to change sensitivity. The larger the value, the lower the sensitivity.
4. Connection Diagram
6. Project Details
Project 1: Simulating Keyboard
As a typical input device, used in interactive products, keyboard has special advantages. For example, we can directly pass on to flash through a keyboard without special interface like serial interface. Though we can disassemble a traditional keyboard and then lead out inner keys . But by doing so we can’t change dynamically the key value and press more than one key each time. If using analog keyboard, we can set liberally key pressing time and value. For instance, in this project ,we simulate 6 number keys, namely No. 1, 2, 3, 4, 5, 6.
Sample Code:
*****************************************************************************
#include "UsbKeyboard.h"
int InData1 = 0, InData2 = 0, InData3 = 0, InData4 = 0, InData5 = 0, InData0 = 0; //touch input value
//temporary storage
int TouchSensitivity = 30; //touch sensitivity。0~1023,the larger the value, the lower the sensitivity
void setup()
{
for(int i = A0; i <= A5; i++)
{
pinMode(i, INPUT); //A0~A5 port as input port
}
for(int i = 6; i <= 12; i++)
{
pinMode(i, OUTPUT); //A0~A5 port as input port
}
TIMSK0 &= !(1 << TOIE0);
}
void loop()
{
UsbKeyboard.update();
//read out the voltage value of all pins, and because of pull-up resistor
//the default of all pins of maximum level is 1023,decrease the level of pins though touch.
//so the value is by 1024-analogRead(A0);
InData0 = 1024 - analogRead(A0);
InData1 = 1024 - analogRead(A1);
InData2 = 1024 - analogRead(A2);
InData3 = 1024 - analogRead(A3);
InData4 = 1024 - analogRead(A4);
InData5 = 1024 - analogRead(A5);
//trigger keyboard events with various possibility
if(InData0 >= TouchSensitivity)
{
digitalWrite (11, HIGH);
UsbKeyboard.sendKeyStroke(79); //right
}
else digitalWrite(11, LOW);
if(InData1 >= TouchSensitivity)
{
digitalWrite(10, HIGH);
UsbKeyboard.sendKeyStroke(80); //left
}
else digitalWrite(10, LOW);
if(InData2 >= TouchSensitivity)
{
digitalWrite(9, HIGH);
UsbKeyboard.sendKeyStroke(81); //down
}
else digitalWrite(9, LOW);
if(InData3 >= TouchSensitivity)
{
digitalWrite(8, HIGH);
UsbKeyboard.sendKeyStroke(82); //up
}
else digitalWrite(8, LOW);
if(InData4 >= TouchSensitivity)
{
digitalWrite(7, HIGH);
UsbKeyboard.sendKeyStroke(KEY_SPACE);
}
else digitalWrite(7, LOW);
if(InData5 >= TouchSensitivity)
{
digitalWrite(6, HIGH);
UsbKeyboard.sendKeyStroke(KEY_ENTER);
}
else digitalWrite(6, LOW);
delay(100);
}

*******************************************************************************
Download Address of Library of UsbKeyboard:
http://7326097.s21d-7.faiusrd.com/0/ABUIABAAGAAg-9qKvQUog677ywU?f=Library+of+UsbKeyboard.zip&v=1470279039
Connection:
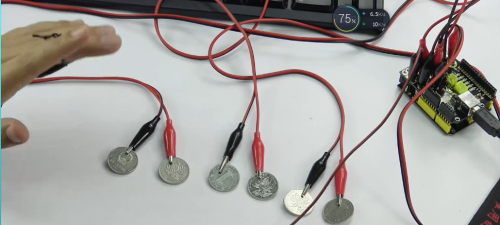
First, connect one end of an alligator clip to GND; hold the metal part of the other end of the alligator clip between your fingers. You are now "grounded".
Next, connect one end of an alligator clip to A0 port on the Touch key USB Shield, and connect the other end to a coin. Connect A1-A5 ports using the same way.
Result:
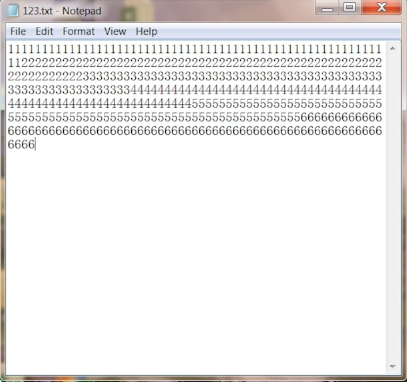
After uploading program, take down one end of the Arduino cable on the control board; plug the end of the Arduino cable into Touch key USB Shield, and the other end still into PC USB port, now appearing new hardware “USB input device” on your PC. It is no need to install device driver, because generally XP and Win7 system support it. Finally, open a blank document; when one end connected to GND, hold the metal part of the other end of the alligator clip between your fingers with one hand; the other hand touches coins the other end of which have been connected to A1-A5 port; you can see No. 1, 2, 3, 4, 5, 6 on the document.
Project 2: Playing Typical 90 Tank Game with Coins
In Project 1, we have simulated the six number keys, No.1, 2, 3, 4, 5, 6. So in this project, we will actually simulate A, S, D, W, J and P key, to control the Tank. Replace A0 port with S key, to turn round the Tank in direction of 180 degree; A1 port with A key, controlling the Tank to turn left; A2 port with D key, controlling the Tank to turn right; A3 port with W key, controlling the Tank to go forward; A4 port with J key, controlling the Tank to shoot; A5 port with P key, controlling the game to pause and start.
Sample Code:
*****************************************************************************
#include "UsbKeyboard.h"
int InData1 = 0, InData2 = 0, InData3 = 0, InData4 = 0, InData5 = 0, InData0 = 0; //touch input value
//temporary storage
int TouchSensitivity = 30; //touch sensitivity. 0~1023,the larger the value, the lower the sensitivity
void setup()
{
for(int i = A0; i <= A5; i++)
{
pinMode(i, INPUT); //A0~A5 port as input port
}
for(int i = 6; i <= 12; i++)
{
pinMode(i, OUTPUT); //A0~A5 port as input port
}
TIMSK0 &= !(1 << TOIE0);
}
void loop()
{
UsbKeyboard.update();
//read out the voltage value of all pins, and because of pull-up resistor,
//the default of all pins of maximum level is 1023,decrease the level of pins though touch.
//so the value is by 1024-analogRead(A0);
InData0 = 1024 - analogRead(A0);
InData1 = 1024 - analogRead(A1);
InData2 = 1024 - analogRead(A2);
InData3 = 1024 - analogRead(A3);
InData4 = 1024 - analogRead(A4);
InData5 = 1024 - analogRead(A5);
//trigger keyboard events with various possibility
if(InData0 >= TouchSensitivity)
{
digitalWrite (11, HIGH);
UsbKeyboard.sendKeyStroke(22); //S
}
else digitalWrite(11, LOW);
if(InData1 >= TouchSensitivity)
{
digitalWrite(10, HIGH);
UsbKeyboard.sendKeyStroke(4); //A
}
else digitalWrite(10, LOW);
if(InData2 >= TouchSensitivity)
{
digitalWrite(9, HIGH);
UsbKeyboard.sendKeyStroke(7); //D}
else digitalWrite(9, LOW);
if(InData3 >= TouchSensitivity)
{
digitalWrite(8, HIGH);
UsbKeyboard.sendKeyStroke(26); //W
}
else digitalWrite(8, LOW);
if(InData4 >= TouchSensitivity)
{
digitalWrite(7, HIGH);
UsbKeyboard.sendKeyStroke(13); //J
}
else digitalWrite(7, LOW);
if(InData5 >= TouchSensitivity)
{
digitalWrite(6, HIGH);
UsbKeyboard.sendKeyStroke(19); //P
}
else digitalWrite(6, LOW);
delay(100);
}

*******************************************************************************
Download Address of Typical 90 Tank Game:
http://7326097.s21d-7.faiusrd.com/0/ABUIABAyGAAgpNuKvQUooNGfmwY?f=Game+of+Typical+90+Tank.swf&v=1470279076
Result:
After uploading program, take down one end of the Arduino cable on the control board; plug the end of the Arduino cable into Touch key USB Shield, and the other end still into PC USB port, now appearing new hardware “USB input device” on your PC. It is no need to install device driver, because generally XP and Win7 system support it. when one end connected to GND, hold the metal part of the other end of the alligator clip between your fingers with one hand; the other hand touches coins the other end of which have been connected to A1-A5 port to control the Tank.
Project 3: Playing Piano with Bananas
This project is similar to Project 2, just changing coins into bananas, to make the project close to daily life and fill with art. That is, change game into playing piano.
In Project 2, we have imitated A, S, D, W, J, P keys. In this project, we will play piano with bananas. Find out an on-line piano software in your PC, and we can play a song through keys. But we simply imitate 6 keys. So we choose an easier song Song of Joy . In this song, we just need 6 keys, including J, K, L, I, H, E.
Song of Joy:
J J K L L K J I H H I J J I IJ J K L L K J I H H I J I H H I I
J H I J K J H I J K J I H I E J J K L L K J I H H I J I H H
Sample Code:
*****************************************************************************
#include "UsbKeyboard.h"
int InData1 = 0, InData2 = 0, InData3 = 0, InData4 = 0, InData5 = 0, InData0 = 0; //touch input value
//temporary storage
int TouchSensitivity = 20; //touch sensitivity. 0~1023,the larger the value, the lower the sensitivity.
void setup()
{
for(int i = A0; i <= A5; i++)
{
pinMode(i, INPUT); //A0~A5 port as input port
}
for(int i = 6; i <= 12; i++)
{
pinMode(i, OUTPUT); //A0~A5 port as input port
}
TIMSK0 &= !(1 << TOIE0);
}
void loop()
{
UsbKeyboard.update();
//read out the voltage value of all pins, and because of pull-up resistor,
//the default of all pins of maximum level is 1023,decrease the level of pins though touch.
//so the value is by 1024-analogRead(A0);
InData0 = 1024 - analogRead(A0);
InData1 = 1024 - analogRead(A1);
InData2 = 1024 - analogRead(A2);
InData3 = 1024 - analogRead(A3);
InData4 = 1024 - analogRead(A4);
InData5 = 1024 - analogRead(A5);
//trigger keyboard events with various possibility
if(InData0 >= TouchSensitivity)
{
digitalWrite (11, HIGH);
UsbKeyboard.sendKeyStroke(13); //J
}
else digitalWrite(11, LOW);
if(InData1 >= TouchSensitivity)
{
digitalWrite(10, HIGH);
UsbKeyboard.sendKeyStroke(14); //K
}
else digitalWrite(10, LOW);
if(InData2 >= TouchSensitivity)
{
digitalWrite(9, HIGH);
UsbKeyboard.sendKeyStroke(15); //L
}
else digitalWrite(9, LOW);
if(InData3 >= TouchSensitivity)
{
digitalWrite(8, HIGH);
UsbKeyboard.sendKeyStroke(12); //I
}
else digitalWrite(8, LOW);
if(InData4 >= TouchSensitivity)
{
digitalWrite(7, HIGH);
UsbKeyboard.sendKeyStroke(11);//H
}
else digitalWrite(7, LOW);
if(InData5 >= TouchSensitivity)
{
digitalWrite(6, HIGH);
UsbKeyboard.sendKeyStroke(8);//E
}
else digitalWrite(6, LOW);
delay(100);
}

*******************************************************************************
Download Address of Piano Game:
http://7326097.s21d-7.faiusrd.com/0/ABUIABAyGAAgtduKvQUovNzqmQY?f=Game+of+Piano.swf&v=1470279093
Result:
After uploading program, take down one end of the Arduino cable on the control board; plug the end of the Arduino cable into Touch key USB Shield, and the other end still into PC USB port, now appearing new hardware “USB input device” on your PC. It is no need to install device driver, because generally XP and Win7 system support it. when one end connected to GND, hold the metal part of the other end of the alligator clip between your fingers with one hand; the other hand touches coins the other end of which have been connected to A1-A5 port . Now, you can play Song of Joy.
Code Explanation:
Among above projects, we just change codes of A0-A5 to simulate various keys on keyboard. In fact, mainly set codes in UsbKeyboard.sendKeyStroke(XXXX). For example, in Project 3, if we set A0 to simulate S Key, the code should be UsbKeyboard.sendKeyStroke(22); //S or UsbKeyboard.sendKeyStroke(KEY_S); //S. 22 corresponds to S Key, and we can find other keys corresponding to UsbKeyboard.h.
Resource
Video
http://www.keyestudio.com/wp/2016/11/ks0188-keyestudio-maker-touch-starter-kit/
http://www.keyestudio.com/wp/2016/11/ks0188-play-games-with-anything/
https://drive.google.com/open?id=1tfTGyNcDw5ydFOj0_EOQZFrH4CYDlW8B
Libraries
https://drive.google.com/open?id=1CwJBxoXhGQPivVE-_Be9_L39lLGwRwDV
Get One Now
http://www.keyestudio.com/keyestudio-maker-touch-shield.html
