Download Arduino and Install Arduino Driver: Difference between revisions
Keyestudio (talk | contribs) No edit summary |
Keyestudio (talk | contribs) |
||
| (45 intermediate revisions by the same user not shown) | |||
| Line 4: | Line 4: | ||
== Download Arduino Environment == | == Download Arduino Environment == | ||
You can | You can directly download the latest version from this link: http://arduino.cc/en/Main/Software. When the download is finished, unzip the downloaded file. Be sure to preserve the folder structure. Double-click the folder to open it. There should be several files and sub-folders inside. <br> | ||
The Arduino Software (IDE) allows you to write programs and upload them to your board. In the Arduino Software page you will find two options: | |||
1. If you have a reliable Internet connection, you should use the [https://create.arduino.cc/editor online IDE ](Arduino Web Editor). It will allow you to save your sketches in the cloud, having them available from any device and backed up. You will always have the most up-to-date version of the IDE without the need to install updates or community generated libraries. | |||
2. If you would rather work offline, you should use the latest version of the [https://www.arduino.cc/en/Main/Software#download desktop IDE ]. | |||
<br> | <br> | ||
== Install the Arduino Desktop IDE== | |||
To get step-by-step instructions select one of the following link accordingly to your operating system. | |||
[https://www.arduino.cc/en/Guide/Windows Windows ] <br> | |||
[https://www.arduino.cc/en/Guide/MacOSX Mac OS X ] <br> | |||
[https://www.arduino.cc/en/Guide/Linux Linux ] <br> | |||
[https://www.arduino.cc/en/Guide/PortableIDE Portable IDE (Windows and Linux) ] | |||
Choose your board in the list here on the right to learn how to get started with it and how to use it on the Desktop IDE. | |||
<br> | <br> | ||
==Example for Installing Arduino IDE== | |||
'''STEP 1:''' Go to https://www.arduino.cc/en/Main/Software and find below page. | |||
<br>[[File:Arduino IDE.jpg|800px|frameless|thumb]]<br> | |||
The version available at this official website is usually the latest version. | |||
'''STEP 2:'''Download the development software that is compatible with the operating system of your computer. In the following, take Windows as an example.<br> | |||
<br>[[File:Operating system.jpg|800px|frameless|thumb]]<br> | |||
First, Click '''Windows Installer''', you will get the following page. | |||
<br>[[File:Window installer.jpg|800px|frameless|thumb]]<br> | |||
Then, Click '''JUST DOWNLOAD'''. After downloading the software installation package to your PC, start the STEP 3 below. | |||
'''STEP 3:Installing Arduino Software(Windows)''' <br> | |||
Install Arduino with the exe. Installation package you have downloaded well. <br> | |||
Get the latest version from the download page. You can choose between the Installer (.exe) and the Zip packages. We suggest you use the first one that installs directly everything you need to use the Arduino Software (IDE), including the drivers. With the Zip package you need to install the drivers manually. The Zip file is also useful if you want to create a portable installation. | |||
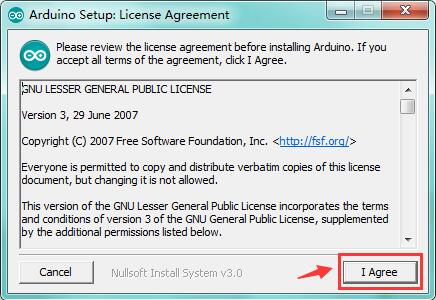
Frist,Click “I Agree”. | |||
<br>[[File:Arduino Setup 1.jpg|800px|frameless|thumb]]<br> | |||
When the download finishes, proceed with the installation and please allow the driver installation process when you get a warning from the operating system. | |||
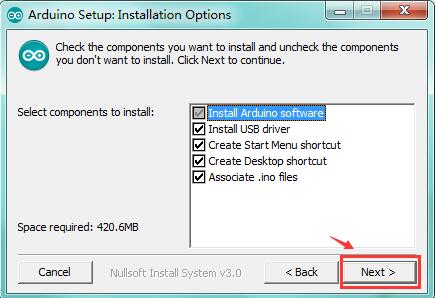
Then, click “Next” | |||
<br>[[File:Arduino Setup 2.jpg|800px|frameless|thumb]]<br> | |||
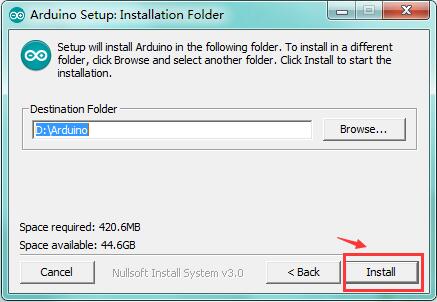
Next, click “Install”. | |||
<br>[[File:Arduino Setup 3.jpg|800px|frameless|thumb]]<br> | |||
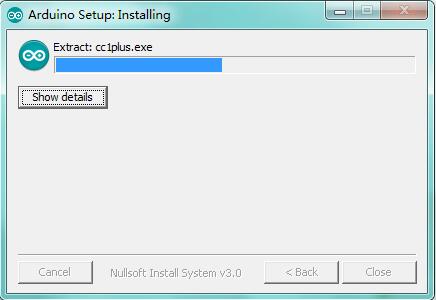
<br>[[File:Arduino Setup 4.jpg|800px|frameless|thumb]]<br> | |||
When the following interface appears, click Install to finish the installation. | |||
<br>[[File:Arduino Setup 5.png|800px|frameless|thumb]]<br> | |||
Finally, click “Close” after completing the installation. | |||
<br>[[File:Arduino Setup 6.png|800px|frameless|thumb]]<br> | |||
And you will see the following icon appear on the desktop | |||
<br>[[File:Software.png|800px|frameless|thumb]]<br> | |||
== Install the Driver == | == Install the Driver == | ||
=== Installing | === Installing Drivers for Arduino Board in Windows 7 === | ||
Before launch the Arduino software, you are going to install the USB drivers.<br> | |||
Plug one end of your USB cable into the Arduino and the other into a USB socket on your computer. <br> | |||
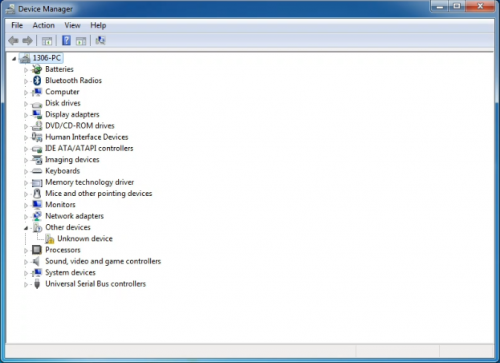
: | *First, right click “Computer” —>select “Properties”—> click “Device manager”, you should see an icon for ‘unknown device’ with a little yellow warning triangle next to it. This is your Arduino. <br>[[Image:Driver 1.png|500px|frameless]]<br> | ||
:*Select | *Right-click on the device and select the top menu option (Update Driver Software...). <br>[[Image:Driver 2.png|500px|frameless]]<br> | ||
*You will then be prompted to either ‘Search Automatically for updated driver software’ or ‘Browse my computer for driver software’. <br> | |||
:* | In this page, click “Browse my computer for driver software”. <br>[[Image:Driver 3.png|500px|frameless]]<br> | ||
: | |||
: | |||
*Select the option to browse and navigate to the drivers folder. <br>[[Image:Driver 4.png|500px|frameless]]<br> | |||
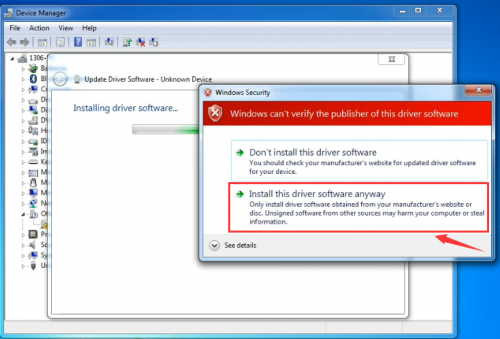
*Click 'Next' and you may get a security warning, if so, allow the software to be installed. Once the software has been installed, you will get a confirmation message. <br>[[Image:Driver 5.png|500px|frameless]]<br> | |||
*Installation completed, click “Close”. <br>[[Image:Driver 6.png|500px|frameless]]<br> | |||
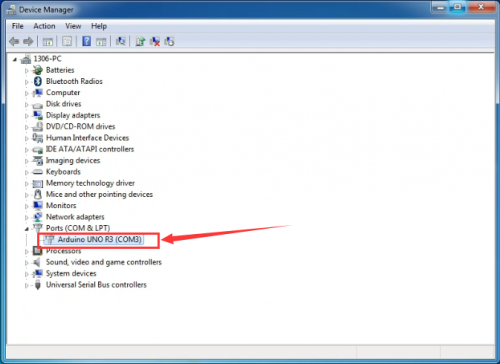
*After installation, go to check the “Device manager” again. right click “Computer” —> “Properties”—> “Device manager”, you can see the device shown as below figure. <br>[[Image:Driver 7.png|500px|frameless]]<br> | |||
== Related Data Download == | |||
'''Using Method for keyestudio UNO R3:''' <br> | |||
You can download the driver installation or software from below link: <br> | |||
https://drive.google.com/open?id=12D-JkXdNm03Qt4dlPQr3RP6OmgXqpvHc | |||
== Reference for Arduino Programming Language == | |||
Arduino programming language can be divided in three main parts: structure, values (variables and constants), and functions. <br> | |||
You can see more details on the following link:<br> | |||
https://www.arduino.cc/reference/en/ | |||
Latest revision as of 10:28, 21 May 2018
Download Arduino Environment
You can directly download the latest version from this link: http://arduino.cc/en/Main/Software. When the download is finished, unzip the downloaded file. Be sure to preserve the folder structure. Double-click the folder to open it. There should be several files and sub-folders inside.
The Arduino Software (IDE) allows you to write programs and upload them to your board. In the Arduino Software page you will find two options:
1. If you have a reliable Internet connection, you should use the online IDE (Arduino Web Editor). It will allow you to save your sketches in the cloud, having them available from any device and backed up. You will always have the most up-to-date version of the IDE without the need to install updates or community generated libraries.
2. If you would rather work offline, you should use the latest version of the desktop IDE .
Install the Arduino Desktop IDE
To get step-by-step instructions select one of the following link accordingly to your operating system.
Windows
Mac OS X
Linux
Portable IDE (Windows and Linux)
Choose your board in the list here on the right to learn how to get started with it and how to use it on the Desktop IDE.
Example for Installing Arduino IDE
STEP 1: Go to https://www.arduino.cc/en/Main/Software and find below page.
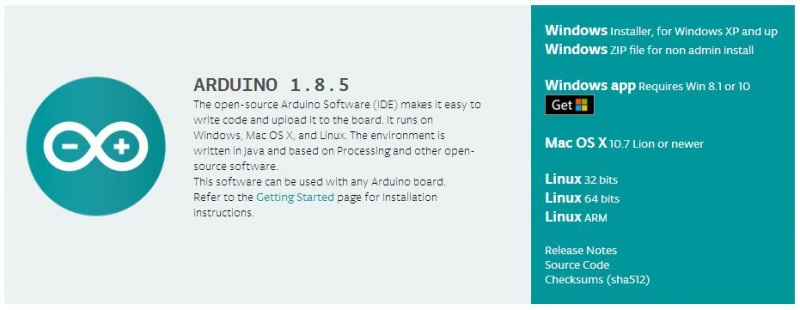
The version available at this official website is usually the latest version.
STEP 2:Download the development software that is compatible with the operating system of your computer. In the following, take Windows as an example.
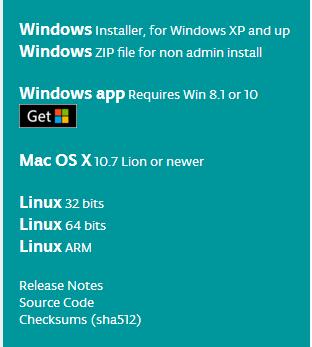
First, Click Windows Installer, you will get the following page.
Then, Click JUST DOWNLOAD. After downloading the software installation package to your PC, start the STEP 3 below.
STEP 3:Installing Arduino Software(Windows)
Install Arduino with the exe. Installation package you have downloaded well.
Get the latest version from the download page. You can choose between the Installer (.exe) and the Zip packages. We suggest you use the first one that installs directly everything you need to use the Arduino Software (IDE), including the drivers. With the Zip package you need to install the drivers manually. The Zip file is also useful if you want to create a portable installation.
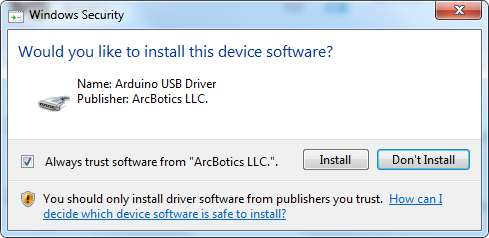
When the download finishes, proceed with the installation and please allow the driver installation process when you get a warning from the operating system.
When the following interface appears, click Install to finish the installation.
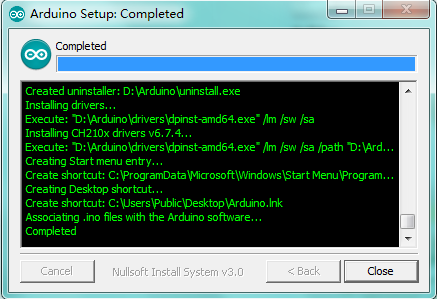
Finally, click “Close” after completing the installation.
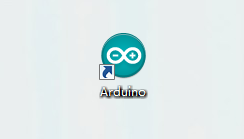
And you will see the following icon appear on the desktop
Install the Driver
Installing Drivers for Arduino Board in Windows 7
Before launch the Arduino software, you are going to install the USB drivers.
Plug one end of your USB cable into the Arduino and the other into a USB socket on your computer.
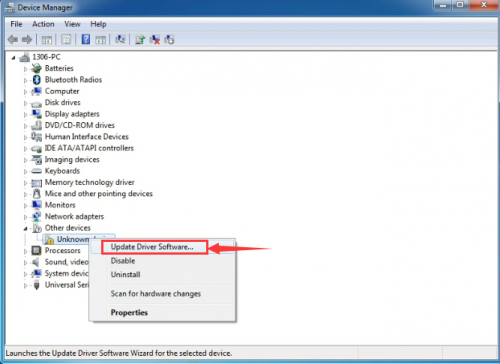
- First, right click “Computer” —>select “Properties”—> click “Device manager”, you should see an icon for ‘unknown device’ with a little yellow warning triangle next to it. This is your Arduino.
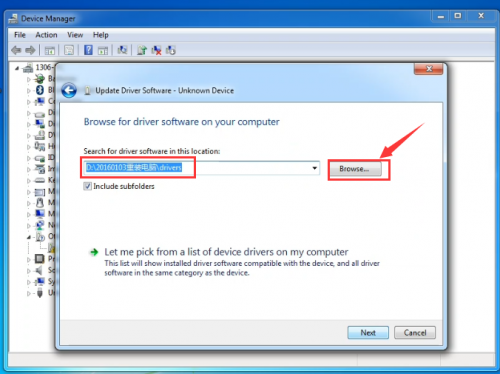
- You will then be prompted to either ‘Search Automatically for updated driver software’ or ‘Browse my computer for driver software’.
In this page, click “Browse my computer for driver software”. 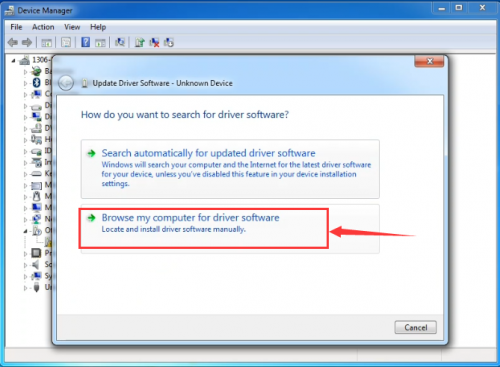
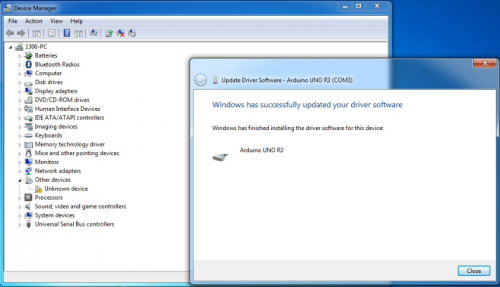
- Click 'Next' and you may get a security warning, if so, allow the software to be installed. Once the software has been installed, you will get a confirmation message.
- After installation, go to check the “Device manager” again. right click “Computer” —> “Properties”—> “Device manager”, you can see the device shown as below figure.
Related Data Download
Using Method for keyestudio UNO R3:
You can download the driver installation or software from below link:
https://drive.google.com/open?id=12D-JkXdNm03Qt4dlPQr3RP6OmgXqpvHc
Reference for Arduino Programming Language
Arduino programming language can be divided in three main parts: structure, values (variables and constants), and functions.
You can see more details on the following link:
https://www.arduino.cc/reference/en/
