Ks0062 keyestudio I2C LCD2004 Module: Difference between revisions
Keyestudio (talk | contribs) No edit summary |
Keyestudio (talk | contribs) |
||
| (5 intermediate revisions by the same user not shown) | |||
| Line 62: | Line 62: | ||
<br> | <br> | ||
<span style =color:red>'''Note:''' To ensure that this module will work properly, these two head files, namely Wire and LiquidCrystal_I2C, must be added into our library before code compiling.<br> | <span style =color:red>'''Note:''' To ensure that this module will work properly, these two head files, namely Wire and LiquidCrystal_I2C, must be added into our library before code compiling.<br> | ||
After uploading the code, you should see the LCD screen pop up the characters "Hello, world!" and more.<br> | |||
<br> | <br> | ||
==Resources == | ==Resources == | ||
* '''Get the Libraries'''<br> | * '''Get the Libraries and Code'''<br> | ||
https:// | https://fs.keyestudio.com/KS0062 | ||
* '''Video'''<br> | * '''Video'''<br> | ||
http://video.keyestudio.com/ks0062/ | http://video.keyestudio.com/ks0062/ | ||
<br> | |||
==Buy from == | ==Buy from == | ||
Latest revision as of 09:11, 8 January 2021
I2C LCD 2004 Module
Introduction
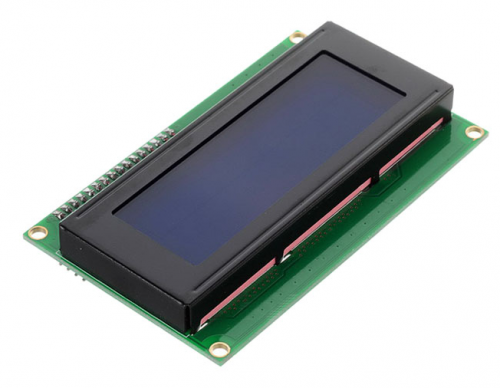
keyestudio 2004 I2C Module is a 20 character by 4 line LCD display with Blue background and White backlight.
The original 2004 LCD needs 7 IO ports to be up and running, ours is built with Arduino IIC/I2C interface, saving you 5 IO ports.
This LCD is ready-to-use because it is compatible with the Arduino Liquid Crystal Library.
LCDs are great for printing data and showing values. Adding an LCD to your project will make it super portable.
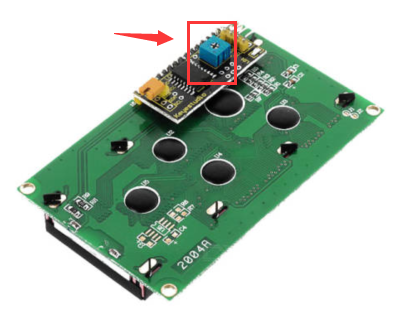
On the back of LCD display there is a blue potentiometer. You can turn the potentiometer to adjust the contrast.
Notice that the screen will get brighter or darker and that the characters become more visible or less visible.
Specification
- Interface: I2C
- I2C address: 0x27
- Operating voltage: +5V
- Contrast control: via potentiometer
Connection Diagram
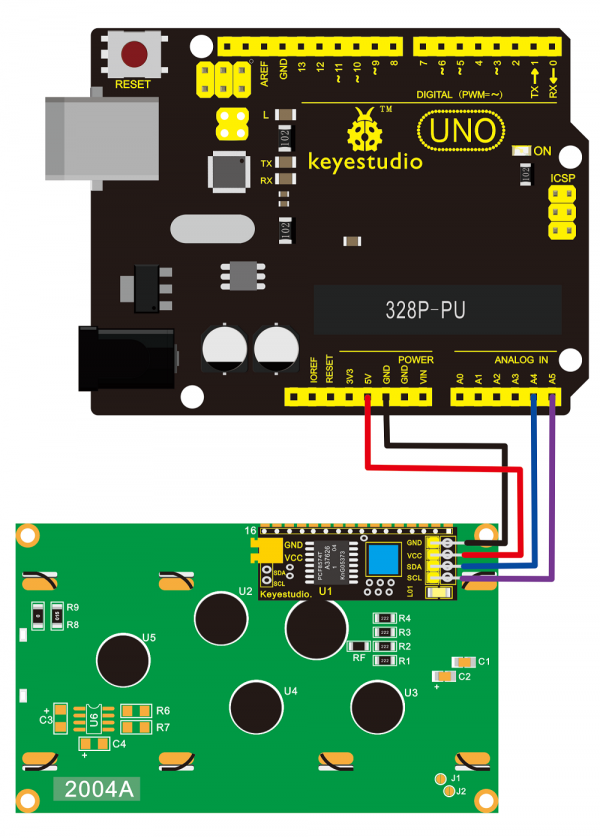
This module carries I2C interface, so we need to comply with I2C protocol in usage and corresponding head files must be included and added into the library.
Below is the connection diagram between this module and Arduino controller:

Sample Code
//YWROBOT
//Compatible with the Arduino IDE 1.0
//Library version:1.1
#include <Wire.h>
#include <LiquidCrystal_I2C.h>

LiquidCrystal_I2C lcd(0x27,20,4);  // set the LCD address to 0x27 for a 16 chars and 2 line display


void setup()
{
  lcd.init();                      // initialize the lcd
  lcd.init();
  // Print a message to the LCD.
  lcd.backlight();
  lcd.setCursor(3,0);
  lcd.print("Hello, world!");
  lcd.setCursor(2,1);
  lcd.print("Hello,keyestudio!");
   lcd.setCursor(0,2);
  lcd.print("Arduino LCM IIC 2004");
   lcd.setCursor(2,3);
  lcd.print("Power By Ec-yuan!");
}
void loop()
{
}
Note: To ensure that this module will work properly, these two head files, namely Wire and LiquidCrystal_I2C, must be added into our library before code compiling.
After uploading the code, you should see the LCD screen pop up the characters "Hello, world!" and more.
Resources
- Get the Libraries and Code
https://fs.keyestudio.com/KS0062
- Video
http://video.keyestudio.com/ks0062/

