Read me first: Difference between revisions
Keyestudio (talk | contribs) No edit summary |
Keyestudio (talk | contribs) |
||
| Line 6: | Line 6: | ||
== '''How to use Arduino''' == | == '''How to use Arduino''' == | ||
====Installing Arduino IDE==== | |||
When you get the REV3 development board, first you should install the software and driver of Arduino. You can see all the Arduino software versions from the link below: <br> | |||
https://www.arduino.cc/en/Main/OldSoftwareReleases#1.5.x <br> | |||
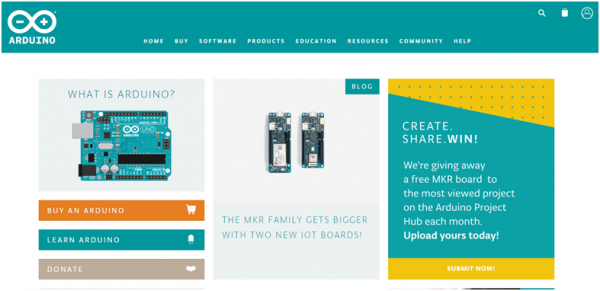
Or you can browse the ARDUINO website at this link, https://www.arduino.cc, pop up the following interface. | |||
<br>[[Image:KS0313-1.png|600px|frameless]]<br> | |||
<br> | |||
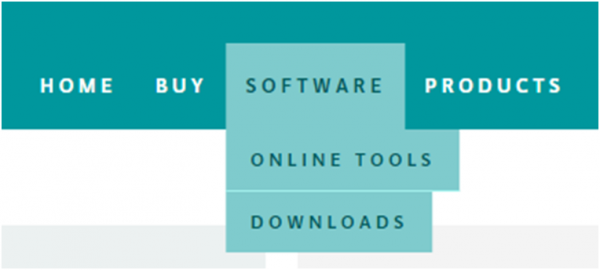
Then click the SOFTWARE on the browse bar, you will have two options ONLINE TOOLS and DOWNLOADS. | |||
<br>[[Image:KS0313-2.png|600px|frameless]]<br> | |||
<br> | |||
Click DOWNLOADS, it will appear the latest software version of ARDUINO 1.8.5 shown as below. | |||
<br>[[Image:KS0313-3.png|600px|frameless]]<br> | |||
<br> | |||
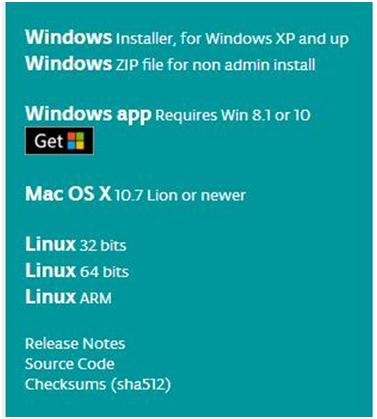
In this software page, on the right side you can see the version of development software for different operating systems. So ARDUINO has a rather powerful compatibility. You should download the software that is compatible with the operating system of your computer.<br> | |||
In our project, we will take WINDOWS system as an example here. There are also two options under Windows system, one is installed version, the other is non-installed version. | |||
For simple installed version, first click Windows Installer, you will get the following page.<br> | |||
<br>[[Image:KS0313-4.png|600px|frameless]]<br> | |||
<br>[[Image:KS0313-5.png|600px|frameless]]<br> | |||
<br> | |||
This way you just need to click JUST DOWNLOAD, then click the downloaded file to install it. <br> | |||
For non-installed version, first click Windows ZIP file, you will also get the pop-up interface as the above figure.<br> | |||
Click JUST DOWNLOAD, and when the ZIP file is downloaded well to your computer, you can directly unzip the file and then click the icon of ARDUINO program to start it. <br> | |||
<br> | |||
When you get the REV4 development board, first you should install the Arduino software and driver. <br> | |||
We usually use the Windows software Arduino 1.5.6 version. You can download it from the link below: <br> | |||
https://www.arduino.cc/en/Main/OldSoftwareReleases#1.5.x<br> | |||
Or you can browse the ARDUINO website to download the latest version from this link, https://www.arduino.cc, pop up the following interface. | |||
<br>[[Image:KS0313-1.png|600px|frameless]]<br> | |||
Then click the '''SOFTWARE''' on the browse bar, you will have two options ONLINE TOOLS and DOWNLOADS. | |||
<br>[[Image:KS0313-2.png|600px|frameless]]<br> | |||
Click '''DOWNLOADS''', it will appear the latest software version of ARDUINO 1.8.5 shown as below. | |||
<br>[[Image:KS0313-3.png|600px|frameless]]<br> | |||
In this software page, on the right side you can see the version of development software for different operating systems. ARDUINO has a powerful compatibility. You should download the software that is compatible with the operating system of your computer.<br> | |||
We will take '''WINDOWS system''' as an example here. There are also two options under Windows system, one is installed version, the other is non-installed version. | |||
For simple installed version, first click '''Windows Installer''', you will get the following page.<br> | |||
<br>[[Image:KS0313-4.png|600px|frameless]]<br> | |||
<br>[[Image:KS0313-5.png|600px|frameless]]<br> | |||
This way you just need to click JUST DOWNLOAD, then click the downloaded file to install it. <br> | |||
For non-installed version, first click Windows ZIP file, you will also get the pop-up interface as the above figure.<br> | |||
Click JUST DOWNLOAD, and when the ZIP file is downloaded well to your computer, you can directly unzip the file and click the icon of ARDUINO software to start it. <br> | |||
<br> | |||
====Installing Driver==== | |||
Next, we will introduce the driver installation of REV4 development board. The driver installation may have slight differences in different computer systems. So in the following let’s move on to the driver installation in the WIN 7 system. <br> | |||
The Arduino folder contains both the Arduino program itself and the drivers that allow the Arduino to be connected to your computer by a USB cable. Before we launch the Arduino software, you are going to install the USB drivers.<br> | |||
<br>[[Image:KS0001-1.jpg|600px|frameless]]<br> | |||
Plug one end of your USB cable into the Arduino and the other into a USB socket on your computer. | |||
When you connect REV4 board to your computer at the first time, right click the icon of your “Computer” —>for “Properties”—> click the “Device manager”, under “Other Devices”, you should see an icon for “Unknown device” with a little yellow warning triangle next to it. This is your Arduino.<br> | |||
<br>[[Image:Driver 1.png|600px|frameless]]<br> | |||
Then right-click on the device and select the top menu option (Update Driver Software...) shown as the figure below.. | |||
<br>[[Image:Driver 2.png|600px|frameless]]<br> | |||
It will then be prompted to either “Search Automatically for updated driversoftware” or “Browse my computer for driver software”. Shown as below. In this page, select “Browse my computer for driver software”. | |||
<br>[[Image:Driver 3.png|600px|frameless]]<br> | |||
After that, select the option to browseand navigate to the “drivers” folder of Arduino installation. | |||
<br>[[Image:KS0286-4.png|800px|frameless]]<br> | |||
Click “Next” and you may get a security warning, if so, allow the software to be installed. Shown as below. | |||
<br>[[Image:Driver 5.png|600px|frameless]]<br> | |||
Once the software has been installed, you will get a confirmation message. Installation completed, click “Close”. | |||
<br>[[Image:Driver 6.png|600px|frameless]]<br> | |||
Up to now, the driver is installed well. Then you can right click “Computer” —>“Properties”—>“Device manager”, you should see the device as the figure shown below. | |||
<br>[[Image:Driver 7.png|600px|frameless]]<br> | |||
<br> | |||
'''Introduction for Arduino IDE Toolbar''' | |||
Double-click the icon of Arduino software downloaded well, you will get the interface shown below. | |||
<br>[[Image:Ks0313图片1.png|600px|frameless]]<br> | |||
('''Note:''' if the Arduino software loads in the wrong language, you can change it in the preferences dialog. See [https://www.arduino.cc/en/Guide/Environment-Languages the environment page] for details.) | |||
<br>[[Image:717.png|600px|frameless]]<br> | |||
<br> | |||
The functions of each button on the Toolbar are listed below: | |||
<br>[[Image:IDE.png|600px|frameless]]<br> | |||
{| class="wikitable" cellpadding="1" cellspacing="1" | |||
|- | |||
!scope="row" |[[Image:IDE 1.png|600px|frameless]] Verify/Compile | |||
| Check the code for errors | |||
|- | |||
!scope="row" |[[Image:IDE 2.png|600px|frameless]] Upload | |||
| Upload the current Sketch to the Arduino | |||
|- | |||
!scope="row" |[[Image:IDE 3.png|600px|frameless]] New | |||
| Create a new blank Sketch | |||
|- | |||
! scope="row" |[[Image:IDE 4.png|600px|frameless]] Open | |||
| Show a list of Sketches | |||
|- | |||
! scope="row" |[[Image:IDE 5.png|600px|frameless]] Save | |||
| Save the current Sketch | |||
|- | |||
! scope="row" |[[Image:IDE 6.png|600px|frameless]] Serial Monitor | |||
| Display the serial data being sent from the Arduino | |||
|- | |||
|} | |||
<br> | |||
Latest revision as of 15:54, 28 April 2020
How to use Mixly
https://1drv.ms/u/s!ArhgRvK6-RyJhWdwHnBd8c8qqZyQ?e=7WHMJp
How to use Arduino
Installing Arduino IDE
When you get the REV3 development board, first you should install the software and driver of Arduino. You can see all the Arduino software versions from the link below:
https://www.arduino.cc/en/Main/OldSoftwareReleases#1.5.x
Or you can browse the ARDUINO website at this link, https://www.arduino.cc, pop up the following interface.
Then click the SOFTWARE on the browse bar, you will have two options ONLINE TOOLS and DOWNLOADS.
Click DOWNLOADS, it will appear the latest software version of ARDUINO 1.8.5 shown as below.
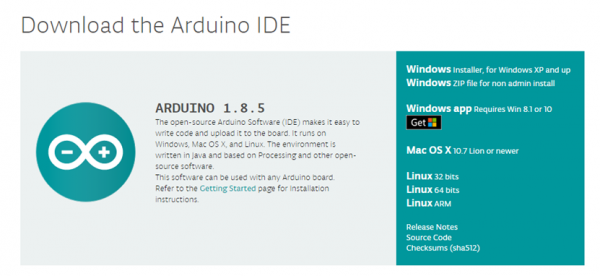
In this software page, on the right side you can see the version of development software for different operating systems. So ARDUINO has a rather powerful compatibility. You should download the software that is compatible with the operating system of your computer.
In our project, we will take WINDOWS system as an example here. There are also two options under Windows system, one is installed version, the other is non-installed version.
For simple installed version, first click Windows Installer, you will get the following page.

This way you just need to click JUST DOWNLOAD, then click the downloaded file to install it.
For non-installed version, first click Windows ZIP file, you will also get the pop-up interface as the above figure.
Click JUST DOWNLOAD, and when the ZIP file is downloaded well to your computer, you can directly unzip the file and then click the icon of ARDUINO program to start it.
When you get the REV4 development board, first you should install the Arduino software and driver.
We usually use the Windows software Arduino 1.5.6 version. You can download it from the link below:
https://www.arduino.cc/en/Main/OldSoftwareReleases#1.5.x
Or you can browse the ARDUINO website to download the latest version from this link, https://www.arduino.cc, pop up the following interface.

Then click the SOFTWARE on the browse bar, you will have two options ONLINE TOOLS and DOWNLOADS.

Click DOWNLOADS, it will appear the latest software version of ARDUINO 1.8.5 shown as below.

In this software page, on the right side you can see the version of development software for different operating systems. ARDUINO has a powerful compatibility. You should download the software that is compatible with the operating system of your computer.
We will take WINDOWS system as an example here. There are also two options under Windows system, one is installed version, the other is non-installed version.
For simple installed version, first click Windows Installer, you will get the following page.


This way you just need to click JUST DOWNLOAD, then click the downloaded file to install it.
For non-installed version, first click Windows ZIP file, you will also get the pop-up interface as the above figure.
Click JUST DOWNLOAD, and when the ZIP file is downloaded well to your computer, you can directly unzip the file and click the icon of ARDUINO software to start it.
Installing Driver
Next, we will introduce the driver installation of REV4 development board. The driver installation may have slight differences in different computer systems. So in the following let’s move on to the driver installation in the WIN 7 system.
The Arduino folder contains both the Arduino program itself and the drivers that allow the Arduino to be connected to your computer by a USB cable. Before we launch the Arduino software, you are going to install the USB drivers.
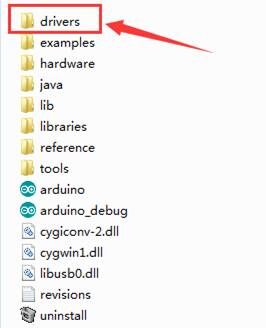
Plug one end of your USB cable into the Arduino and the other into a USB socket on your computer.
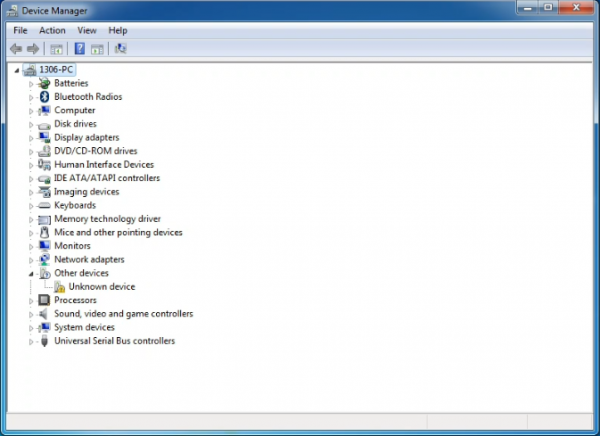
When you connect REV4 board to your computer at the first time, right click the icon of your “Computer” —>for “Properties”—> click the “Device manager”, under “Other Devices”, you should see an icon for “Unknown device” with a little yellow warning triangle next to it. This is your Arduino.
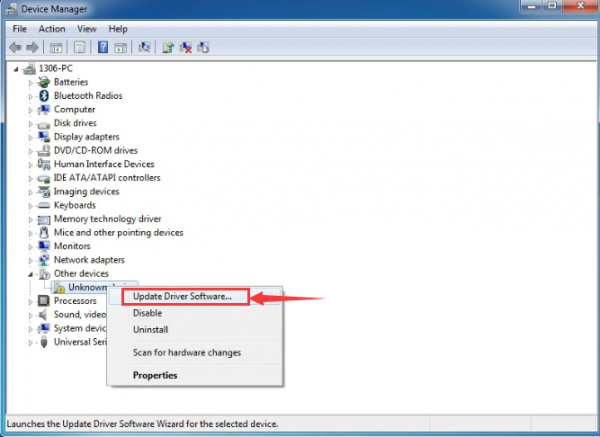
Then right-click on the device and select the top menu option (Update Driver Software...) shown as the figure below..
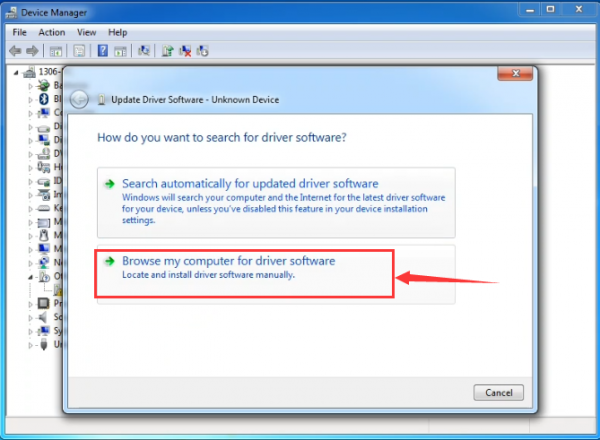
It will then be prompted to either “Search Automatically for updated driversoftware” or “Browse my computer for driver software”. Shown as below. In this page, select “Browse my computer for driver software”.
After that, select the option to browseand navigate to the “drivers” folder of Arduino installation.
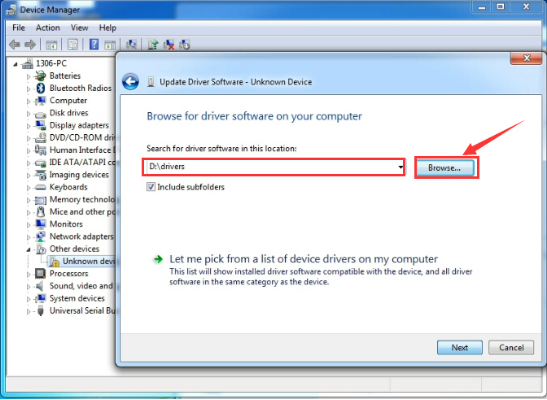
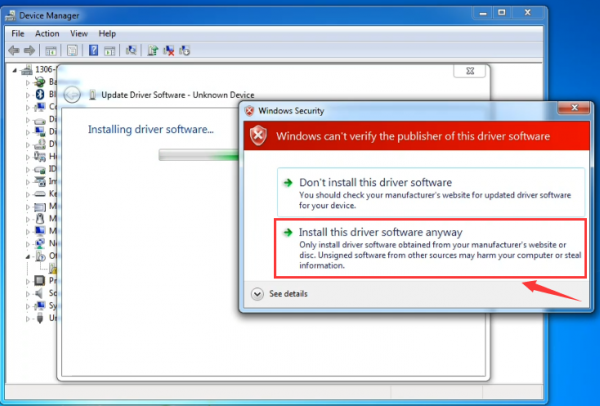
Click “Next” and you may get a security warning, if so, allow the software to be installed. Shown as below.
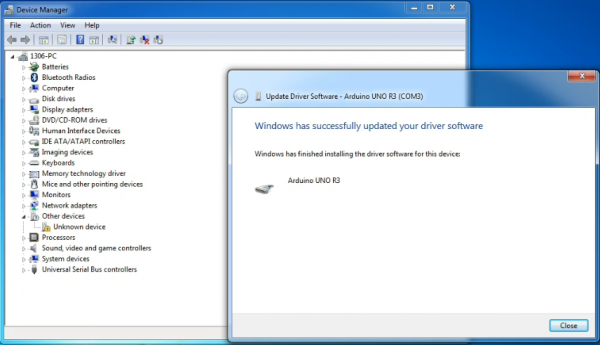
Once the software has been installed, you will get a confirmation message. Installation completed, click “Close”.
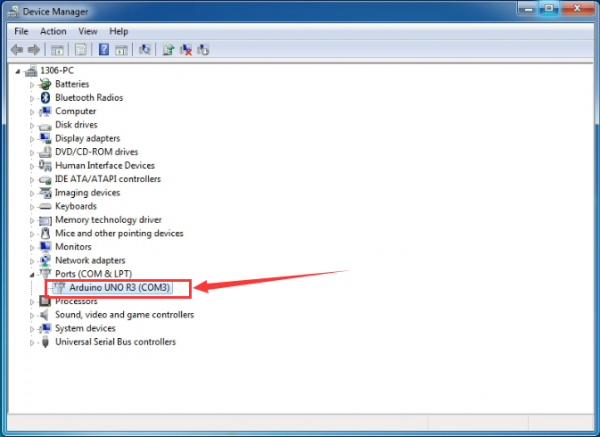
Up to now, the driver is installed well. Then you can right click “Computer” —>“Properties”—>“Device manager”, you should see the device as the figure shown below.
Introduction for Arduino IDE Toolbar
Double-click the icon of Arduino software downloaded well, you will get the interface shown below.
(Note: if the Arduino software loads in the wrong language, you can change it in the preferences dialog. See the environment page for details.)
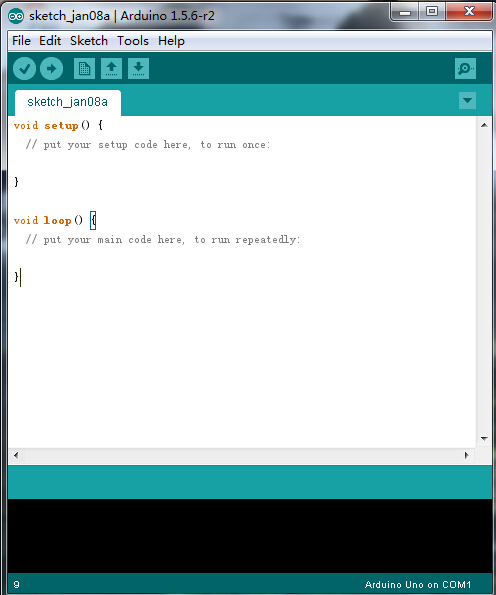
The functions of each button on the Toolbar are listed below:
![]()