Ks0036 keyestudio Flame Sensor: Difference between revisions
Jump to navigation
Jump to search
Keyestudio (talk | contribs) No edit summary |
Keyestudio (talk | contribs) |
||
| (7 intermediate revisions by the same user not shown) | |||
| Line 1: | Line 1: | ||
<br> | |||
==Introduction== | ==Introduction== | ||
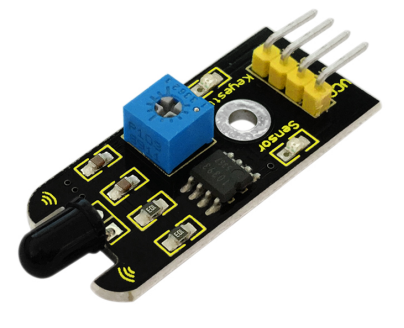
This flame sensor can be used to detect fire or other lights | This flame sensor can be used to detect fire or other lights with wavelength stands at 760nm ~ 1100nm. <br> | ||
<br>[[File: | In the fire-fighting robot game, the flame plays an important role in the probe, which can be used as the robot's eyes to find fire source. | ||
<br>[[File:Ks0036.png|500px|frameless|thumb]]<br> | |||
<br> | |||
==Specification== | ==Specification== | ||
*Supply Voltage: 3.3V to 5V | *Supply Voltage: 3.3V to 5V | ||
*Detection Range: 20cm (4.8V) ~ 100cm (1V) | *Detection Range: 20cm (4.8V) ~ 100cm (1V) | ||
*Rang of Spectral Bandwidth: 760nm to 1100nm | *Rang of Spectral Bandwidth: 760nm to 1100nm | ||
*Operating Temperature: - | *Operating Temperature: -25℃ to 85℃ | ||
*Interface: Digital | *Interface: Digital | ||
<br> | |||
==Connection Diagram == | ==Connection Diagram == | ||
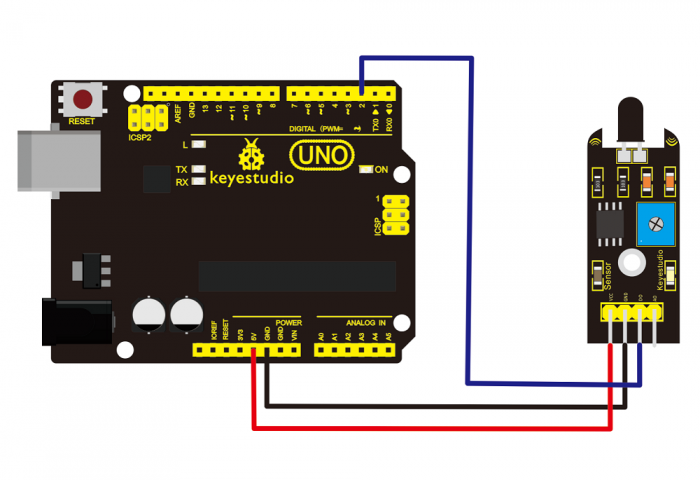
Connect the D0 pin to digital 2, GND pin to GND port, VCC pin to 5V port. | |||
<br>[[File:Ks0036-1.png|700px|frameless|thumb]]<br> | |||
<br> | <br> | ||
==Sample Code == | ==Sample Code == | ||
<pre> | <pre> | ||
| Line 41: | Line 43: | ||
// turn LED off: | // turn LED off: | ||
digitalWrite(ledPin, LOW); | digitalWrite(ledPin, LOW); | ||
}</pre> | } | ||
</pre> | |||
<br> | |||
== Result == | |||
<br>[[File:KS0349 16-2.png|800px|frameless|thumb]]<br> | |||
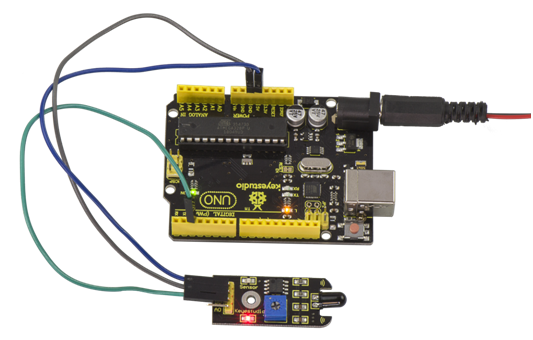
Done wiring and powered up, upload well the code to the board.<br> | |||
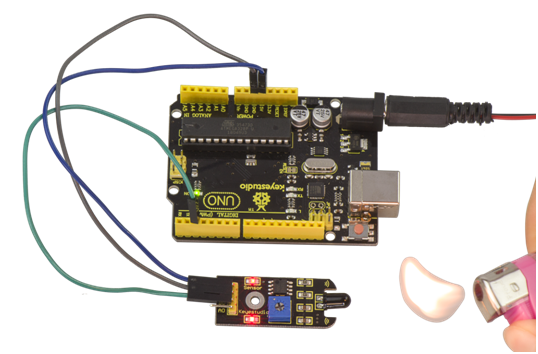
Then if you put a lighter close to the sensor, when the sensor detects the flame, another led on the sensor is turned on.<br> | |||
<br>[[File:KS0349 16-3.png|800px|frameless|thumb]]<br> | |||
<br> | |||
==Resources == | ==Resources == | ||
'''Video''' | * '''Video'''<br> | ||
http://video.keyestudio.com/ks0036/ | |||
* '''PDF and Code'''<br> | |||
https://fs.keyestudio.com/KS0036 | |||
<br> | |||
==Buy from == | |||
*[https://www.keyestudio.com/free-shipping-keyestudio-flame-fire-detection-sensor-module-for-arduino-p0148.html '''Official Website'''] | |||
*[https://www.aliexpress.com/store/product/Free-shipping-Flame-sensor-for-arduino/1452162_2051417128.html?spm=2114.12010612.8148356.45.29bd7498iQQUVn '''Shop on aliexpress'''] | |||
[[Category: Sensor]] | [[Category: Sensor]] | ||
Latest revision as of 14:55, 7 January 2021
Introduction
This flame sensor can be used to detect fire or other lights with wavelength stands at 760nm ~ 1100nm.
In the fire-fighting robot game, the flame plays an important role in the probe, which can be used as the robot's eyes to find fire source.

Specification
- Supply Voltage: 3.3V to 5V
- Detection Range: 20cm (4.8V) ~ 100cm (1V)
- Rang of Spectral Bandwidth: 760nm to 1100nm
- Operating Temperature: -25℃ to 85℃
- Interface: Digital
Connection Diagram
Connect the D0 pin to digital 2, GND pin to GND port, VCC pin to 5V port.

Sample Code
const int flamePin = 2;     // the number of the flame pin
const int ledPin =  13;      // the number of the LED pin
// variables will change:
int State = 0;         // variable for reading status
void setup() {
  // initialize the LED pin as an output:
  pinMode(ledPin, OUTPUT);
  // initialize the pushbutton pin as an input:
  pinMode(flamePin, INPUT);
}
void loop(){
  // read the state of the value:
State = digitalRead(flamePin);
  if (State == HIGH) {
    // turn LED on:
    digitalWrite(ledPin, HIGH);
  }
  else {
    // turn LED off:
    digitalWrite(ledPin, LOW);
}
Result

Done wiring and powered up, upload well the code to the board.
Then if you put a lighter close to the sensor, when the sensor detects the flame, another led on the sensor is turned on.

Resources
- Video
http://video.keyestudio.com/ks0036/
- PDF and Code
https://fs.keyestudio.com/KS0036