KS0509 Keyestudio Mega 2560 Smart Development Board: Difference between revisions
Keyestudio (talk | contribs) |
Keyestudio (talk | contribs) No edit summary |
||
| Line 235: | Line 235: | ||
<br>analogWrite(PIN,0-255); //The corresponding pins output PWM signals | <br>analogWrite(PIN,0-255); //The corresponding pins output PWM signals | ||
<br>Notes: PIN stands for the digital ports or PWM ports of this MEGA 2560 Smart development board.<br> | <br>Notes: PIN stands for the digital ports or PWM ports of this MEGA 2560 Smart development board.<br> | ||
[[Category: Arduino Board]] | |||
Latest revision as of 15:20, 28 December 2021
Description
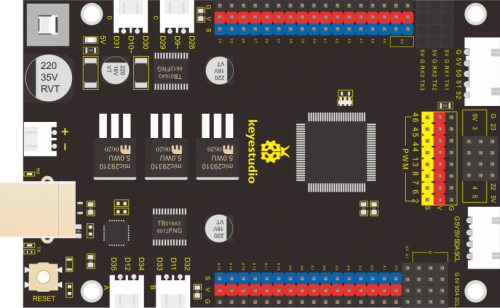
The core processor of this MEGA 2560 Smart development board is TMEGA2560-16AU which is compatible with the Arduino MEGA 2650 development board. Integrated with 2 TB6612 motor driving chips, this processor can be served as the solution to drive the 4WD Smart car .
In addition, the output power supply of this board can reach the maximum 5V 3A, in 3 channels (good heat dissipation).Through 2.54mm pins, most of the GPIO ports are extend out to facilitate external connection of sensors/ modules.
Specifications
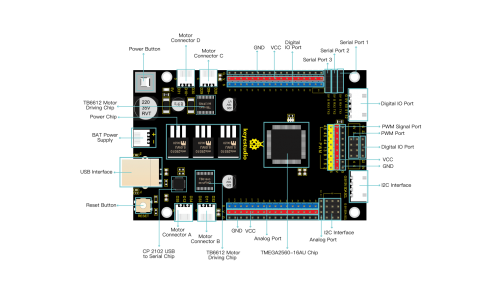
The core processor of this development board is ATMEGA2560-16AU, together with the chip CP 2102 equipped it can serve as a UART - to - USB converter.
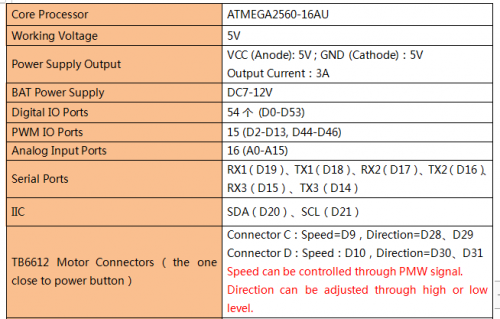
It boasts 54 digital I/O ports (12 designed for motors) of which 15 can be used an PWM output (4 for motors), 16 analog input ports, 4-channel serial communication ports (port 0 is for program burning), 16MHz quartz crystal, a USB interface , a power jack, a ICSP plug and a reset button. It supports all functions as a microcontroller. And connecting it to a computer with a USB cable, and powering it up through the external power (BAT power supply: DC 7-12V) are all needed to start using it.
Instructions
Download Arduino IDE
When getting this control board, we need to install Arduino IDE
Enter the website https://www.arduino.cc/, click ![]() and
and ![]()
There are many versions of Arduino IDE suitable for Windows,Mac and Linux systems. You are free to select the version fit for you computer. Here we intend to take the Windows version as an example for installation instructions. As is shown in the below picture, there are two kind of loading for Windows version too. The Windows Win 7 and newer needs installing manually. Yet , the Windows ZIP file can be directly downloaded and installed.
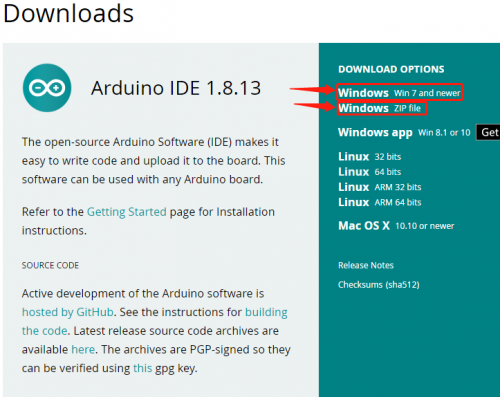
They all operate well. Just choose the one you like to download to your computer.

Just click JUST DOWNLOAD can do the trick.You can also help its development with a donation.
Install Driver for Windows System
Let’s install the driver of MEGA 2560 Smart Development Board. The USB-TTL chip of 2560 Smart board adopts CP2102 serial chip.
Its driver files are included in the Arduino 1.8 version and above.
When the board is attached to the computer, the computer can recognize the driver of CP2102 automatically.
If it is installed unsuccessfully, you need to install it manually.
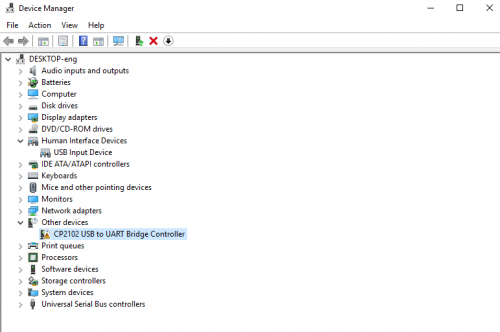
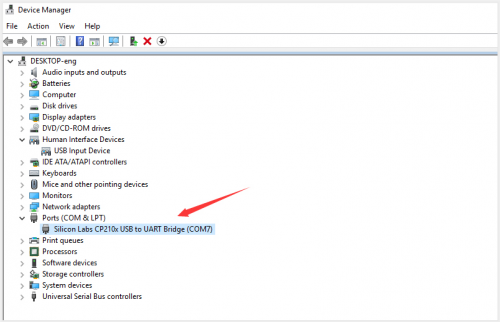
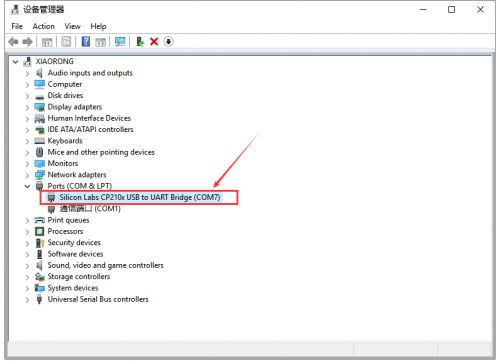
Click Computer----- Properties----- Device Manager, as shown below:
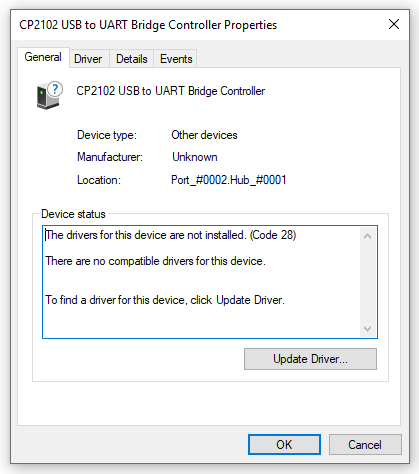
There is a yellow exclamation mark on the page, which implies the installation of the driver of CP2102 fails. Double-click to update the driver.
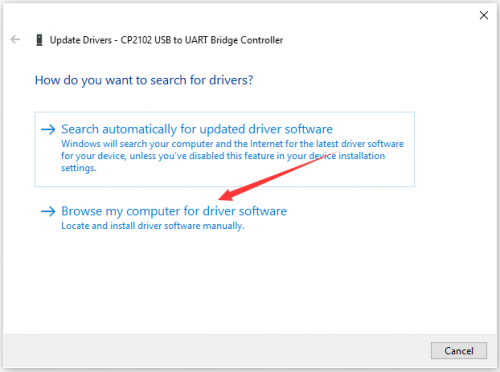
Click “OK” to enter the following page and click “browse my computer for driver software”.
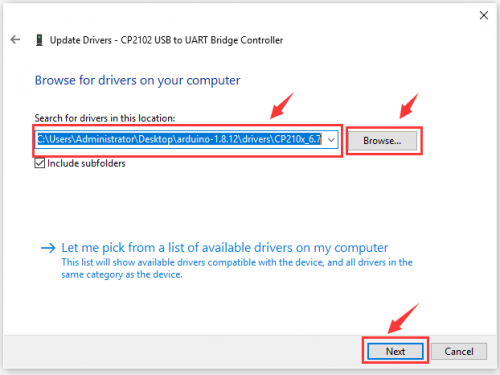
There is a DRIVERS folder in Arduino software installed package. Open this driver folder and check the driver of CP210X series chips.
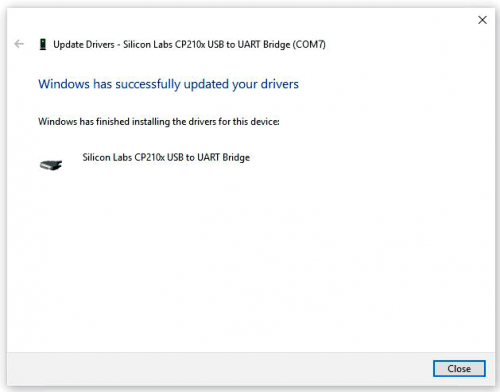
Select this file and then click OK to install the driver.
When opening the device manager, we will find the yellow exclamation mark disappear. The driver of CP2102 is installed successfully.
Install Driver for MAC System
Click the following link for installation:
https://wiki.keyestudio.com/How_to_Install_the_Driver_of_CP2102_on_MAC_System
Arduino IDE Setting
To avoid the errors when uploading the program to the board, you need to select the correct Arduino board that matches the board connected to your computer.
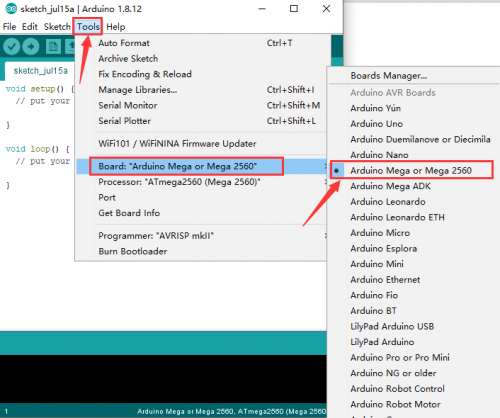
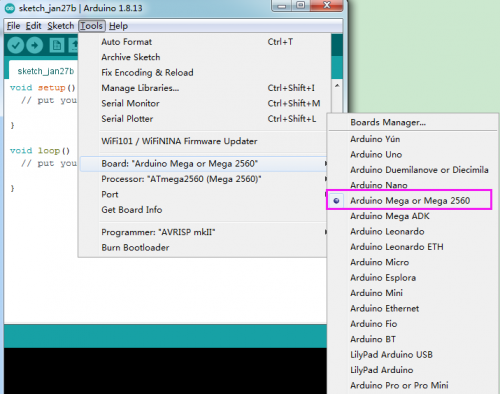
Then come back to the Arduino software, you should click Tools→Board, select the board. (as shown below)
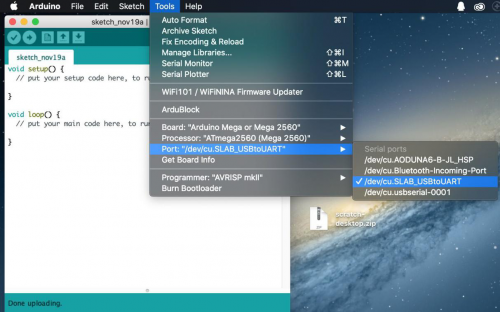
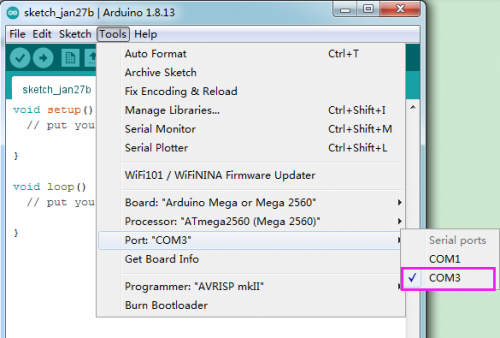
Then select the correct COM port (you can see the corresponding COM port after the driver is successfully installed)
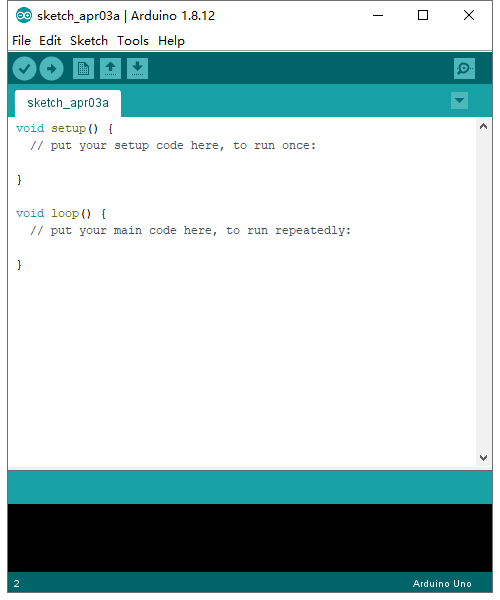
Before uploading the program to the board, let’s demonstrate the function of each symbol in the Arduino IDE toolbar.
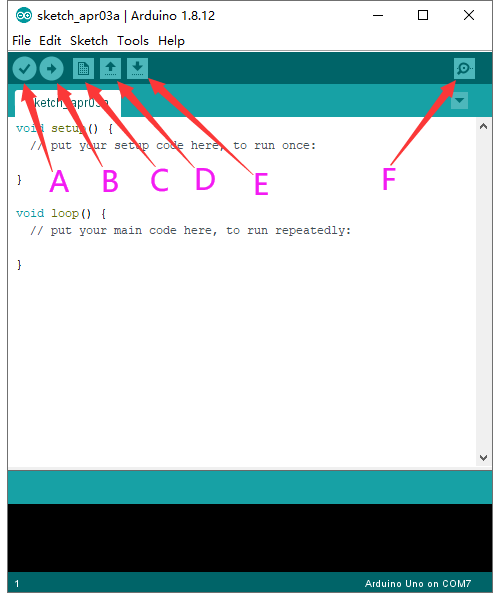
A- Used to verify whether there is any compiling mistakes or not.
B- Used to upload the sketch to your Arduino board.
C- Used to create shortcut window of a new sketch.
D- Used to directly open an example sketch.
E- Used to save the sketch.
F- Used to send the serial data received from board to the serial monitor.
Please note that the method to Arduino IDE setting for Mac system and Windows system is almost the same except from COM port, as shown below.
Enjoy Your First Program
We have learned how to download the Arduino IDE and the driver. Now let’s begin the first program “Hello World!”
The test code is as follows:
void setup() {
  // initialize serial communication at 9600 bits per second:
  Serial.begin(9600);
}
void loop() {
  // print out "Hello world!"
  Serial.println("Hello world!");
  delay(1000);// delay 1 second
}
Open Arduino IDE to change the code to make Keyestudio MEGA 2560 Smart development board to show “Hello World!” on the serial port monitor every second.
Set the development board manager as shown below:
Set COM port as follows:
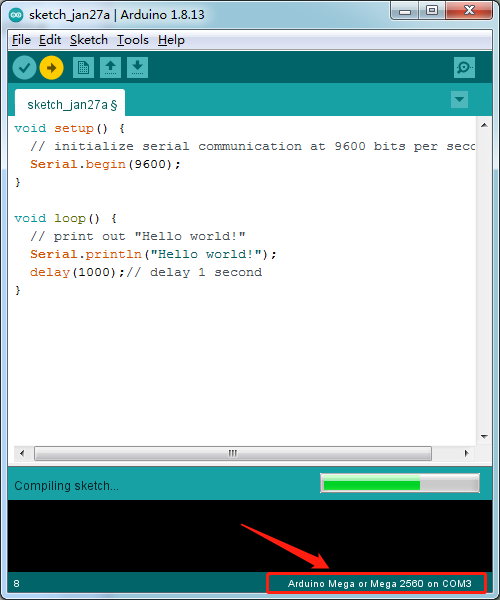
Click ![]() to start compiling the program, check errors.
to start compiling the program, check errors.
The setting of the development board appears in the lower right and it is consistent with that on Device Manager.
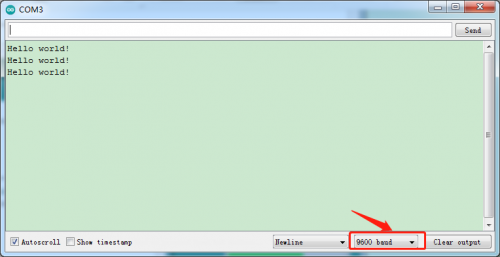
When upload successfully, set baud rate to 9600 and the serial port monitor output “Hello World! “ as shown in the picture below:
Congratulations! You have finished your first program!
Driving Motors
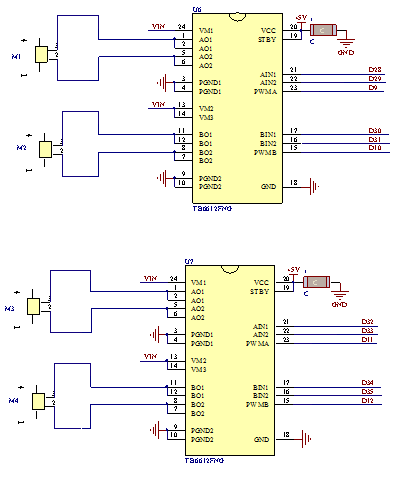
The MEGA 2560 Smart development board, integrated with 2 TB6612 chips, can independently control 4-channel DC0-12V motors and the average driving current can reach 1.2A.
The IO ports used for driving motors is as follows:
Pinout:
Principle
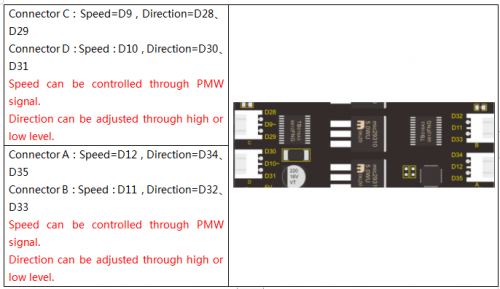
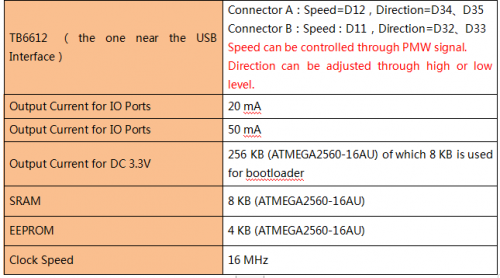
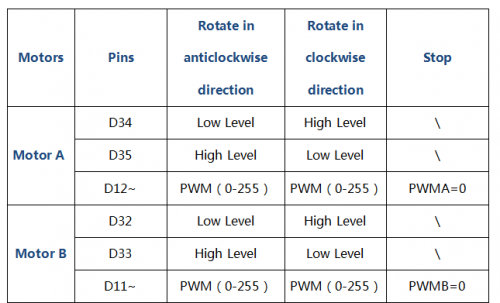
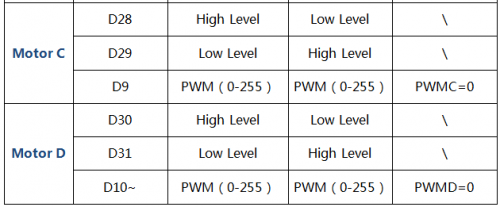
In final analysis, the direction of motor A(M4) is controlled by D35 and D34 and its speed is determined by D12; the direction of motor B(M3) is controlled by D33 and D33 and its speed is determined by D11; the direction of motor C(M1) is controlled by D29 and D28 and its speed is determined by D9; the direction of motor D(M2) is controlled by D31 and D30 and its speed is determined by D10;
More details are shown in the below table:
(Please notice that the range of PWM signal is from 0 to 255 and the larger the PMW, the bigger the speed of the motor )
Connection Diagram:
(take TT motor as an example)
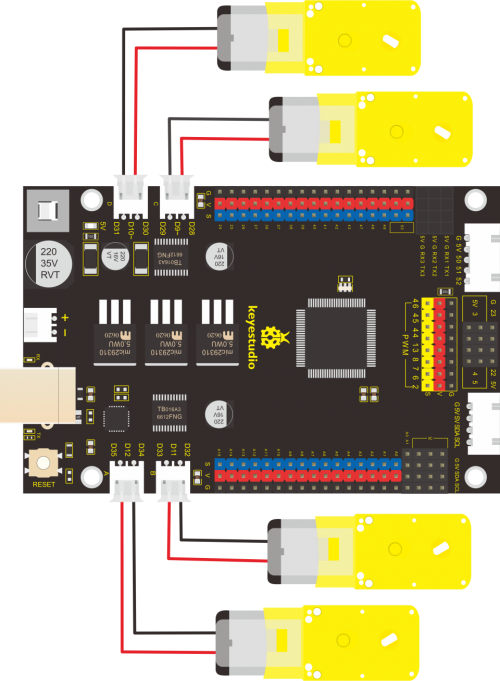
Test Code:
// Define the pin of Motor A
const int A_D1 = 34;
const int A_D2 = 35;
const int A_S  = 12;
//Define the pin of Motor B
const int B_D1 = 32;
const int B_D2 = 33;
const int B_S  = 11;
//Define the pin of Motor C
const int C_D1 = 28;
const int C_D2 = 29;
const int C_S  = 9;
//Define the pin of Motor D
const int D_D1 = 30;
const int D_D2 = 31;
const int D_S  = 10;
void setup() {
  //All motor interfaces are configured in output mode

  pinMode(A_D1, OUTPUT);
  pinMode(A_D2, OUTPUT);
  pinMode(B_D1, OUTPUT);
  pinMode(B_D2, OUTPUT);
  pinMode(C_D1, OUTPUT);
  pinMode(C_D2, OUTPUT);
  pinMode(D_D1, OUTPUT);
  pinMode(D_D2, OUTPUT);
}
void loop () {
  //Motor A rotate in clockwise direction
  digitalWrite(A_D1, HIGH);
  digitalWrite(A_D2, LOW);
  analogWrite(A_S, 100);
  //Motor B rotate in clockwise direction
  digitalWrite(B_D1, HIGH);
  digitalWrite(B_D2, LOW);
  analogWrite(B_S, 100);
  //Motor C rotate in clockwise direction
  digitalWrite(C_D1, LOW);
  digitalWrite(C_D2, HIGH);
  analogWrite(C_S, 100);
  //Motor D rotate in clockwise direction
  digitalWrite(D_D1, LOW);
  digitalWrite(D_D2, HIGH);
  analogWrite(D_S, 100);
  delay(2000);  //Delay in 2s

  //Motor A rotate in anticlockwise direction
  digitalWrite(A_D1, LOW);
  digitalWrite(A_D2, HIGH);
  analogWrite(A_S, 100);
  //Motor B rotate in anticlockwise direction
  digitalWrite(B_D1, LOW);
  digitalWrite(B_D2, HIGH);
  analogWrite(B_S, 100);
  //Motor C rotate in anticlockwise direction
  digitalWrite(C_D1, HIGH);
  digitalWrite(C_D2, LOW);
  analogWrite(C_S, 100);
  //Motor D rotate in anticlockwise direction
  digitalWrite(D_D1, HIGH);
  digitalWrite(D_D2, LOW);
  analogWrite(D_S, 100);
  delay(2000);  //Delay in 2s

  //All four motors stop
  analogWrite(A_S, 0);
  analogWrite(B_S, 0);
  analogWrite(C_S, 0);
  analogWrite(D_S, 0);
  delay(1000);  //Delay in 2s
}
Test Results:
Uploading the test code and powering the board up, the motors rotate in clockwise direction at 2s and then in anticlockwise direction at 2s and repeat the sequence.
Code Explanation:
digitalWrite(PIN,HIGH/LOW); //The corresponding pins output High or Low Levels
analogWrite(PIN,0-255); //The corresponding pins output PWM signals
Notes: PIN stands for the digital ports or PWM ports of this MEGA 2560 Smart development board.

