Ks0138 keyestudio EASY plug I2C 2004 LCD: Difference between revisions
Keyestudio (talk | contribs) |
Keyestudio (talk | contribs) No edit summary |
||
| Line 1: | Line 1: | ||
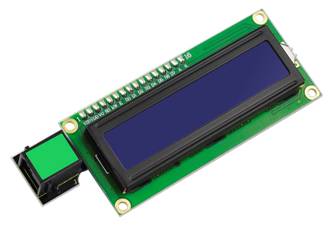
[[image:ks0137图.jpg|thumb|600px|right|Keyestudio EASY plug 2004 LCD Module]] | |||
<br> | |||
==Introduction== | ==Introduction== | ||
An LCD, or liquid crystal display, is a simple screen that can display commands, bits of information, or readings from your sensor - all depending on how you program your board.<br> | |||
Note: this module | This module is a 20 character by 4 line LCD display with Blue background and White backlight. <br> | ||
The original 2004 LCD needs 7 IO ports to be up and running, ours is built with Arduino IIC/I2C interface, saving you 5 IO ports. <br> | |||
This LCD is ready-to-use because it is compatible with the Arduino Liquid Crystal Library. It comes with EASY Plug connector, you can use one line for simple connection.<br> | |||
<span style="color: red">'''Note: ''' this module should be used together with EASY plug control board. | |||
<br> | |||
== | ==Specifications== | ||
* Interface: I2C | |||
* I2C address: 0x27 | |||
* White text on blue background | |||
* 20 characters wide, 4 rows | |||
* Operating voltage: +5V | |||
* Contrast control: through potentiometer | |||
* Compatible with Arduino LiquidCrystal Library | |||
<br> | |||
==Technical Details== | |||
* Dimensions: 114mm*60mm*22mm | |||
* Weight: 77.7g | |||
<br> | |||
==Connect It Up == | |||
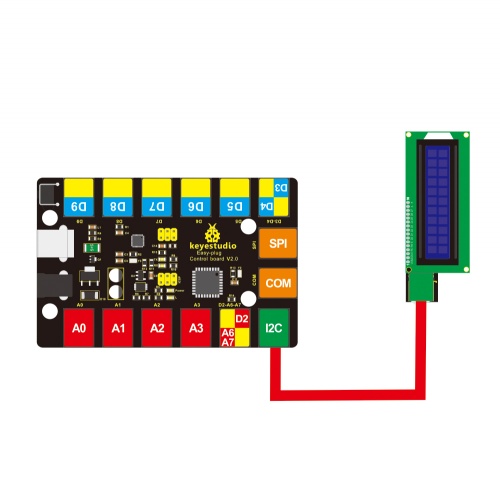
Connect the EASY Plug 2004 LCD to control board using an RJ11 cable. Then connect the control board to your PC with a USB cable. | |||
<br>[[File:ks0137.jpg|500px|frameless|thumb]]<br> | |||
<br> | |||
==Upload the Code== | |||
Copy and paste below code to [http://wiki.keyestudio.com/index.php/How_to_Download_Arduino_IDE Arduino IDE] and upload.<br> | |||
<span style="color: red">'''Code to Note: ''' </span> <br> Before compile the code, do remember to put the libraries needed inside the libraries folder of Arduino IDE directory. Or else, it will fail to verify. <br> | |||
Download all the libraries: https://drive.google.com/open?id=1KkjnoR3Y_eRM-LMHEIrMzQabLabbSQpU | |||
<pre> | <pre> | ||
//Compatible with the Arduino IDE 1.0 | //Compatible with the Arduino IDE 1.0 | ||
//Library version:1.1 | //Library version:1.1 | ||
| Line 31: | Line 43: | ||
LiquidCrystal_I2C lcd(0x27,20,4); // set the LCD address to 0x27 for a 16 chars and 2 line display | LiquidCrystal_I2C lcd(0x27,20,4); // set the LCD address to 0x27 for a 16 chars and 2 line display | ||
void setup() | void setup() | ||
| Line 42: | Line 53: | ||
lcd.print("Hello, world!"); | lcd.print("Hello, world!"); | ||
lcd.setCursor(2,1); | lcd.setCursor(2,1); | ||
lcd.print(" | lcd.print("Hello,keyestudio!"); | ||
lcd.setCursor(0,2); | lcd.setCursor(0,2); | ||
lcd.print("Arduino | lcd.print("Arduino LCD IIC 2004"); | ||
lcd.setCursor(2,3); | lcd.setCursor(2,3); | ||
lcd.print("Power By Ec-yuan!"); | lcd.print("Power By Ec-yuan!"); | ||
| Line 53: | Line 64: | ||
</pre> | </pre> | ||
<br> | |||
==What You Should See== | |||
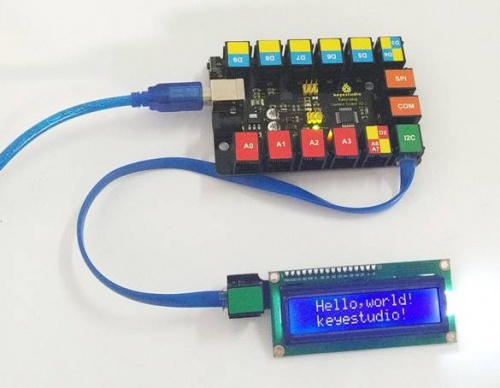
Initially, you should see the words “hello, word!” and “keyestudio!” pop up on your LCD.<br> | |||
<br>[[File: | Remember you can adjust the contrast using the potentiometer on the module back if you can’t make out the words clearly. | ||
<br>[[File:ks0137 Result.jpg|500px|frameless|thumb]]<br> | |||
https://drive.google.com/open?id= | <br> | ||
==Resources == | |||
'''Download the PDF:'''<br> | |||
https://drive.google.com/open?id=1JS4n3MTCjJXYyMunvqFNCQRlUKGfA2ib | |||
<br> | |||
'''Download the libraries:'''<br> | |||
https://drive.google.com/open?id=105RNjo0aDBthorceoKgqaJ251D3tbWlc | |||
<br> | |||
http://www.keyestudio.com/ | ==Buy from == | ||
*'''Official Website:''' http://www.keyestudio.com/ks0137.html | |||
*[https://www.aliexpress.com/store/product/New-Keyestudio-EASY-plug-IIC-I2C-1602-LCD-Module-for-Arduino/1452162_32645935653.html?spm=2114.12010612.8148356.16.627466e6AdFkCx Shop on aliexpress ] | |||
[[ | [[category:EASY Plug]] | ||
Revision as of 11:01, 28 November 2018
Introduction
An LCD, or liquid crystal display, is a simple screen that can display commands, bits of information, or readings from your sensor - all depending on how you program your board.
This module is a 20 character by 4 line LCD display with Blue background and White backlight.
The original 2004 LCD needs 7 IO ports to be up and running, ours is built with Arduino IIC/I2C interface, saving you 5 IO ports.
This LCD is ready-to-use because it is compatible with the Arduino Liquid Crystal Library. It comes with EASY Plug connector, you can use one line for simple connection.
Note: this module should be used together with EASY plug control board.
Specifications
- Interface: I2C
- I2C address: 0x27
- White text on blue background
- 20 characters wide, 4 rows
- Operating voltage: +5V
- Contrast control: through potentiometer
- Compatible with Arduino LiquidCrystal Library
Technical Details
- Dimensions: 114mm*60mm*22mm
- Weight: 77.7g
Connect It Up
Connect the EASY Plug 2004 LCD to control board using an RJ11 cable. Then connect the control board to your PC with a USB cable.

Upload the Code
Copy and paste below code to Arduino IDE and upload.
Code to Note:
Before compile the code, do remember to put the libraries needed inside the libraries folder of Arduino IDE directory. Or else, it will fail to verify.
Download all the libraries: https://drive.google.com/open?id=1KkjnoR3Y_eRM-LMHEIrMzQabLabbSQpU
//Compatible with the Arduino IDE 1.0
//Library version:1.1
#include <Wire.h>
#include <LiquidCrystal_I2C.h>

LiquidCrystal_I2C lcd(0x27,20,4);  // set the LCD address to 0x27 for a 16 chars and 2 line display

void setup()
{
  lcd.init();                      // initialize the lcd
  lcd.init();
  // Print a message to the LCD.
  lcd.backlight();
  lcd.setCursor(3,0);
  lcd.print("Hello, world!");
  lcd.setCursor(2,1);
  lcd.print("Hello,keyestudio!");
   lcd.setCursor(0,2);
  lcd.print("Arduino LCD IIC 2004");
   lcd.setCursor(2,3);
  lcd.print("Power By Ec-yuan!");
}
void loop()
{
}
What You Should See
Initially, you should see the words “hello, word!” and “keyestudio!” pop up on your LCD.
Remember you can adjust the contrast using the potentiometer on the module back if you can’t make out the words clearly.

Resources
Download the PDF:
https://drive.google.com/open?id=1JS4n3MTCjJXYyMunvqFNCQRlUKGfA2ib
Download the libraries:
https://drive.google.com/open?id=105RNjo0aDBthorceoKgqaJ251D3tbWlc
Buy from
- Official Website: http://www.keyestudio.com/ks0137.html
