KS0447 Keyestudio Micro TF Card Write-Read Module: Difference between revisions
Keyestudio (talk | contribs) |
Keyestudio (talk | contribs) |
||
| Line 108: | Line 108: | ||
<br> | <br> | ||
==Resource== | ==Resource== | ||
*'''Download all the relevant info. from the link:'''<br> | *'''Download all the relevant info. from the link:'''<br> | ||
https:// | |||
https://fs.keyestudio.com/KS0447 | |||
Latest revision as of 10:00, 4 March 2021
Overview
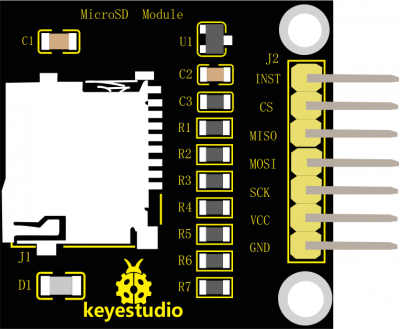
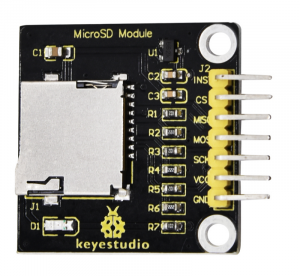
The TF card is the most commonly used storage element for interactive media devices. Keyestudio micro TF card read-write module uses SPI communication to read or write data to the TF card.
When using, we just insert the TF card into the TF card socket, connect the keyestudio MicroSD module to the MCU, and then read/write the TF card through programming.
The module comes with two 3mm fixing holes, easy to fix it to other devices.
Technical Details
- Input voltage: DC 5V
- Operating voltage: DC 3.3V
- Working current: about 10mA
- Maximum power: 0.1W
- Operating temperature range: -25℃ to 70℃
- Interface type: 7-pin header with a pitch of 2.54mm
- Positioning hole diameter: 3mm
- TF card socket: self-popping
- Dimensions: 34mm*28mm*6mm
- Weight: 4.1g
- Environmental attributes: ROHS
Hookup Guide
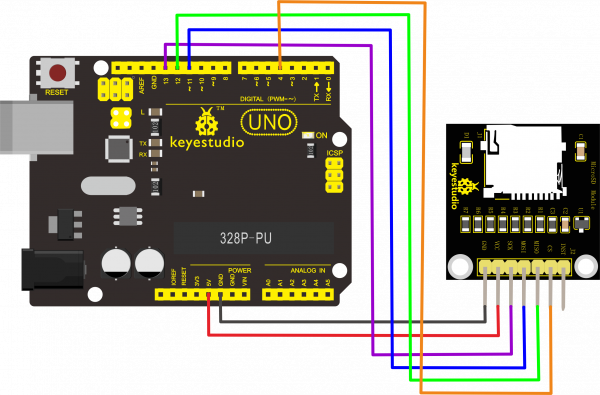
Connect keyestudio MicroSD module to UNO R3 board as below diagram. Then insert your TF card into the TF card socket.

Test Code
Don’t forget to place the necessary library into Arduino library directory when uploading the test code.
#include <SPI.h>
#include <SD.h>
File myFile;

void setup()
{
  // Open serial communications and wait for port to open:
  Serial.begin(9600);
  while (!Serial) {
    ; // wait for serial port to connect. Needed for Leonardo only
  }
  Serial.print("Initializing SD card...");
  // On the Ethernet Shield, CS is pin 4. It's set as an output by default.
  // Note that even if it's not used as the CS pin, the hardware SS pin
  // (10 on most Arduino boards, 53 on the Mega) must be left as an output
  // or the SD library functions will not work.
  pinMode(10, OUTPUT);
  if (!SD.begin(4)) {
    Serial.println("initialization failed!");
    return;
  }
  Serial.println("initialization done.");
  // open the file. note that only one file can be open at a time,
  // so you have to close this one before opening another.
  myFile = SD.open("test.txt", FILE_WRITE);
  // if the file opened okay, write to it:
  if (myFile) {
    Serial.print("Writing to test.txt...");
    myFile.println("Hello,keyestudio!");
    // close the file:
    myFile.close();
    Serial.println("done.");
  } else {
    // if the file didn't open, print an error:
    Serial.println("error opening test.txt");
  }
  // re-open the file for reading:
  myFile = SD.open("test.txt");
  if (myFile) {
    Serial.println("test.txt:");
    // read from the file until there's nothing else in it:
    while (myFile.available()) {
      Serial.write(myFile.read());
    }
    // close the file:
    myFile.close();
  } else {
    // if the file didn't open, print an error:
    Serial.println("error opening test.txt");
  }
}

void loop()
{
  // nothing happens after setup
}
Result
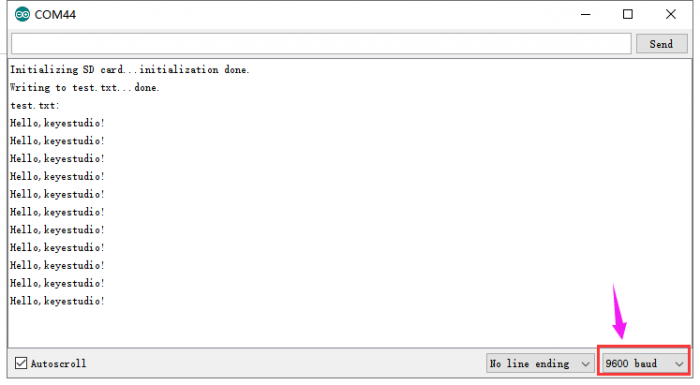
Done uploading the code, open the serial monitor and set the baud rate to 9600.
In the code, we already set up a TEST.txt file in the TF card, and write into "Hello,keyestudio!"
The serial monitor window will read the content of TEST.txt file, and print out the content "Hello,keyestudio!"

Resource
- Download all the relevant info. from the link:
https://fs.keyestudio.com/KS0447
Buy from
- [ Official Website]

