Ks0083 keyestudio New sensor kit with Uno: Difference between revisions
Keyestudio (talk | contribs) |
Keyestudio (talk | contribs) No edit summary |
||
| Line 53: | Line 53: | ||
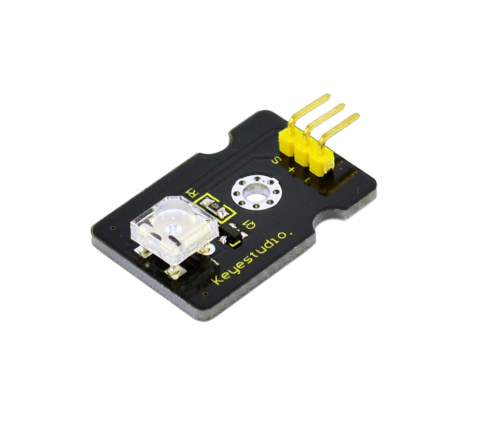
'''Introduction:'''<br> | '''Introduction:'''<br> | ||
This is a special LED module. When you connect it to ARDUINO development board, after program, it can emit beautiful light. Of course, you can also control it using PWM. It will be like fireflies at night. Isn’t cool? We can also combine it with other sensors to do various interesting interactive experiments. | This is a special LED module. When you connect it to ARDUINO development board, after program, it can emit beautiful light. Of course, you can also control it using PWM. It will be like fireflies at night. Isn’t cool? We can also combine it with other sensors to do various interesting interactive experiments. | ||
'''Specifications:'''<br> | '''Specifications:'''<br> | ||
| Line 61: | Line 60: | ||
Size: 30*20mm<br> | Size: 30*20mm<br> | ||
Weight: 3g<br> | Weight: 3g<br> | ||
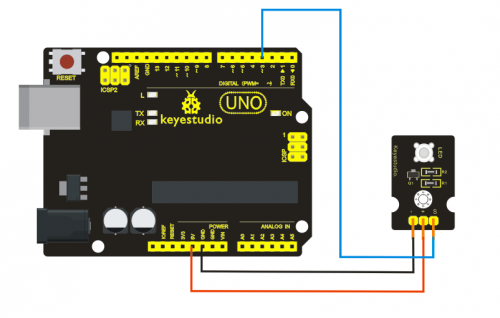
'''Connection Diagram:'''<br> | '''Connection Diagram:'''<br> | ||
<br>[[File:ks0068 2-2.png|500px|frameless|thumb]]<br> | <br>[[File:ks0068 2-2.png|500px|frameless|thumb]]<br> | ||
'''Sample Code:'''<br> | '''Sample Code:'''<br> | ||
| Line 79: | Line 76: | ||
digitalWrite(led, LOW); //Turn on led | digitalWrite(led, LOW); //Turn on led | ||
delay(2000); | delay(2000); | ||
} | |||
</pre> | |||
===Project 2: Digital white LED module=== | |||
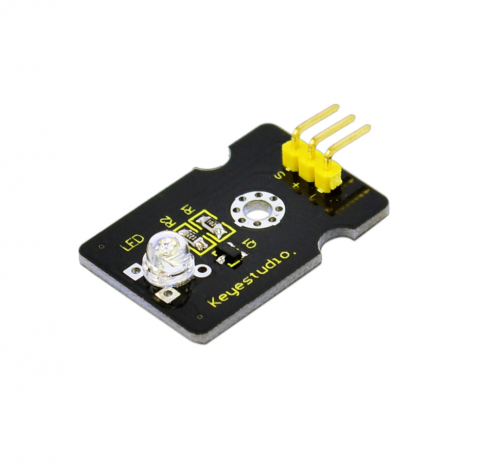
<br>[[File:ks0083 2-1.png|500px|frameless|thumb]]<br> | |||
'''Introduction:'''<br> | |||
This LED light module has a shiny color, ideal for Arduino starters. It can be easily connected to IO/Sensor shield. | |||
'''Specification:'''<br> | |||
Type: Digital<br> | |||
PH2.54 socket<br> | |||
White LED light module<br> | |||
Enables interaction with light-related works<br> | |||
Size: 30*20mm<br> | |||
Weight: 3g<br> | |||
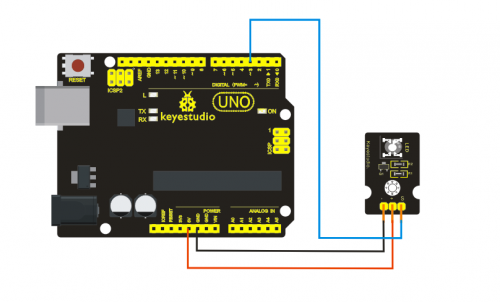
'''Connection Diagram:'''<br> | |||
<br>[[File:ks0068 1-2.png|500px|frameless|thumb]]<br> | |||
'''Sample Code:'''<br> | |||
<pre> | |||
int led = 3; | |||
void setup() | |||
{ | |||
pinMode(led, OUTPUT); //Set Pin3 as output | |||
} | |||
void loop() | |||
{ | |||
digitalWrite(led, HIGH); //Turn on led | |||
delay(2000); | |||
digitalWrite(led, LOW); //Turn off led | |||
delay(2000); | |||
} | |||
</pre> | |||
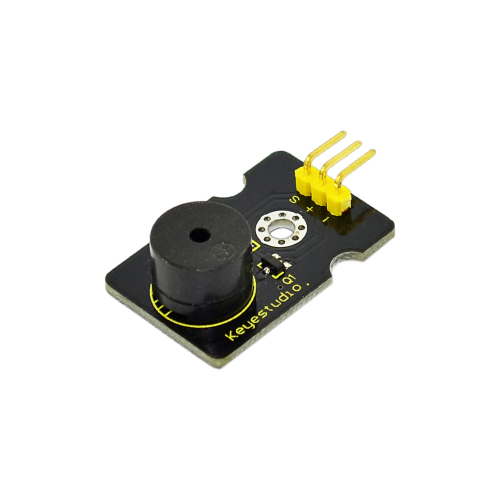
===Project 3: Passive Buzzer module=== | |||
<br>[[File:ks0068 9-1.png|500px|frameless|thumb]]<br> | |||
'''Introduction:'''<br> | |||
We can use Arduino to make many interactive works of which the most commonly seen is acoustic-optic display. All the previous experiment has something to do with LED. However, the circuit in this experiment can produce sound. Normally, the experiment is done with a buzzer or a speaker while buzzer is simpler and easier to use. The buzzer we introduced here is a passive buzzer. It cannot be actuated by itself, but by external pulse frequencies. Different frequencies produce different sounds. We can use Arduino to code the melody of a song, which is actually quite fun and simple. | |||
'''Specification:'''<br> | |||
Working voltage: 3.3-5v <br> | |||
Interface type: digital<br> | |||
Size: 30*20mm<br> | |||
Weight: 4g<br> | |||
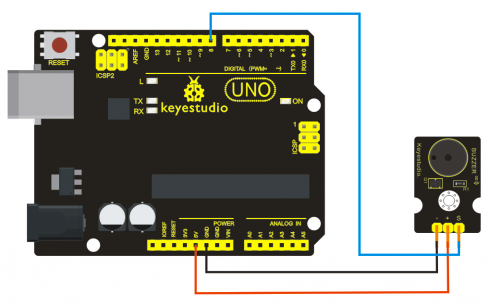
'''Connection Diagram:'''<br> | |||
<br>[[File:ks0068 9-2.png|500px|frameless|thumb]]<br> | |||
'''Sample Code:'''<br> | |||
<pre> | |||
int buzzer=8;//set digital IO pin of the buzzer | |||
void setup() | |||
{ | |||
pinMode(buzzer,OUTPUT);// set digital IO pin pattern, OUTPUT to be output | |||
} | |||
void loop() | |||
{ unsigned char i,j;//define variable | |||
while(1) | |||
{ for(i=0;i<80;i++)// output a frequency sound | |||
{ digitalWrite(buzzer,HIGH);// sound | |||
delay(1);//delay1ms | |||
digitalWrite(buzzer,LOW);//not sound | |||
delay(1);//ms delay | |||
} | |||
for(i=0;i<100;i++)// output a frequency sound | |||
{ | |||
digitalWrite(buzzer,HIGH);// sound | |||
digitalWrite(buzzer,LOW);//not sound | |||
delay(2);//2ms delay | |||
} } } | |||
</pre> | |||
After downloading the program, buzzer experiment will been finished. | |||
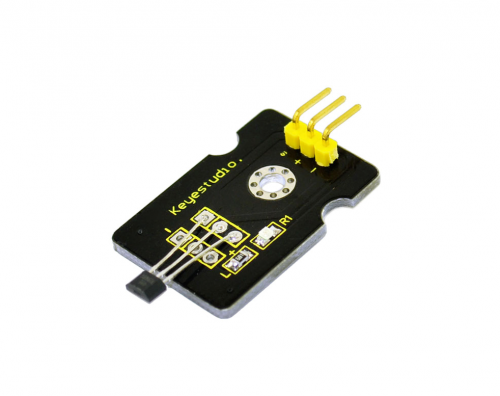
===Project 4: Hall Magnetic Sensor=== | |||
<br>[[File:ks0083 4-1.png|500px|frameless|thumb]]<br> | |||
'''Introduction:'''<br> | |||
This is a Magnetic Induction Sensor. It senses the magnetic materials within a detection range up to 3cm. The detection range and the strength of the magnetic field are proportional. The output is digital on/off. This sensor uses the SFE Reed Switch - Magnetic Field Sensor. | |||
'''Specification:'''<br> | |||
Sensing magnetic materials<br> | |||
Detection range: up to 3cm<br> | |||
Output: digital on/off<br> | |||
Detection range and magnetic field strength are proportional<br> | |||
Size: 30*20mm<br> | |||
Weight: 3g<br> | |||
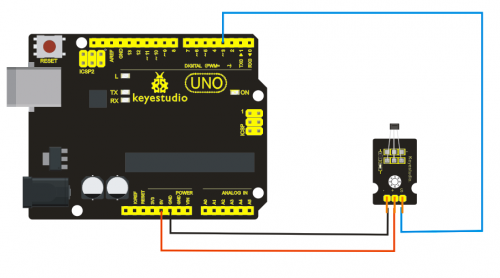
'''Connection Diagram:'''<br> | |||
<br>[[File:ks0020-2.png|500px|frameless|thumb]]<br> | |||
'''Sample Code:'''<br> | |||
<pre> | |||
int ledPin = 13; // choose the pin for the LED | |||
int inputPin = 3; // Connect sensor to input pin 3 | |||
int val = 0; // variable for reading the pin status | |||
void setup() { | |||
pinMode(ledPin, OUTPUT); // declare LED as output | |||
pinMode(inputPin, INPUT); // declare pushbutton as input | |||
} | |||
void loop(){ | |||
val = digitalRead(inputPin); // read input value | |||
if (val == HIGH) { // check if the input is HIGH | |||
digitalWrite(ledPin, LOW); // turn LED OFF | |||
} else { | |||
digitalWrite(ledPin, HIGH); // turn LED ON | |||
} | |||
} | |||
</pre> | |||
===Project 5: LM35 Linear Temperature Sensor=== | |||
<br>[[File:ks0083 4-1.png|500px|frameless|thumb]]<br> | |||
'''Introduction:'''<br> | |||
LM35 Linear Temperature Sensor is based on semiconductor LM35 temperature sensor. It can be used to detect ambient air temperature. This sensor offers a functional range among 0 degree Celsius to 100 degree Celsius. Sensitivity is 10mV per degree Celsius. The output voltage is proportional to the temperature.<br> | |||
This sensor is commonly used as a temperature measurement sensor. It includes thermocouples, platinum resistance, and thermal resistance and temperature semiconductor chips. The chip is commonly used in high temperature measurement thermocouples. Platinum resistance temperature sensor is used in the measurement of 800 degrees Celsius, while the thermal resistance and semiconductor temperature sensor is suitable for measuring the temperature of 100-200 degrees or below, in which the application of a simple semiconductor temperature sensor is good in linearity and high in sensitivity. The LM35 linear temperature sensor and sensor-specific Arduino shield can be easily combined.<br> | |||
'''Specification:'''<br> | |||
Based on the semiconductor LM35 temperature sensor<br> | |||
Can be used to detect ambient air temperature<br> | |||
Sensitivity: 10mV per degree Celcius<br> | |||
Functional range: 0 degree Celsius to 100 degree Celsius<br> | |||
Size: 30*20mm<br> | |||
Weight: 3g<br> | |||
'''Connection Diagram:'''<br> | |||
<br>[[File:ks0083 4-2.png|500px|frameless|thumb]]<br> | |||
'''Sample Code:'''<br> | |||
<pre> | |||
void setup() | |||
{ | |||
Serial.begin(9600);//Set Baud Rate to 9600 bps | |||
} | |||
void loop() | |||
{ | |||
int val; | |||
int dat; | |||
val=analogRead(0);//Connect LM35 on Analog 0 | |||
dat=(500 * val) /1024;; | |||
Serial.print("Temp:"); //Display the temperature on Serial monitor | |||
Serial.print(dat); | |||
Serial.println("C"); | |||
delay(500); | |||
} | } | ||
</pre> | </pre> | ||
Revision as of 10:45, 7 October 2016
keyestudio New sensor kit with Uno
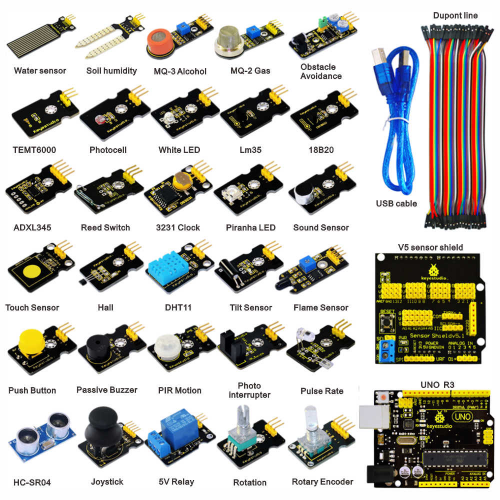
Sensor kit for Arduino
Based on open-source hardware
30 various sensors in one box
For you to make interesting projects
Summary
This is an Arduino sensor learning kit developed by Keyes. We bring together 30 basic sensors and modules, aiming for the convenience of its learning for starters. Inside this box, there are digital and analog sensors and also some special modules such as buzzer, ultrasonic, acceleration modules etc. For each module, there is clear connection diagram and sample code. So even if you are totally new at this, you can get started easily.
The sample codes for this sensor kit are based on ARDUINO because it's open source and easy. And if you are good at this, you can also apply this kit to other MCU development platform, such as 51, STM32, Raspberries Pi. The working principle is pretty much the same.
Now, let us embrace this fascinating world of ARDUINO and learn together!
Kit list
1. Piranha LED Module
2. Digital white LED module
3. Passive Buzzer module
4. Hall Magnetic Sensor
5. LM35 Temperature Sensor
6. 18B20 Temperature Sensor
7. Digital Tilt Sensor
8. Photocell sensor
9. Digital Push Button
10. Capacitive Touch Sensor
11. DHT11 Temperature and Humidity Sensor
12. Analog Sound Sensor
13. Flame Sensor
14. 3231 Clock Module
15. MQ-2 Analog Gas Sensor
16. MQ-3 Analog Alcohol Sensor
17. Water sensor
18. Soil humidity sensor
19. Infrared Obstacle Avoidance Sensor
20. PIR Motion Sensor
21. Joystick Module
22. photo interrupter module
23. 5V Relay Module
24. ADXL345 Three Axis Acceleration Module
25. Rotary Encoder module
26. Analog Rotation Sensor
27. HC-SR04 Ultrasonic Sensor
28. Pulse Rate Monitor
29. Reed Switch Module
30. TEMT6000 ambient light sensor
Project details
Project 1: Piranha LED Module
Introduction:
This is a special LED module. When you connect it to ARDUINO development board, after program, it can emit beautiful light. Of course, you can also control it using PWM. It will be like fireflies at night. Isn’t cool? We can also combine it with other sensors to do various interesting interactive experiments.
Specifications:
Module type: digital
Working voltage: 5v
Distance between pins: 2.54mm
Size: 30*20mm
Weight: 3g
Sample Code:
int led = 3;
void setup()
{
  pinMode(led, OUTPUT);     //Set Pin3 as output
}
void loop()
{      digitalWrite(led, HIGH);   //Turn off led
          delay(2000);
          digitalWrite(led, LOW);    //Turn on led
          delay(2000);
}
Project 2: Digital white LED module
Introduction:
This LED light module has a shiny color, ideal for Arduino starters. It can be easily connected to IO/Sensor shield.
Specification:
Type: Digital
PH2.54 socket
White LED light module
Enables interaction with light-related works
Size: 30*20mm
Weight: 3g
Sample Code:
int led = 3;
void setup()
{
 pinMode(led, OUTPUT);     //Set Pin3 as output
}
void loop()
{
         digitalWrite(led, HIGH);   //Turn on led
         delay(2000);
         digitalWrite(led, LOW);    //Turn off led
         delay(2000);
}
Project 3: Passive Buzzer module
Introduction:
We can use Arduino to make many interactive works of which the most commonly seen is acoustic-optic display. All the previous experiment has something to do with LED. However, the circuit in this experiment can produce sound. Normally, the experiment is done with a buzzer or a speaker while buzzer is simpler and easier to use. The buzzer we introduced here is a passive buzzer. It cannot be actuated by itself, but by external pulse frequencies. Different frequencies produce different sounds. We can use Arduino to code the melody of a song, which is actually quite fun and simple.
Specification:
Working voltage: 3.3-5v
Interface type: digital
Size: 30*20mm
Weight: 4g
Sample Code:
int buzzer=8;//set digital IO pin of the buzzer
void setup()
{
pinMode(buzzer,OUTPUT);// set digital IO pin pattern, OUTPUT to be output
}
void loop()
{ unsigned char i,j;//define variable
while(1)
{ for(i=0;i<80;i++)// output a frequency sound
{ digitalWrite(buzzer,HIGH);// sound
delay(1);//delay1ms
digitalWrite(buzzer,LOW);//not sound
delay(1);//ms delay
}
for(i=0;i<100;i++)// output a frequency sound
{
digitalWrite(buzzer,HIGH);// sound
digitalWrite(buzzer,LOW);//not sound
delay(2);//2ms delay
} } }
After downloading the program, buzzer experiment will been finished.
Project 4: Hall Magnetic Sensor
Introduction:
This is a Magnetic Induction Sensor. It senses the magnetic materials within a detection range up to 3cm. The detection range and the strength of the magnetic field are proportional. The output is digital on/off. This sensor uses the SFE Reed Switch - Magnetic Field Sensor.
Specification:
Sensing magnetic materials
Detection range: up to 3cm
Output: digital on/off
Detection range and magnetic field strength are proportional
Size: 30*20mm
Weight: 3g
Sample Code:
int ledPin = 13;                // choose the pin for the LED
int inputPin = 3;               // Connect sensor to input pin 3
int val = 0;                    // variable for reading the pin status

void setup() {
  pinMode(ledPin, OUTPUT);      // declare LED as output
  pinMode(inputPin, INPUT);     // declare pushbutton as input
}

void loop(){
  val = digitalRead(inputPin);  // read input value
  if (val == HIGH) {            // check if the input is HIGH
    digitalWrite(ledPin, LOW);  // turn LED OFF
  } else {
    digitalWrite(ledPin, HIGH); // turn LED ON
  }
}
Project 5: LM35 Linear Temperature Sensor
Introduction:
LM35 Linear Temperature Sensor is based on semiconductor LM35 temperature sensor. It can be used to detect ambient air temperature. This sensor offers a functional range among 0 degree Celsius to 100 degree Celsius. Sensitivity is 10mV per degree Celsius. The output voltage is proportional to the temperature.
This sensor is commonly used as a temperature measurement sensor. It includes thermocouples, platinum resistance, and thermal resistance and temperature semiconductor chips. The chip is commonly used in high temperature measurement thermocouples. Platinum resistance temperature sensor is used in the measurement of 800 degrees Celsius, while the thermal resistance and semiconductor temperature sensor is suitable for measuring the temperature of 100-200 degrees or below, in which the application of a simple semiconductor temperature sensor is good in linearity and high in sensitivity. The LM35 linear temperature sensor and sensor-specific Arduino shield can be easily combined.
Specification:
Based on the semiconductor LM35 temperature sensor
Can be used to detect ambient air temperature
Sensitivity: 10mV per degree Celcius
Functional range: 0 degree Celsius to 100 degree Celsius
Size: 30*20mm
Weight: 3g
Connection Diagram:
thumb
Sample Code:
void setup()
{
    Serial.begin(9600);//Set Baud Rate to 9600 bps
}
 void loop()
{
    int val;
    int dat;
    val=analogRead(0);//Connect LM35 on Analog 0
    dat=(500 * val) /1024;;
    Serial.print("Temp:"); //Display the temperature on Serial monitor
    Serial.print(dat);
    Serial.println("C");
    delay(500);
}
