KS4017 Keyestudio Micro:bit V2.0 Basic Starter Kit: Difference between revisions
Keyestudio (talk | contribs) |
Keyestudio (talk | contribs) (→Kit) |
||
| Line 38: | Line 38: | ||
<br>To put it simple, Micro:bit V2 main board is like a micro computer which has made programming at our fingertips and enhanced digital innovation. And about programming environment, BBC provides a website:<br> https://microbit.org/code/, which has a graphical MakeCode program easy for use. | <br>To put it simple, Micro:bit V2 main board is like a micro computer which has made programming at our fingertips and enhanced digital innovation. And about programming environment, BBC provides a website:<br> https://microbit.org/code/, which has a graphical MakeCode program easy for use. | ||
==Kit== | ==Kit List== | ||
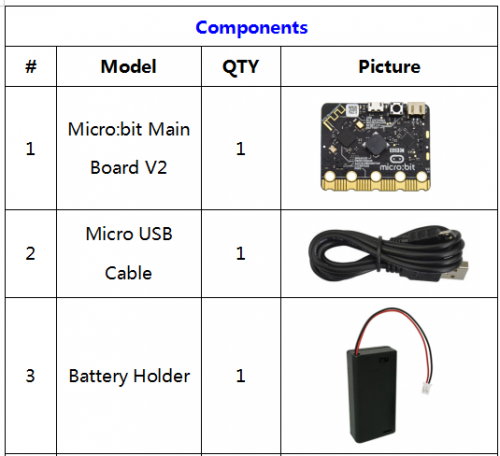
<br>[[File:KS4017-06.PNG|500px|frameless|thumb]]<br> | <br>[[File:KS4017-06.PNG|500px|frameless|thumb]]<br> | ||
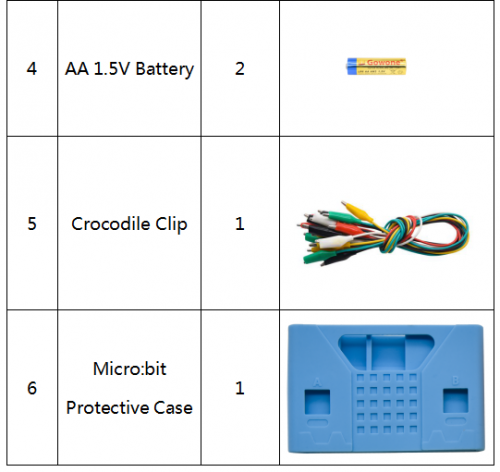
<br>[[File:KS4017-07.PNG|500px|frameless|thumb]]<br> | <br>[[File:KS4017-07.PNG|500px|frameless|thumb]]<br> | ||
==Resources== | ==Resources== | ||
Link to project code, tutorial and other files:<br> | Link to project code, tutorial and other files:<br> | ||
https://fs.keyestudio.com/KS4017 | https://fs.keyestudio.com/KS4017 | ||
Revision as of 14:01, 20 December 2021
Introduction
What is Micro:bit?
Designed by BBC, Micro:bit main board aims to help children aged above 10 years old to have a better learning of programming.
It is equipped with loads of components,including a 5*5 LED dot matrix, 2 programmable buttons, a compass, a Micro USB interface and a Bluetooth module and others. Though it is just the size of a credit card, it boasts multiple functions. To name just a few, it can be applied in programming video games, making interactions between light and sound, controlling a robot, conducting scientific experiments, developing wearable devices and make some cool inventions like robots and musical instruments, basically everything imaginable.
The latest version, that’s version 2.0, of Micro:bit main board has a touch-sensitive logo and a MEMS microphone. And there is a speaker built in the other side of the board which makes playing all kinds of sound possible without any external equipment. The golden fingers and gears added provide a better fixing of crocodile clips. Moreover, this board has a sleeping mode to lower the power consumption of battery and it can be entered if users long press the Reset & Power button on the back of it. More importantly, the CPU capacity of this version is much better than that of the V1.5 and the V2 has more RMA.
In final analysis, the Micro:bit main board V2 can allow customers to explore more functions so as to make more innovative products.
Comparison between V2.0 & V1.5
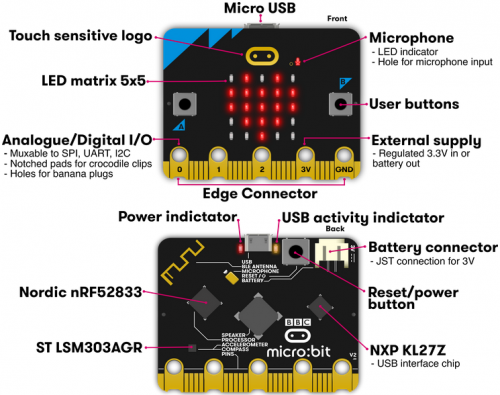
Board V2.0
Board V1.5
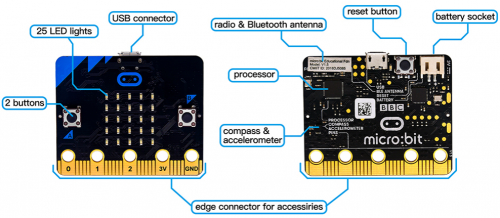
More details:
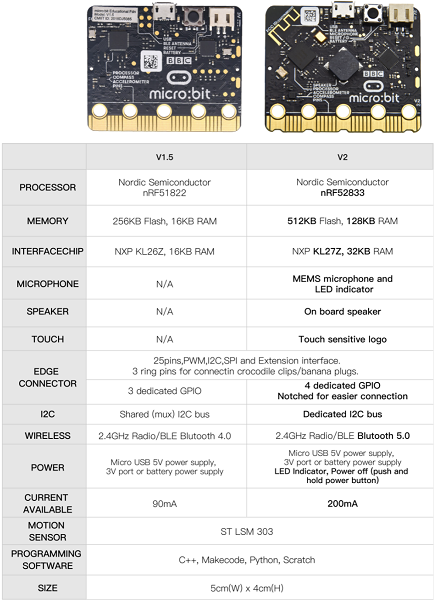
For the Micro: Bit main board V2, pressing the Reset & Power button , it will reset the Micro: Bit and rerun the program.If you hold it tight, the red LED will slowly get darker.When the power indicator becomes darker, releasing the button and your Micro: Bit board will enter sleep mode for power saving .This will make your battery more durable. And you could press this button again to ‘wake up’ your Micro:bit.
For more information,please resort to following links:
https://tech.microbit.org/hardware/
https://microbit.org/new-microbit/
https://www.microbit.org/get-started/user-guide/overview/
https://microbit.org/get-started/user-guide/features-in-depth/
Pinout
Micro:bit main board V2.0 VS V1.5
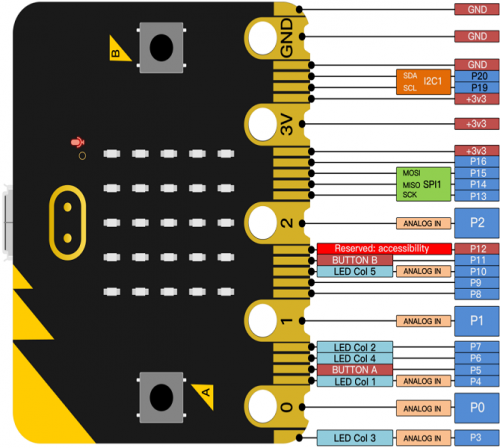
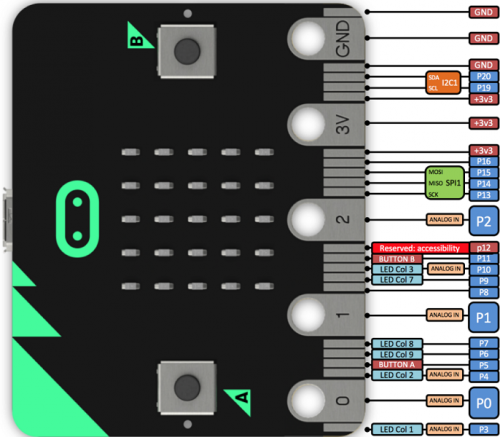
Browse the official website for more details:
https://tech.microbit.org/hardware/edgeconnector/
https://microbit.org/guide/hardware/pins/
Notes for the application of Micro:bit main board V2.0
a.It is recommended to cover it with a silicone protector to prevent short circuit for it has a lot of sophisticated electronic components.
b.Its IO port is very weak in driving since it can merely handle current less than 300mA. Therefore, do not connect it with devices operating in large current,such as servo MG995 and DC motor or it will get burnt. Furthermore, you must figure out the current requirements of the devices before you use them and it is generally recommended to use the board together with a Micro:bit shield.
c.It is recommended to power the main board via the USB interface or via the battery of 3V. The IO port of this board is 3V, so it does not support sensors of 5V. If you need to connect sensors of 5 V, a Micro: Bit expansion board is required.
d.When using pins(P3、P4、P6、P7、P10)shared with the LED dot matrix, blocking them from the matrix or the LEDs may display randomly and the data about sensors maybe wrong.
e.The battery port of 3V cannot be connected with battery more than 3.3V or the main board will be damaged.
f. Forbid to use it on metal products to avoid short circuit.
To put it simple, Micro:bit V2 main board is like a micro computer which has made programming at our fingertips and enhanced digital innovation. And about programming environment, BBC provides a website:
https://microbit.org/code/, which has a graphical MakeCode program easy for use.
Kit List
Resources
Link to project code, tutorial and other files:
https://fs.keyestudio.com/KS4017
