Ks0274 keyestudio Current Sensor Current Detection Sensor: Difference between revisions
Keyestudio (talk | contribs) |
Keyestudio (talk | contribs) (→Result) |
||
| Line 68: | Line 68: | ||
== Result == | == Result == | ||
Done as the above wiring, upload the code, and then open the serial monitor, the magnitude of current is shown (not connected to the current), as the figure below. | |||
<br>[[File:Ks0274-.png|500px|frameless|thumb]]<br> | <br>[[File:Ks0274-.png|500px|frameless|thumb]]<br> | ||
Revision as of 15:09, 27 October 2017
Introduction
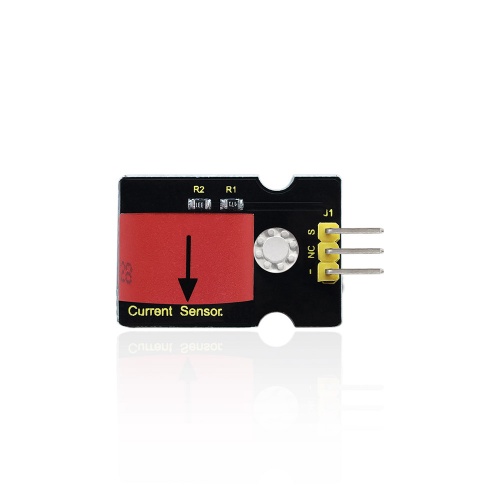
Keyestudio current detection sensor is mainly composed of a current sensor TA12-200, which can convert large current into a small amplitude of voltage output. This product can be applied to the AC current detection, and its maximum detectable current is up to 5A. Current sensors can be used in a variety of microcontroller controllers, especially on the Arduino controller, which can be connected to the Arduino dedicated sensor expansion board with the 3P sensor cable, easily achieving interactive works related to environmental awareness.
Specification
- Working voltage:5V
- Detecting current:up to 5A
- Working frequency: 20Hz~20KHz
- Data type: analog input
- Flame retardant conforms to UL94-VO
- Dielectric strength 6000V AC/1min
- Usage: electrical load remote monitoring; as an electronic control system of input signals;lack of phase indication, power measurement; motor running state monitoring.
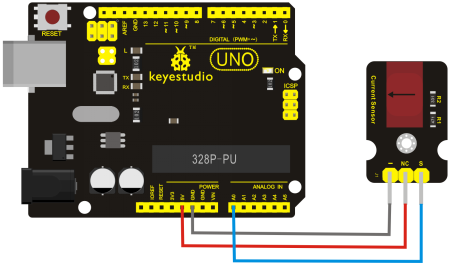
Connection Diagram
Sample Code
#define ELECTRICITY_SENSOR A0 // Analog input pin that sensor is attached to
float amplitude_current;               //amplitude current
float effective_value;       //effective current
void setup()
{
	Serial.begin(9600);
	pins_init();
}
void loop()
{
	int sensor_max;
	sensor_max = getMaxValue();
	Serial.print("sensor_max = ");
	Serial.println(sensor_max);
	//the VCC on the RobotBase interface of the sensor is 5v
	amplitude_current=(float)sensor_max/1024*5/800*2000000;
	effective_value=amplitude_current/1.414;//minimum_current=1/1024*5/800*2000000/1.414=8.6(mA)
						//Only for sinusoidal alternating current
	Serial.println("The amplitude of the current is(in mA)");
	Serial.println(amplitude_current,1);//Only one number after the decimal point
	Serial.println("The effective value of the current is(in mA)");
	Serial.println(effective_value,1);
}
void pins_init()
{
	pinMode(ELECTRICITY_SENSOR, INPUT);
}
/*Function: Sample for 1000ms and get the maximum value from the SIG pin*/
int getMaxValue()
{
	int sensorValue;             //value read from the sensor
	int sensorMax = 0;
	uint32_t start_time = millis();
	while((millis()-start_time) < 1000)//sample for 1000ms
	{
		sensorValue = analogRead(ELECTRICITY_SENSOR);
		if (sensorValue > sensorMax)
		{
			/*record the maximum sensor value*/
			sensorMax = sensorValue;
		}
	}
	return sensorMax;
}
Result
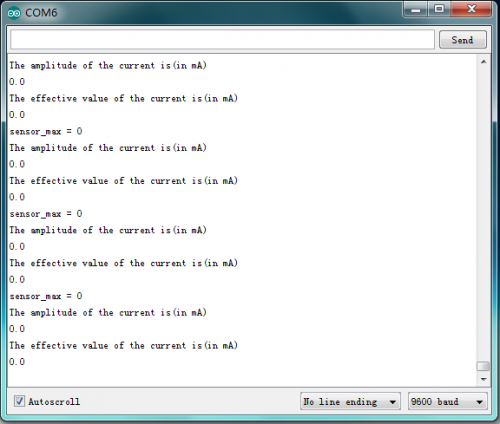
Done as the above wiring, upload the code, and then open the serial monitor, the magnitude of current is shown (not connected to the current), as the figure below.
Resources
PDF File:
http://www.keyestudio.com/files/index/download/id/1500602045/
Get One Now
http://www.keyestudio.com/keyestudio-current-detection-sensor.html


