Ks0015 keyestudio Pulse Rate Monitor: Difference between revisions
Keyestudio (talk | contribs) |
Keyestudio (talk | contribs) No edit summary |
||
| Line 1: | Line 1: | ||
<br> | |||
==Introduction== | ==Introduction== | ||
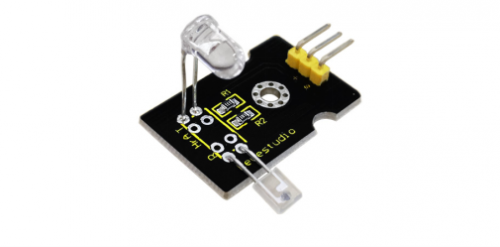
This module uses a ultra-bright infrared LED and a phototransistor to detect the pulse | This module uses a ultra-bright infrared (IR) LED and a phototransistor to detect the pulse in your finger. The red LED then flashes in time with your pulse. <br> | ||
Working | '''Working principle:''' <br> | ||
phototransistor on the other side of your finger picks up the amount of transmitted light. The resistance of the phototransistor will vary slightly as the blood pulses through your finger. | Shine the bright LED onto one side of your finger while the phototransistor on the other side of your finger picks up the amount of transmitted light. <br> | ||
The resistance of the phototransistor will vary slightly as the blood pulses through your finger. | |||
<br>[[File:Ks0015-2.png|500px|frameless|thumb]]<br> | <br>[[File:Ks0015-2.png|500px|frameless|thumb]]<br> | ||
<br> | |||
==Connection Diagram == | ==Connection Diagram == | ||
<br>[[File:152.png|500px|frameless|thumb]]<br> | <br>[[File:152.png|500px|frameless|thumb]]<br> | ||
<br> | |||
==Sample Code == | ==Sample Code == | ||
Copy and paste the code below to Arduino software.<br> | |||
<pre> | <pre> | ||
int ledPin = 13; | int ledPin = 13; | ||
| Line 29: | Line 30: | ||
static double oldValue = 0; | static double oldValue = 0; | ||
static double oldChange = 0; | static double oldChange = 0; | ||
int rawValue = | int rawValue = analogRead(sensorPin); | ||
analogRead(sensorPin); | double value = alpha * oldValue + (1 - alpha) * rawValue; | ||
double value = alpha * oldValue | |||
+ (1 - alpha) * rawValue; | |||
Serial.print(rawValue); | Serial.print(rawValue); | ||
Serial.print(","); | Serial.print(","); | ||
Serial.println(value); | Serial.println(value); | ||
oldValue = value; | oldValue = value; | ||
delay(period); | delay(period); | ||
} | } | ||
</pre> | </pre> | ||
<br> | |||
==Result== | |||
Wire it up well as the above diagram, then upload well the code to the board and click the icon of serial monitor on the upper right corner of Arduino software. <br> | |||
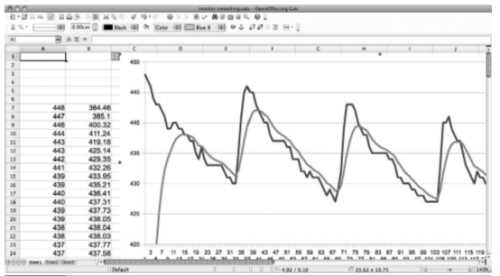
Set the baud rate as 115200, you will see the data is displayed on the monitor. You can copy and paste the data to the excel, finally it will generate the corresponding picture shown below. | |||
<br>[[File:153.png|500px|frameless|thumb]]<br> | |||
<br>[[File:153.png|500px|frameless|thumb]]<br> | |||
<br>[[File:153.png|500px|frameless|thumb]]<br> | |||
<br> | |||
==Resources == | ==Resources == | ||
'''Video''' | '''Video'''<br> | ||
http://video.keyestudio.com/ks0015/ | |||
'''PDF and Code''' <br> | |||
https://drive.google.com/open?id=1JUXzCroCGLEsEJFEa70_W2AXPLepItbi | |||
<br> | |||
==Get One Now== | |||
[https://www.keyestudio.com/free-shipping-keyestudio-finger-probe-heart-rate-pulse-monitor-sensor-module-for-arduino-p0015.html '''Official Website''' ] | |||
'''Official Website''' | |||
[[Category: Sensor]] | [[Category: Sensor]] | ||
Revision as of 13:36, 12 April 2019
Introduction
This module uses a ultra-bright infrared (IR) LED and a phototransistor to detect the pulse in your finger. The red LED then flashes in time with your pulse.
Working principle:
Shine the bright LED onto one side of your finger while the phototransistor on the other side of your finger picks up the amount of transmitted light.
The resistance of the phototransistor will vary slightly as the blood pulses through your finger.

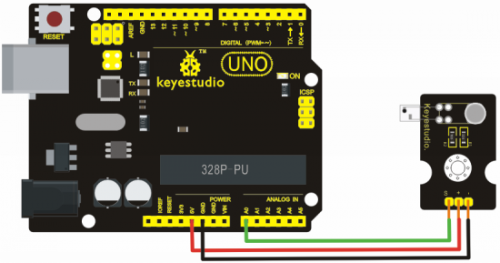
Connection Diagram
Sample Code
Copy and paste the code below to Arduino software.
int ledPin = 13;
int sensorPin = 0;
double alpha = 0.75;
int period = 20;
double change = 0.0;
void setup()
{
pinMode(ledPin, OUTPUT);
Serial.begin(115200);
}
void loop()
{
static double oldValue = 0;
static double oldChange = 0;
int rawValue = analogRead(sensorPin);
double value = alpha * oldValue + (1 - alpha) * rawValue;
Serial.print(rawValue);
Serial.print(",");
Serial.println(value);
oldValue = value;
delay(period);
}
Result
Wire it up well as the above diagram, then upload well the code to the board and click the icon of serial monitor on the upper right corner of Arduino software.
Set the baud rate as 115200, you will see the data is displayed on the monitor. You can copy and paste the data to the excel, finally it will generate the corresponding picture shown below.


Resources
Video
http://video.keyestudio.com/ks0015/
PDF and Code
https://drive.google.com/open?id=1JUXzCroCGLEsEJFEa70_W2AXPLepItbi
