KS5001 ESP32-CAM Development Board WiFi+Bluetooth Module with OV2640 Camera (Black and Eco-friendly): Difference between revisions
Keyestudio (talk | contribs) |
Keyestudio (talk | contribs) |
||
| Line 8: | Line 8: | ||
ESP-32CAM adopts DIP sealed package and can be used directly by plug-in, realizing the rapid production of products, providing customers with high-reliability connection methods, in support for various IoT hardware terminal occasions. <br> | ESP-32CAM adopts DIP sealed package and can be used directly by plug-in, realizing the rapid production of products, providing customers with high-reliability connection methods, in support for various IoT hardware terminal occasions. <br> | ||
* Adopt low-consumption, double core 32 bit CPU, can be taken as a application processor. | * Adopt low-consumption, double core 32 bit CPU, can be taken as a application processor. | ||
Revision as of 10:08, 7 January 2022
Description
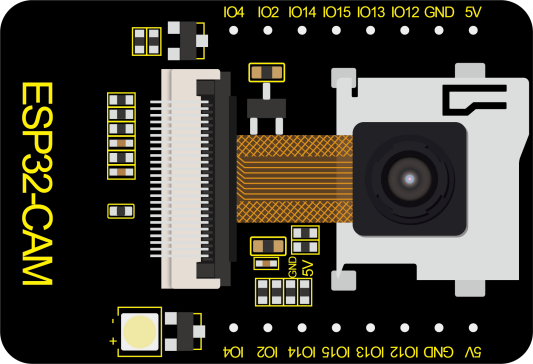
ESP32-CAM has a very competitive small-size camera module in the industry. It can work independently as the smallest system, with a size of only 27*40.5*4.5mm, and a deep sleep current as low as 6mA.
ESP-32CAM can be widely used in various IoT applications, home smart devices, industrial wireless control, wireless monitoring, QR wireless identification, wireless positioning system signals and other IoT applications.
ESP-32CAM adopts DIP sealed package and can be used directly by plug-in, realizing the rapid production of products, providing customers with high-reliability connection methods, in support for various IoT hardware terminal occasions.
- Adopt low-consumption, double core 32 bit CPU, can be taken as a application processor.
- The main frequency is up to 240MHz, and the computing power reaches to 600 DMIPS.
- Built-in 520 KB SRAM,external 8MB PSRAM.
- Compatible with UART/SPI/I2C/PWM/ADC/DAC ports.
- Support OV2640 and OV7670 cameras,with a built-in flashing light.
- Support TF card, multiple sleep modes, WIFI upload and STA/AP/STA+AP working mode.
- Built-in Lwip and FreeRTOS.
- Support Smart Config/AirKiss smart config.
- Support second development.
Parameters:
- Power supply range: 5V
- Working current: 2A
- Deep sleep current: 6mA
- Product size: 27mm * 40.5mm
Connection Diagram
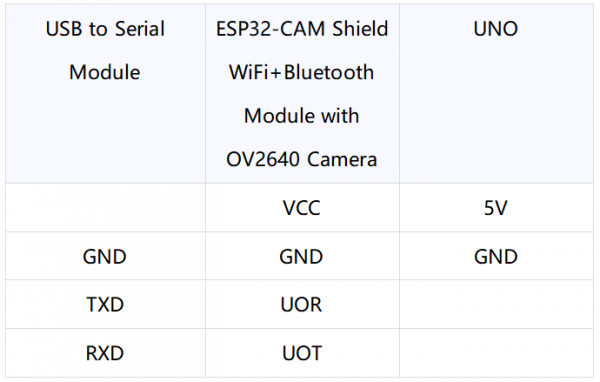
Step 1: wire up the USB to serial module and the ESP32-CAM development board
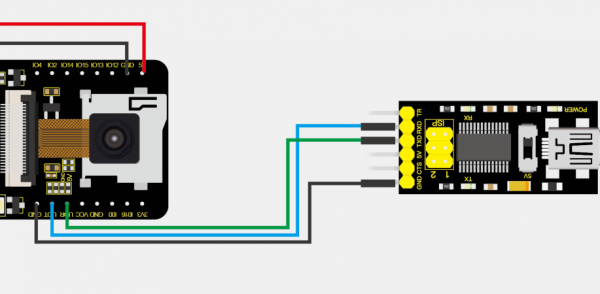
Step 2: Insert the camera and a SD card into the ESP32-CAM development board, and interface the external power wire of the ESP32-CAM board with the control board.(USB cable can’t supply large current to drive the development board, thus, the external power more than 5V 500mA is needed.)
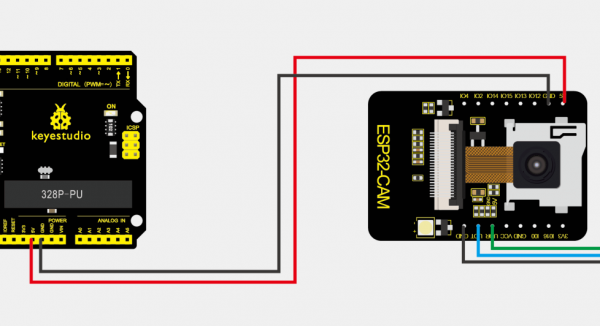
Step 3:Connect the external DC power to the control board, MINI USB to the USB to serial module

Set up the test environment:
If you find![]() in the board type of the Arduino IDE, you can skip to set up the environment.
in the board type of the Arduino IDE, you can skip to set up the environment.
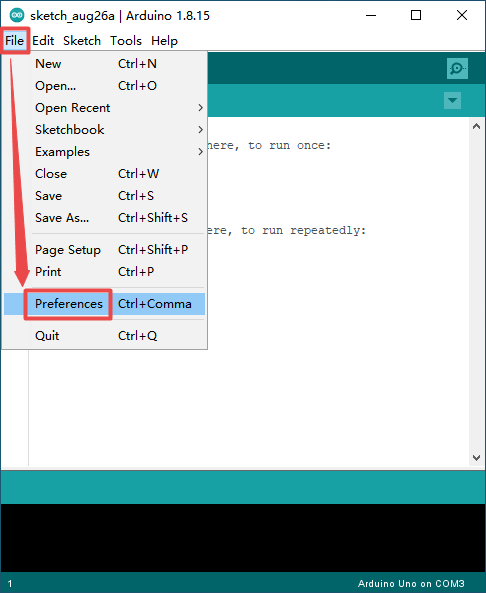
Configure esp32:Go to Arduino-->File-->Preferences +comma,
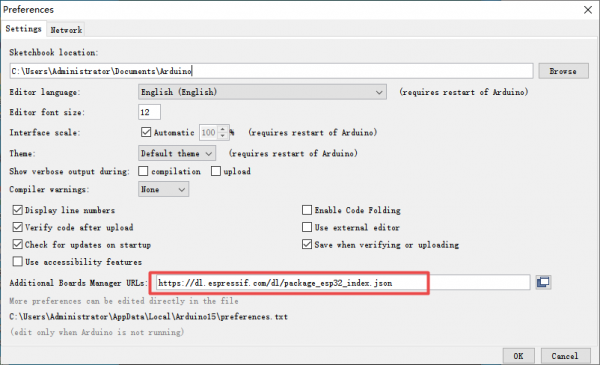
Configure ESP url
Copy “https://dl.espressif.com/dl/package_esp32_index.json”to “Additional Board Manager URLs”
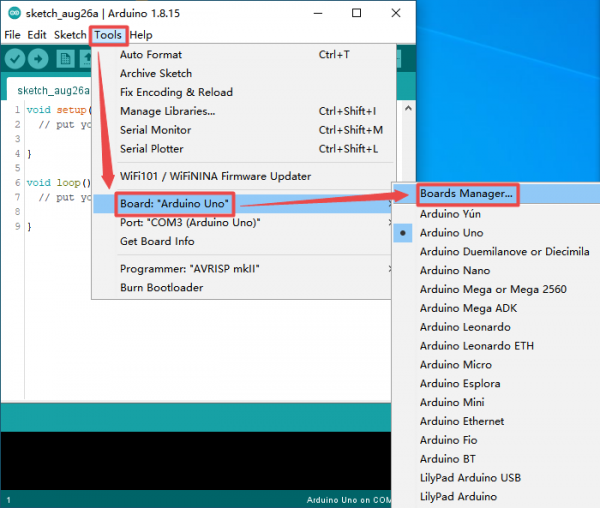
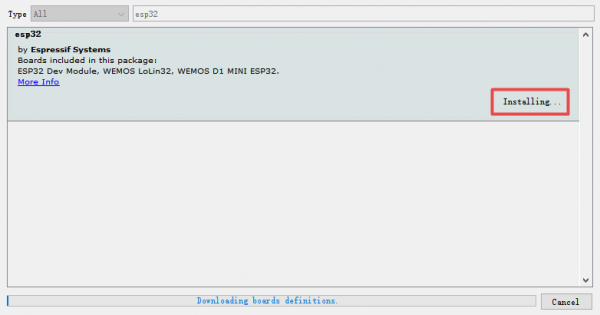
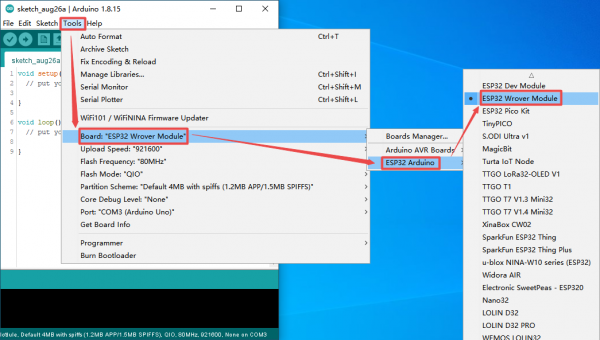
Configure the development board:Open Tools-->Board: “Arduino UNO”-->Boards Manager)
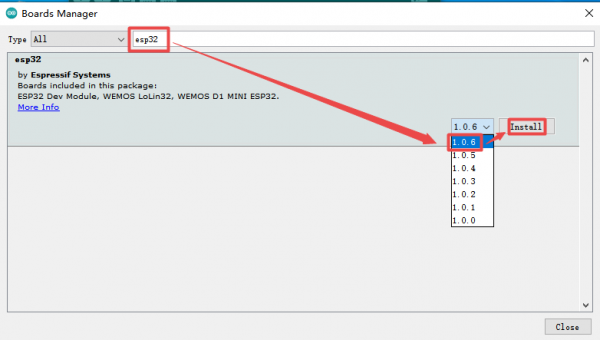
Search esp32 to select the version and install it;)
If the installing is successful, you can find ESP32 Wrover Module, as shown below;
Programming
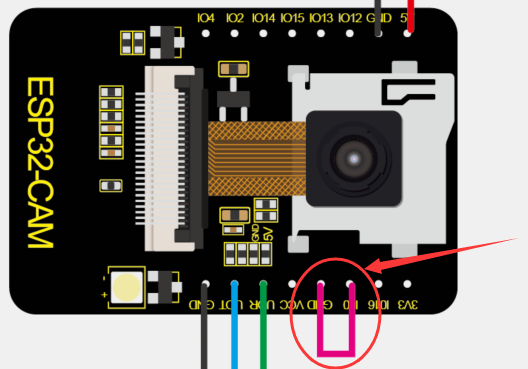
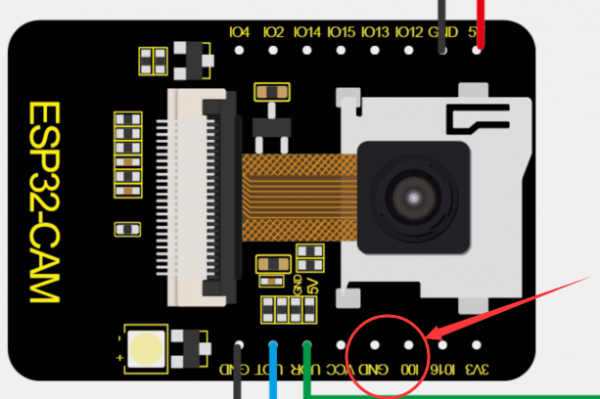
Step 1: Through the short circuit between IO0 and GND on ESP32-CAM board, the module is activated to program.
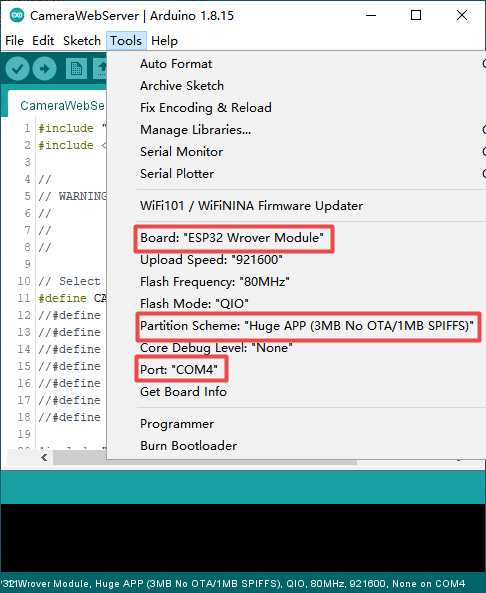
Step 2:make sure the parameters of serial port and board type correct
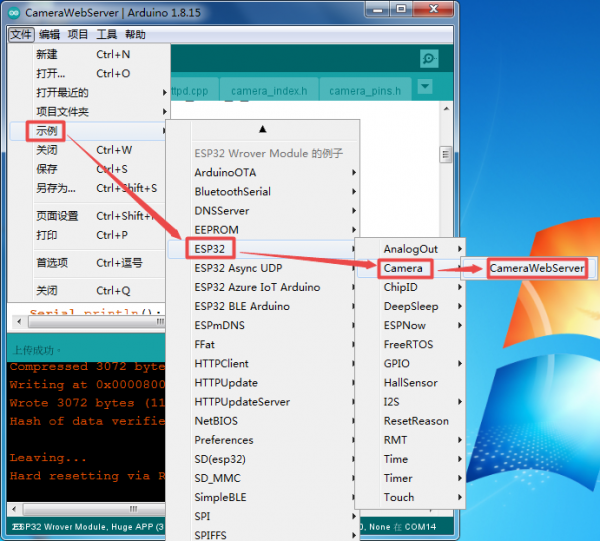
Select sample
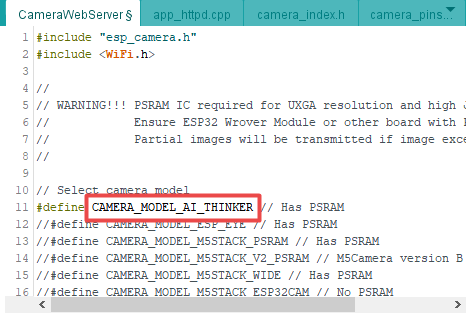
Modify the camera type: change into esp32-cam
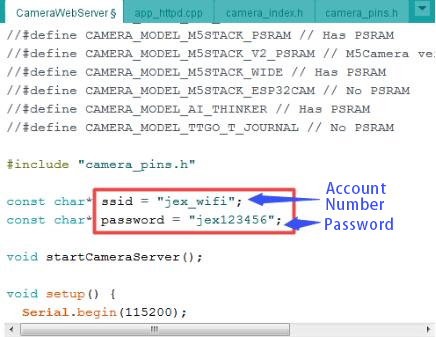
Configure WiFi:
Compile:
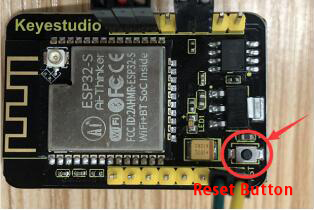
Click![]() and the IDE shows connecting....______ , then press the reset button of the ESP32-CAM board to upload test code
and the IDE shows connecting....______ , then press the reset button of the ESP32-CAM board to upload test code
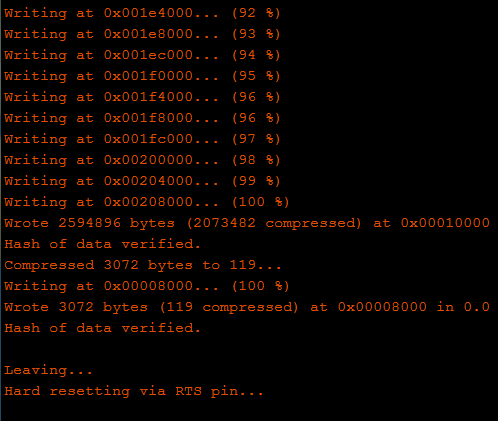
If the IDE shows the following picture as follows, the test code is uploaded successfully. After programming, open serial monitor in the upper right corner of the Arduino.
Test
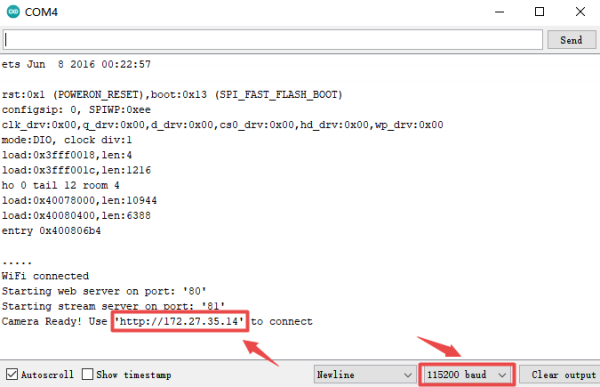
Select 11500 baud rate, remove IO0 and GND wire. Press reset button, LED indicator will flash. If fail to connect WiFi, press the reset button again.
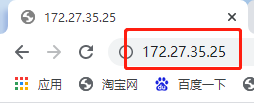
Step 1: connect the computer to the development board though WiFi, and paste the above displayed IP address in the searching box of Google or Foxfire browser. (Other browsers may not compatible)
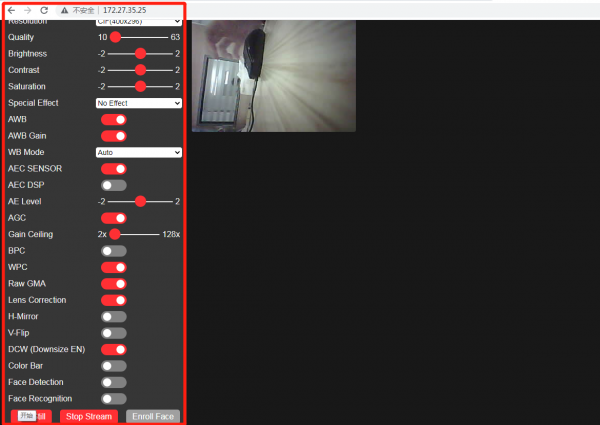
Step 2: set the parameters as follows and click Start Stream. Then the camera will start work, the WiFi module will heat and serial port will display numerous communication data. You don’t need to worry about.
Test Result
The video screen will appear Note: IP address should be displayed normally on serial monitor, the camera should be wired up and video screen is clear.
Note:
- 1.The input power is least 5V 2A; otherwise pictures will show abnormally
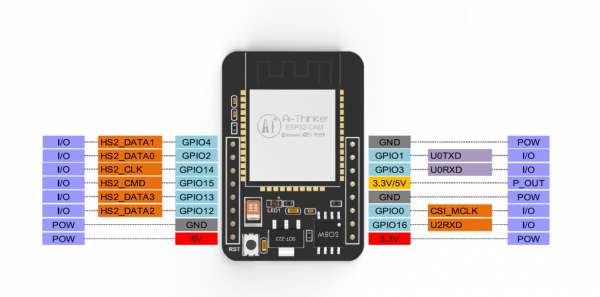
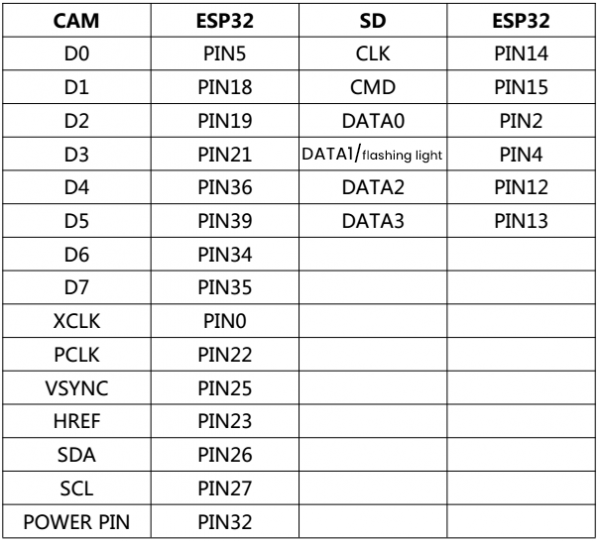
- 2.ESP32 GPIO32 pin controls the power of the camber; when the camera works, pull down GPIO32.
- 3.As IO0 is connected to XCLK, hang the IO0 and avoid connecting high or low levels when using it.
- 4.The default firmwares are included when delivered from factory, yet we don’t provide the way to download them. Please be cautious about operation if programming other firmwares.
More Tutorials:
For more details, click the following link:
