Keyestudio 1.3 128x64 OLED Display with IIC Ports: Difference between revisions
Keyestudio (talk | contribs) No edit summary |
Keyestudio (talk | contribs) No edit summary |
||
| Line 1: | Line 1: | ||
<br>[[File:0532-1.png|400px|right|frameless|thumb]]<br> | |||
== Description == | == Description == | ||
| Line 23: | Line 24: | ||
== Wiring Up == | == Wiring Up == | ||
<br>[[File:0532-2.png|400px|frameless|thumb]]<br> | |||
<pre> | <pre> | ||
| Line 68: | Line 71: | ||
} | } | ||
</pre> | </pre> | ||
Attention: | Attention: | ||
The library file is used in the code. | The library file is used in the code. <br> | ||
Before uploading the test code, you need to copy the library folder to the libraries folder of the Arduino software, as shown below; | Before uploading the test code, you need to copy the library folder to the libraries folder of the Arduino software, as shown below;<br> | ||
<br>[[File:0532-3.png|400px|frameless|thumb]]<br> | |||
== Test Result == | == Test Result == | ||
Wire up, upload test code and power up. The OLED display shows as follows: | Wire up, upload test code and power up. The OLED display shows as follows: | ||
<br>[[File:0532-4.png|400px|frameless|thumb]]<br> | |||
Revision as of 16:03, 11 April 2022
Description
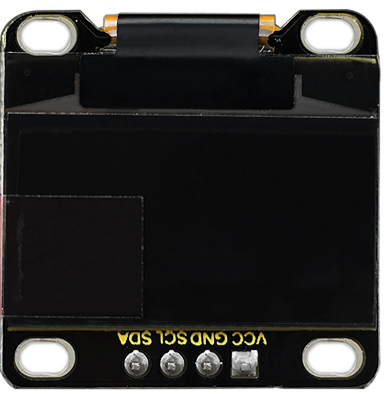
OLED is an organic light-emitting diode, also known as organic dot laser display. Composed of a very thin coating of organic materials that emit light and a glass substrate, it has self-luminous properties, a large viewing angle and low power consumption.
It doesn’t need a backlight ( it will light up when the driver and wiring up are correct).
It has high contrast and fast response speed, applied for flexible surface. In addition, it is easy to build.
The module comes with 4 positioning holes, which is convenient for you to fix it on other devices.
Specification
- Working voltage: DC 3.3V-5V
- Working current: 30mA
- Interface: pin header interface with a pitch of 2.54mm
- Communication method: I2C communication
- Internal driver chip: SSD1306
- Resolution: 128*64
- Viewing angle: more than 150°
- Size: 33*35*3mm
- Hole spacing: 30.5mm (length) 29mm (width)
- Weight: 7.1g
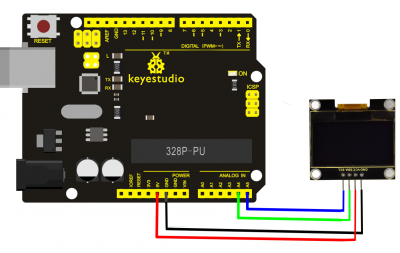
Wiring Up
== Test Code (Arduino1.8.2) ==

#include <SPI.h>
#include <Wire.h>
#include <Adafruit_GFX.h>
#include <Adafruit_SSD1306.h>

#define SCREEN_WIDTH 128 // OLED display width, in pixels
#define SCREEN_HEIGHT 64 // OLED display height, in pixels

#define OLED_RESET 4
Adafruit_SSD1306 display(SCREEN_WIDTH, SCREEN_HEIGHT, &Wire, OLED_RESET);

void setup() {

// by default, we'll generate the high voltage from the 3.3v line internally! (neat!)
display.begin(SSD1306_SWITCHCAPVCC, 0x3C); // initialize with the I2C addr 0x3D (for the 128x64)
// init done

// Show image buffer on the display hardware.
// Since the buffer is intialized with an Adafruit splashscreen
// internally, this will display the splashscreen.
// Clear the buffer.
display.clearDisplay();
}

void loop() {

display.clearDisplay();
display.setTextSize(1);
display.setTextColor(WHITE);
display.setCursor(0,0);
display.println(F("Hello,world!"));
display.println(F("Hello,keyestudio!"));
display.setTextSize(2);
display.println(F("Hello!"));
//display.println(F("keyes!"));
display.println(F("keyestudio"));
display.display();
delay(250);
}
Attention:
The library file is used in the code.
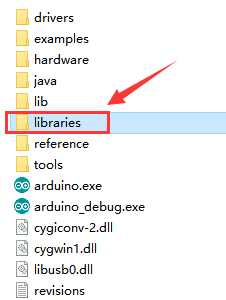
Before uploading the test code, you need to copy the library folder to the libraries folder of the Arduino software, as shown below;
Test Result
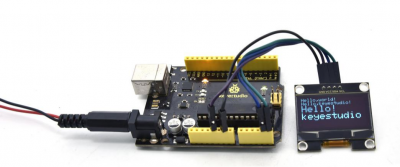
Wire up, upload test code and power up. The OLED display shows as follows:


