SMP0100 Raspberry Pi 400 4GB RAM: Difference between revisions
Keyestudio (talk | contribs) |
Keyestudio (talk | contribs) |
||
| Line 40: | Line 40: | ||
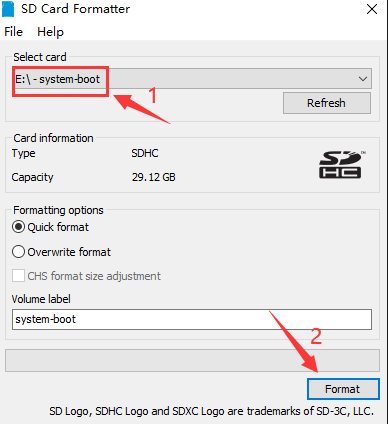
Format a SD card:insert the SD card into a card reader, then connect to your computer and format the SD card through SDCardFormatter.exe <br> | Format a SD card:insert the SD card into a card reader, then connect to your computer and format the SD card through SDCardFormatter.exe <br> | ||
<br>[[File: | <br>[[File:图片1smp 3.png|400px|frameless|]]<br> | ||
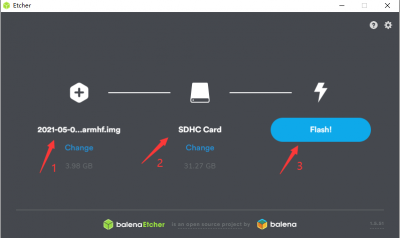
Program the imager with balenaEtcher-Setup-1.5.51.exe. Open the software to click“Select image”to choose,select SD card,click“Flash!”. After programming, click Cancel if a prompt shows that format is required. | Program the imager with balenaEtcher-Setup-1.5.51.exe. Open the software to click“Select image”to choose,select SD card,click“Flash!”. After programming, click Cancel if a prompt shows that format is required. | ||
<br>[[File: | <br>[[File:图片1smp 4.png|400px|frameless|]]<br> | ||
<br>[[File: | <br>[[File:图片1smp 5.png|400px|frameless|]]<br> | ||
Start Raspberry pi 400:then insert the SD card to the Raspberry pi 400, connect 5V 3A Type-C adapter to start Raspberry pi 400. | Start Raspberry pi 400:then insert the SD card to the Raspberry pi 400, connect 5V 3A Type-C adapter to start Raspberry pi 400. | ||
<br>[[File: | <br>[[File:图片1smp 6.png|400px|frameless|]]<br> | ||
Latest revision as of 14:19, 22 April 2022
Description
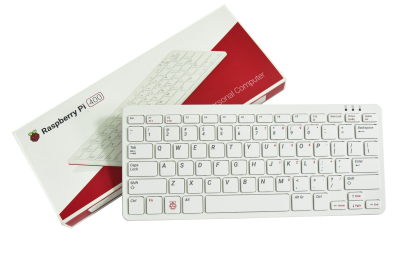
The Raspberry Pi 400 is a compact keyboard with a built-in computer. Just plug it into a TV or monitor using one of its two micro HDMI ports, insert a microSD card, attach a power cord and mouse, and you’ve got yourself a basic computer for day-to-day tasks, coding, or media playback.
It has quad-core 64-bit processor and 4GB RAM, wireless network, dual display output and 4K video playback and 40-pin GPIO header.
It integrates a computer into a portable keyboard, which is powerful and easy to use, as well as with a specially designed cooling unit to keep your computer cool.
It is an ideal educational tool for students of all ages.
Parameters
- Processor: Broadcom BCM2711 quad-core Cortex-A72 (ARM v8) 64-bit SoC@1.8GHz
- Memory: 4GB LPDDR4-3200
- Connectivity: Dual Band (2.4GHz and 5.0GHz) IEEE 802.11b/g/n/ac Wireless LAN Bluetooth: 5.0, BLE
- Ethernet: Gigabit Ethernet USB: 2 USB 3.0 and 1 USB 2.0 ports
- GPIO: 40PIN GPIO interface
- Sound and Video: 2 micro HDMI (up to 4Kp60)
- Multimedia: H.265 (4Kp60 decoding); H.264 (1080p60 decoding, 1080p30 encoding); OpenGL ES 3.0 graphics SD card support: Micro SD card slot for operating system and storing data
- Keyboard: 78-key compact keyboard
- Power supply: DC5V 3A via USB connector
- Operating temperature: 0°C to +50°C
- Maximum size: 286 x 122 x 23 mm
Pin-out
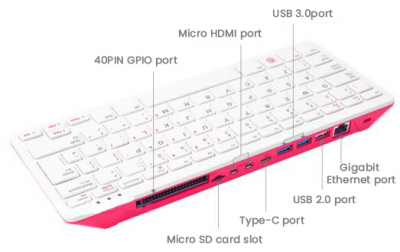
- (1) Type-C power supply interface. It is recommended to use the official 5V 3A Raspberry Pi power supply.
- (2) 40PIN GPIO interface. Convenient to connect various expansion boards.
- (3) Micro SD card slot. Used for operating system and storing data.
- (4) Micro HDMI interface. Support dual 4K high-resolution display, connect the HDMI port of the monitor through a micro HDMI cable.
How to get started
Prepare a SD card, a card reader and a screen。
Download system or use the imager system. Download the latest system( download the system after 7th May 2021 if you use Raspberry Pi 400)
Official link:https://www.raspberrypi.com/software/operating-systems/
Format a SD card:insert the SD card into a card reader, then connect to your computer and format the SD card through SDCardFormatter.exe
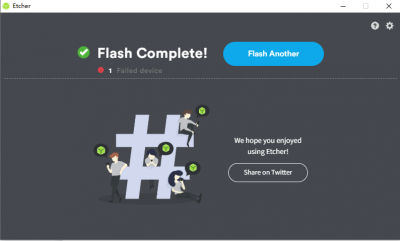
Program the imager with balenaEtcher-Setup-1.5.51.exe. Open the software to click“Select image”to choose,select SD card,click“Flash!”. After programming, click Cancel if a prompt shows that format is required.
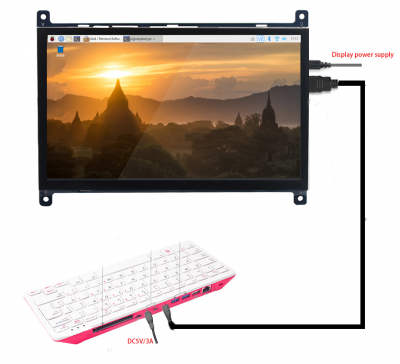
Start Raspberry pi 400:then insert the SD card to the Raspberry pi 400, connect 5V 3A Type-C adapter to start Raspberry pi 400.
