Ks0318 keyestudio Tb6560 Stepper Motor Drive Board
keyestudio Tb6560 Stepper Motor Drive Board
Introduction
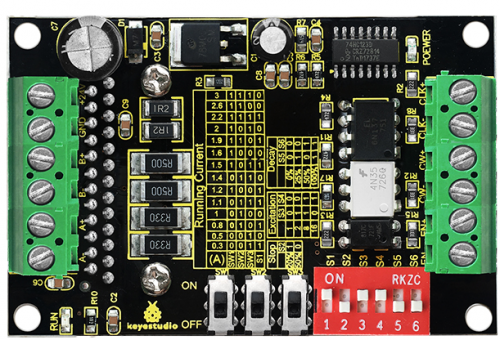
Keyestudio Tb6560 stepper motor drive board mainly uses the TB6560 stepper motor driver, which is an economical stepper motor driver with high stability, reliability and immunity, applied to various industrial control environments. This driver is mainly used to drive Type 35, 39, 42, 57 with 4, 6 and 8-wire two-phase hybrid stepper motors. It has 4 kinds of subdivisions and the maximum is up to 16-subdivision. The driving current is within 0.3A-3A, and output current has a total of 14 modes, and current resolution is about 0.2A. It has the function of automatic half-current, low-voltage shutdown for over-current protection and over-temperature shutdown.
Specification
- Supply Voltage: DC 8-35V, DC 24V recommended
- Driving Current: 0.3-3A
- Current Resolution: 0.2A
- Driver Support: Type 35、39、42、57 with 4、6、8-wire two-phase hybrid stepper motors
- Highest subdivision: 16-subdivision
- Dimensions: 75mm*50mm*35mm
Pinout Guide and Settings
| Driver | Operating Instructions |
|---|---|
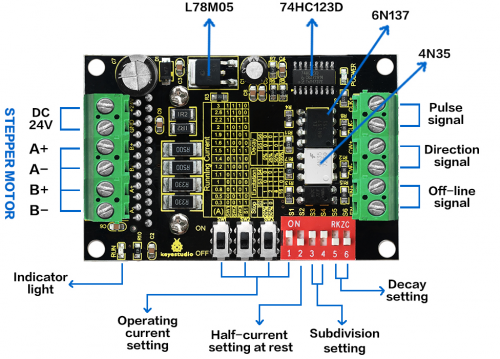
| Running current setting | Using four dial switches SW1, SW2, SW3, S1 to set the driver output current, with total 14 modes of output current. |
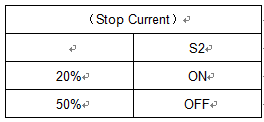
| Stop current setting | User can set the automatic half-current of driver via S2.
“1”means that Stop current is set as 20% of running current; “0”means that Stop current is set as 50% of running current. In general, should set S2 as “1” to reduce the heat generated by the motor and driver, thus improve the reliability. |
| Excitation setting | Use S3-S4 to set the driver subdivisions, with total 4 modes of subdivision. First should stop the driver running before setting the subdivision. |
| Decay setting | Use S5-S6 to set the Decay mode, with total 4 modes of decay. Choose different Decay modes to get the better drive effect. |
| Signal connector | CLK+ / CLK- : positive and negative terminal of pulse control signal;
CW+ / CW- : positive and negative terminal of direction signal ENA+ / ENA- : positive and negative terminal of enable signal |
| Motor connector | A+ and A- are connected to the positive and negative terminal of stepping motor A-phase winding;
B+ and B- are connected to the positive and negative terminal of stepping motor B-phase winding; If A-phase and B-phase winding are swapped, motor direction will be reversed. |
| Power connector | DC current for power supply; supply voltage range of DC 8-35V, 24V DC power supply recommended.
Recommend to use 24V/5A switching power supply. |
| Indicator light | POWER indicator is always on when driver is powered up.
RUN indicator: The brightness of this indicator will vary with the running speed of motor. The faster the motor runs, the brighter the indicator light. When motor stops, indicator will be always on or off. |
Setting Method
1. With 6 input terminals, can be easily connected to the input form of Common anode or Common cathode.
2. The level of input pulse is 5V. If it is 12V level pulse, need to connect a 1K resistor; if it is 24V level pulse, need to connect a 2.4K resistor.
3. CLK terminal has pulse, motor runs; if no pulse, it will automatically enter half-current mode to lock the motor.
4. CW terminal is low level or floating, motor turns in forward; if high level, motor turns in reverse.
5. EN terminal is low level or floating, in working mode; if it is high level, in off-line state.
Note:
1. It is necessary to check the wiring repeatedly before powered up, or else the wrong wiring may burn out the chip!
2. The setting current should not exceed the rated current of motor.
Sample Code
Get the Libraries of PN532:[1] Get the Libraries of SPI: [2]
//This example reads a MIFARE memory block. It is tested with a new MIFARE 1K cards. Uses default keys.
//Contributed by Seeed Technology Inc (www.seeedstudio.com)

#include <PN532.h>
#include <SPI.h>

/*Chip select pin can be connected to D10 or D9 which is hareware optional*/
/*if you the version of NFC Shield from SeeedStudio is v2.0.*/
#define PN532_CS 10

PN532 nfc(PN532_CS);
#define  NFC_DEMO_DEBUG 1

void setup(void) {
#ifdef NFC_DEMO_DEBUG
  Serial.begin(9600);
  Serial.println("Hello!");
#endif
  nfc.begin();

  uint32_t versiondata = nfc.getFirmwareVersion();
  if (! versiondata) {
#ifdef NFC_DEMO_DEBUG
    Serial.print("Didn't find PN53x board");
#endif
    while (1); // halt
  }
#ifdef NFC_DEMO_DEBUG
  // Got ok data, print it out!
  Serial.print("Found chip PN5");
  Serial.println((versiondata>>24) & 0xFF, HEX);
  Serial.print("Firmware ver. ");
  Serial.print((versiondata>>16) & 0xFF, DEC);
  Serial.print('.');
  Serial.println((versiondata>>8) & 0xFF, DEC);
  Serial.print("Supports ");
  Serial.println(versiondata & 0xFF, HEX);
#endif
  // configure board to read RFID tags and cards
  nfc.SAMConfig();
}

void loop(void) {
  uint32_t id;
  // look for MiFare type cards
  id = nfc.readPassiveTargetID(PN532_MIFARE_ISO14443A);

  if (id != 0)
  {
#ifdef NFC_DEMO_DEBUG
    Serial.print("Read card #");
    Serial.println(id);
#endif
    uint8_t keys[]= { 0xFF,0xFF,0xFF,0xFF,0xFF,0xFF };
    if(nfc.authenticateBlock(1, id ,0x08,KEY_A,keys)) //authenticate block 0x08
    {
      //if authentication successful
      uint8_t block[16];
      //read memory block 0x08
      if(nfc.readMemoryBlock(1,0x08,block))
      {
#ifdef NFC_DEMO_DEBUG
        //if read operation is successful
        for(uint8_t i=0;i<16;i++)
        {
          //print memory block
          Serial.print(block[i],HEX);
          Serial.print(" ");
        }
        Serial.println();
#endif
      }
    }
  }
 delay(500);
}
Test Result
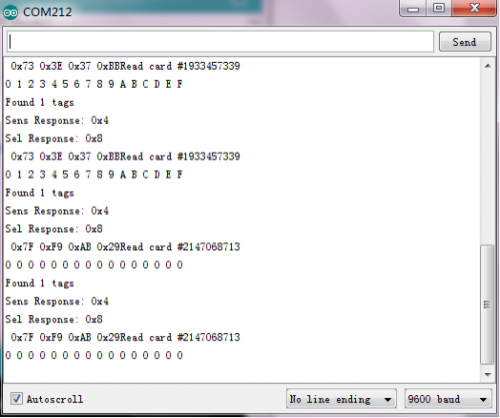
In the experiment, we use SPI communication, and SCK, MI, MO and NSS on the shield is connected with jumper cap. Dial SET0 to L, SET1 to H. After wiring and uploading the code to the board, open the serial monitor, respectively using S50 Fudan card and key chain to test it, you will get the information as the figure shown blow:
Resources
PDF
https://drive.google.com/open?id=1c96oFlawsJ3k-vWRw6Gkzhc3mhX13sZf
Get the Libraries of PN532
https://drive.google.com/open?id=1PHDePQzTCWEht9Js6X1aJkbW_N8gAjQm
Get the Libraries of SPI
https://drive.google.com/open?id=171BsjAyEi8_X69Nc37KXtd8SyyK41nz5
Get One Now
Official Website
http://www.keyestudio.com/keyestudio-pn532-nfc-rfid-controller-shield.html


