KS0218 keyestudio RPI L298P Motor Drive Shield
keyestudio RPI L298P Motor Drive Shield
Introduction
Keyestudio RPI L298P motor drive shield adopts high-power motor driver chip L298P, which can directly drive two DC motors, with drive current up to 2A, and motor output terminal uses eight high-speed Schottky diodes as protection.
The shield is fully compatible with various versions of Raspberry Pi. Meanwhile, on the shield has leaded out each interface for simple connection of other sensors. This shield also has an IR receiver, so you can use infrared remote control to communicate with it.
To make it easier for you to mount the shield to your Raspberry Pi, we have specially provided you with 4 M2.5*20MM round-head screws, 4 double-pass M2.5*10MM copper pillars and 4 M2.5 nickel-plating Nuts.
Specification
- Logic part input voltage: 5V
- Driving part input voltage: 4.8 ~ 24V
- Logic part working current Iss: ≤36mA
- Driving part working current Io: ≤ 2A
- Maximum power dissipation: 25W (T=75℃)
- Control signal input level:
High level: 2.3V ≤ Vin ≤ 5V Low level: -0.3V ≤ Vin ≤ 1.5V
- Working temperature: -25℃~+130℃
- Driver form: Dual power H bridge driving
Connection Diagram
Connect the motors and batteries to the terminal block of RPI L298P shield.
thumb
Sample Code
#include <wiringPi.h>
#include <stdio.h>
#include <string.h>
#include <errno.h>
#include <wiringSerial.h>
#define PIN 27
#define IO digitalRead(PIN)
unsigned char i,idx,cnt;
unsigned char count;
unsigned char data[4];
char a;
long  up  = 0x40;
long  back = 0x15;
long  stop = 0x46;
long  left = 0x44;
long  right= 0x43;
long  esc= 0x4a;


int main()
{
    wiringPiSetup();
    pinMode(PIN, INPUT);
    pullUpDnControl(PIN, PUD_UP);
    pinMode(1,OUTPUT);
    int fd ;

    pinMode(22,OUTPUT);
    pinMode(26,OUTPUT);
    pinMode(21,OUTPUT);
    pinMode(30,OUTPUT);
    printf("L298P test......\n");
    for(a=0;a<2;a++)
       {
       digitalWrite(21,HIGH);
       digitalWrite(26,HIGH);
       digitalWrite(22,LOW);
       digitalWrite(30,LOW);
       delay(1000);
       digitalWrite(22,HIGH);
       digitalWrite(30,HIGH);
       delay(1000);
       digitalWrite(21,LOW);
       digitalWrite(26,LOW);
       delay(1000);
       digitalWrite(22,LOW);
       digitalWrite(30,LOW);
       delay(1000);
       }
       printf("IRM Test Program ... \n");

	while (data[2]  != esc )
	{
		if(IO == 0)
		{
			count = 0;
			while(IO == 0 && count++ < 200)   //9ms
		    	delayMicroseconds(60);

			count = 0;
			while(IO == 1 && count++ < 80)	  //4.5ms
		    	delayMicroseconds(60);

			idx = 0;
			cnt = 0;
			data[0]=0;
			data[1]=0;
			data[2]=0;
			data[3]=0;
			for(i =0;i<32;i++)
			{
				count = 0;
				while(IO == 0 && count++ < 15)  //0.56ms
		    		delayMicroseconds(60);

				count = 0;
				while(IO == 1 && count++ < 40)  //0: 0.56ms; 1: 1.69ms
		    		delayMicroseconds(60);

				if (count > 25)data[idx] |= (1<<cnt);
				if(cnt == 7)
				{
					cnt = 0;
					idx++;
				}
				else cnt++;
			}

			if(data[0]+data[1] == 0xFF && data[2]+data[3]==0xFF)	//check
				printf("Get the key: 0x%02x\n",data[2]);
                 if (data[2]  == up )
			    {
                      digitalWrite(21,HIGH);
                      digitalWrite(26,HIGH);
                      digitalWrite(22,LOW);
                      digitalWrite(30,LOW);
                      delay(1000);
				}
                  if (data[2]  == back )
				{
                      digitalWrite(21,LOW);
                      digitalWrite(26,LOW);
                      digitalWrite(22,HIGH);
                      digitalWrite(30,HIGH);
                      delay(1000);
				}
                   if (data[2]  == stop )
				{
                      digitalWrite(21,HIGH);
                      digitalWrite(26,HIGH);
                      digitalWrite(22,HIGH);
                      digitalWrite(30,HIGH);
                      delay(1000);
				}
                     if (data[2]  == left )
				{
                      digitalWrite(21,HIGH);
                      digitalWrite(26,LOW);
                      digitalWrite(22,LOW);
                      digitalWrite(30,HIGH);
                      delay(1000);
				}
                     if (data[2]  == right )
				{
                      digitalWrite(21,LOW);
                      digitalWrite(26,HIGH);
                      digitalWrite(22,HIGH);
                      digitalWrite(30,LOW);
                      delay(1000);
				}
		}
	}
 printf("Bluetooth Test Program ... \n");
 if ((fd = serialOpen ("/dev/ttyAMA0", 9600)) < 0)
  {
    fprintf (stderr, "Unable to open serial device: %s\n", strerror (errno)) ;
    return 1 ;
  }

// Loop, getting and printing characters
  while(1)
 {
    putchar (serialGetchar (fd)) ;
    fflush (stdout) ;
   }
}
Program Writing
1.Installing bcm-2835 Library
Here is the tutorial for installing bcm-2835 library in Raspberry Pi. To install bcm-2835, first we need to download bcm2835 library. So we will provide an installation package or click its office web http://www.airspayce.com/mikem/bcm2835/ to download it.
Step1:- Now after downloading library, copy it in any folder of your raspberry pi by winSCP(we provide its installation package, but please refer to usage by yourselves).
Step2:- Now it’s time to extract the library, so open terminal of raspberry pi and go to the folder where you have copied your library and type this command: tar zxvf bcm2835-1.26.tar.gz
Step3:- Now to into library folder, type this command: cd bcm2835-1.26
Step4:- Now, we are ready to install bcm2835 library, so to start installation type this command: ./configure
Step5:- then type this command: make
Step6:- then this: sudo make check
Step7:- and finally this: sudo make install
Congrats your library is installed. Now use “#include <bcm2835.h>” in your program to use bcm2835 library.
2.Programming
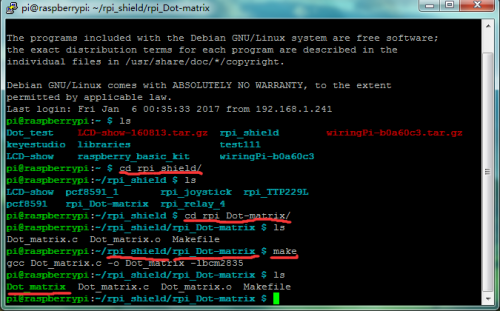
Now its time to write a program. Copy the file rpi_Dot-matrix provided by us and put it into the directory rpi_shield through winSCP. Next , type this command: cd rpi_Dot-matrix to go inside the rpi_Dot-matrix folder. Then type this command: make to make an executable file. This means this is the file we run to launch the program as shown in below figure.
Finally type this: sudo ./Dot_matrix to launch the program.

Test Result
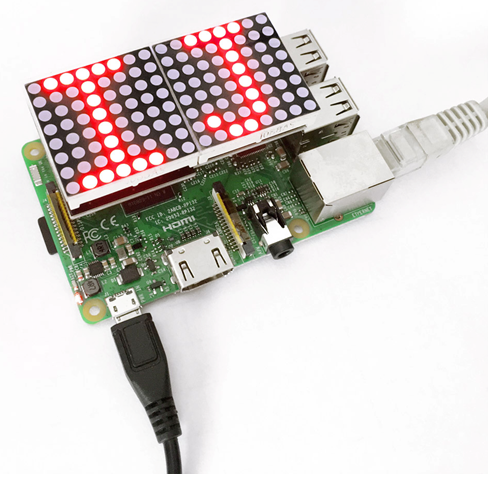
The dot matrix will display letters “IJ” as shown in below figure. Use Ctrl+C to exit the processing program.

Sudo ./Dot_matrix
Documents
PDF File:
https://drive.google.com/open?id=1_lHJOaTWCbNSRAyCG9lr7AoCUa7xwiXk
Installation Package:
https://drive.google.com/open?id=1fkLMzRFuqDaFqw_NB22N7uM2qHOZg1FN
Source Code:
https://drive.google.com/open?id=1Ig5ZcMdIrzgz8lhx_Gn-C_cQzQBP5Gkn