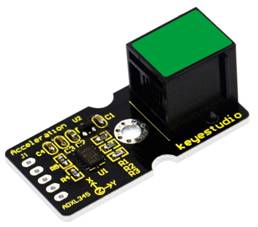
Ks0128 keyestudio EASY plug ADXL345 Three Axis Acceleration Module
Introduction
The ADXL345 module is a low power, 3-axis MEMS accelerometer with high resolution (13-bit) and measurement at up to ±16g (gravitational force).
Digital output data is formatted as 16-bit twos complement, and is accessible through either a SPI or I2C digital interface.
The ADXL345 is well suited to measures the static acceleration of gravity in tilt-sensing applications, as well as dynamic acceleration resulting from motion or shock.
Note: this module needs to be used together with EASY plug control board.
Features
- Connector: Easy plug
- Working Voltage: 2.0-3.6V
- Ultra Low Power @2.5v: 40uA /working mode; 0.1uA / standby mode
- Communication interface: I2C / SPI
- Tap/Double Tap Detection
- Free-Fall Detection
Technical Details
- Dimensions: 41mm*20mm*18mm
- Weight: 4.6g
Connect It Up
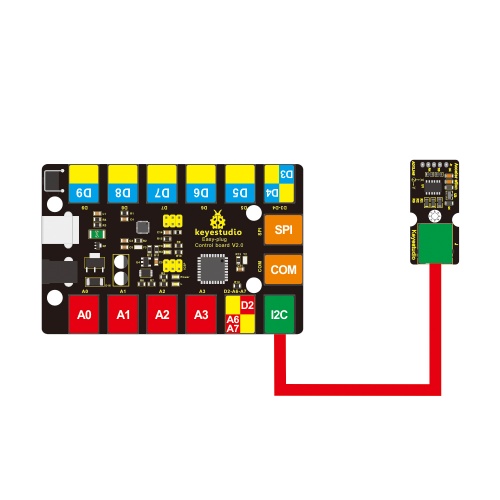
Connect the EASY Plug ADXL345 Acceleration module to control board using an RJ11 cable. Then connect the control board to your PC with a USB cable.

Upload the Code
Copy and paste below code to Arduino IDE and upload.
 #include <Wire.h>    // place file “Wire.h” under the directory “libraries” of Arduino
// Registers for ADXL345
#define ADXL345_ADDRESS (0xA6 >> 1)  // address for device is 8 bit but shift to the
                                     // right by 1 bit to make it 7 bit because the
                                     // wire library only takes in 7 bit addresses
#define ADXL345_REGISTER_XLSB (0x32)

int accelerometer_data[3];
// void because this only tells the cip to send data to its output register
// writes data to the slave's buffer
void i2c_write(int address, byte reg, byte data) {
  // Send output register address
  Wire.beginTransmission(address);
  // Connect to device
  Wire.write(reg);
  // Send data
  Wire.write(data); //low byte
  Wire.endTransmission();
}

// void because using pointers
// microcontroller reads data from the sensor's input register
void i2c_read(int address, byte reg, int count, byte* data) {
  // Used to read the number of data received
  int i = 0;
  // Send input register address
  Wire.beginTransmission(address);
  // Connect to device
  Wire.write(reg);
  Wire.endTransmission();

  // Connect to device
  Wire.beginTransmission(address);
  // Request data from slave
  // Count stands for number of bytes to request
  Wire.requestFrom(address, count);
  while(Wire.available()) // slave may send less than requested
  {
    char c = Wire.read(); // receive a byte as character
    data[i] = c;
    i++;
  }
  Wire.endTransmission();
}

void init_adxl345() {
  byte data = 0;

  i2c_write(ADXL345_ADDRESS, 0x31, 0x0B);   // 13-bit mode  +_ 16g
  i2c_write(ADXL345_ADDRESS, 0x2D, 0x08);   // Power register

  i2c_write(ADXL345_ADDRESS, 0x1E, 0x00);   // x
  i2c_write(ADXL345_ADDRESS, 0x1F, 0x00);   // Y
  i2c_write(ADXL345_ADDRESS, 0x20, 0x05);   // Z

  // Check to see if it worked!
  i2c_read(ADXL345_ADDRESS, 0X00, 1, &data);
  if(data==0xE5)
    Serial.println("it work Success");
  else
    Serial.println("it work Fail");
}

void read_adxl345() {
  byte bytes[6];
  memset(bytes,0,6);

  // Read 6 bytes from the ADXL345
  i2c_read(ADXL345_ADDRESS, ADXL345_REGISTER_XLSB, 6, bytes);
  // Unpack data
  for (int i=0;i<3;++i) {
    accelerometer_data[i] = (int)bytes[2*i] + (((int)bytes[2*i + 1]) << 8);
  }
}
// initialise and start everything
void setup() {
  Wire.begin();
  Serial.begin(9600);
  for(int i=0; i<3; ++i) {
    accelerometer_data[i]  = 0;
  }
  init_adxl345();
}
void loop() {
  read_adxl345();
  Serial.print("ACCEL: ");
  Serial.print(float(accelerometer_data[0])*3.9/1000);//3.9mg/LSB scale factor in 13-bit mode
  Serial.print("\t");
  Serial.print(float(accelerometer_data[1])*3.9/1000);
  Serial.print("\t");
  Serial.print(float(accelerometer_data[2])*3.9/1000);
  Serial.print("\n");
  delay(100);
}
What You Should See
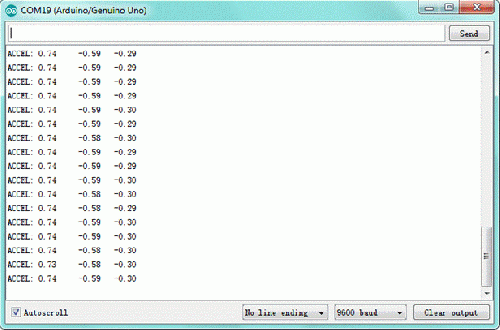
Open the Serial monitor to see the 3-axis acceleration data. See changes as you sway the Accelerometer.

Resources
Download the PDF:
https://drive.google.com/open?id=1y4fcjZzVs7ds2udrOFQINh8LxXg4tp1F
Buy from
- Official Website: http://www.keyestudio.com/ks0128.html
