KS0463 keyestudio ISD1820 Voice Recording and Playback Module
Description
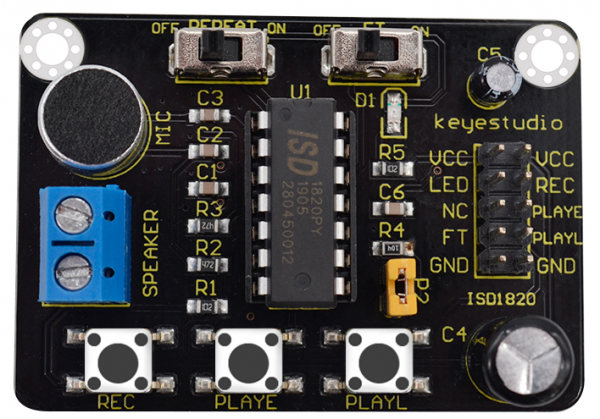
After the Keyestudio ISD1820 voice recording and playback module is connected to an 8Ω 2W speaker, it can play the sound of the module. The module uses 10 seconds of voice recording and playback, with loop playback, jog playback, single-pass playback, high quality, natural voice reproduction, can be used as a megaphone module. When using it, we provide the DC 3-5V voltage to VCC GND, and use 3 buttons and 2 DIP switches to set the module working state. At the same time, we can connect the corresponding signal terminal to the single-chip microcomputer through the pin header interface, and then use the code to control the working state of the module. When the 3 buttons are pressed, the corresponding pin header interface is at a high level, and after the button is released, the corresponding pin header interface is at a low level. When two dialing codes are dialed to the ON end, the corresponding pin header interface is high level, and when the dialing terminal is dialed, the corresponding pin header interface is low level. At the same time, in order to facilitate the fixing of the module on other devices, the module comes with two positioning holes with a diameter of 3mm.
Technical Parameters
- Working voltage: DC 3-5V
- Working current: 60mA
- Maximum power: 0.3W
- Operating temperature range: -25°C to +65°C
- Default recording time: 10 seconds
- Size: 54*38*16mm
- Weight: 14.8g
- Environmental attributes: ROHS
Schematic Diagram
Wiring Diagram
- A. The module VCC and GND provide DC 3-5V voltage supply, and blue terminal block of the module is connected to an 8Ω 2W speaker.
- B. The REPEAT and FT DIP switches on the module are dialed to the OFF terminal.
- C. Speak into the microphone, press the REC button to record, the LED light will illuminate, and the continuous sounding time is 10s.
- D. Release the REC button and press the 1 PLATE button to get the test phenomenon: the speaker starts to play the recording, and the whole segment
stops playing after it is finished. - E. Dial the REPEAT dial switch to the ON terminal, and the speaker will automatically play the recording.
- F. Dial the REPEAT dial switch to the OFF end, press and hold the PLAYL button, and the test phenomenon is: the speaker plays the recording, and
the playback stops when the PLAYL button is released; and the PLAYL button is pressed again the recording plays from the beginning. - G. Dial the FT dial switch to the ON terminal, you can hear the speaker sound, this is the pass-through function; it is to talk to the microphone,
get the test phenomenon, and speak the microphone in real time through the speaker.
Special Attention
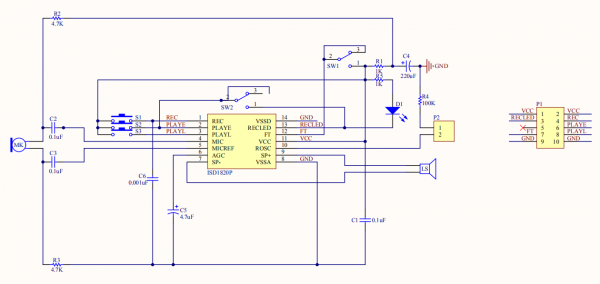
Referring to the schematic diagram, the P2 jumper cap on the module is connected to the POSC end of the chip. We can change the recording and playback time by adjusting the connection resistance of the POSC terminal (default 100KΩ). The shorter the recording and playback time, the better the sound quality, the longer the time, the worse the sound quality.
The table below represents the recording and playback time corresponding to the POSC terminal connection resistance.
ROSC/KΩ Recording-play time / S Sampling frequency/KHz Typical broadband/KHz 80 8 8.0 3.4 100 10 6.4 2.6 120 12 5.3 2.3 160 16 4.0 1.7 200 20 3.2 1.3
| ROSC/KΩ | Recording-play time / S | Sampling frequency/KHz | Typical broadband/KHz | 80 | 8 | 8.0 | 3.4 |
|---|---|---|---|---|---|---|---|
| 示例 | 示例 | 示例 | 示例 | ||||
| 示例 | 示例 | 示例 | 示例 | ||||
| 示例 | 示例 | 示例 | 示例 | ||||
| 示例 | 示例 | 示例 | 示例 |

