KS0361(KS0365) keyestudio 37 in 1 Starter Kit for BBC micro:bit: Difference between revisions
Keyestudio (talk | contribs) |
Keyestudio (talk | contribs) |
||
| Line 789: | Line 789: | ||
If you are not familiar to make code, don't worry. Firstly, you can enter this link:https://makecode.microbit.org/reference to know more about microbit blocks. <br> | If you are not familiar to make code, don't worry. Firstly, you can enter this link:https://makecode.microbit.org/reference to know more about microbit blocks. <br> | ||
Then you can directly enter the https://makecode.microbit.org/ to edit your project program. Below is an example code we have done for you as reference. | Then you can directly enter the https://makecode.microbit.org/ to edit your project program. Below is an example code we have done for you as reference. | ||
<br>[[File:361 7- | <br>[[File:361 7-9-2.png|600px|frameless|thumb]]<br> | ||
'''Example Result'''<br> | '''Example Result'''<br> | ||
| Line 796: | Line 796: | ||
'''Extension Experiment'''<br> | '''Extension Experiment'''<br> | ||
<br>[[File:361 7-10-3.png|600px|frameless|thumb]]<br> | <br>[[File:361 7-10-3.png|600px|frameless|thumb]]<br> | ||
===Project 5: Make a Sound=== | ===Project 5: Make a Sound=== | ||
Revision as of 14:48, 1 August 2018
Introduction
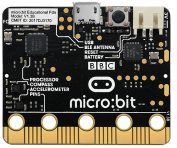
micro: bit is a powerful hand-held, fully programmable, computer designed by the BBC. It is only half size of a credit card, available for children’s programming education. Onboard comes with Bluetooth, accelerometer, compass, three buttons, 5x5 LED matrix, USB interface, connection pins. In order to learn micro bit more easier, we particularly make this kit, in which includes a keyestudio sensor shield fully compatible with micro bit and other commonly used sensor modules. In addition, this sensor kit also provides various learning projects for you, including wiring diagram, source code and more. It can help you make learning easy and fun to enjoy the programming.
Kit List
Note: The micro:bit main board is Not Included in KS0361 starter kit, but Included in KS0365 starter kit.
micro:bit Driver Installation
Next, let’s intall the driver for micro:bit main board.
1) First of all, connect the micro:bit to your computer using a USB cable.
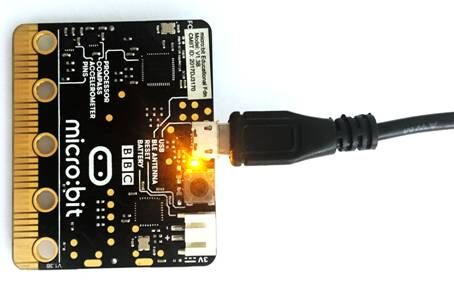
2)Then, double click the driver software to install it. Here you can click the icon below to download it.
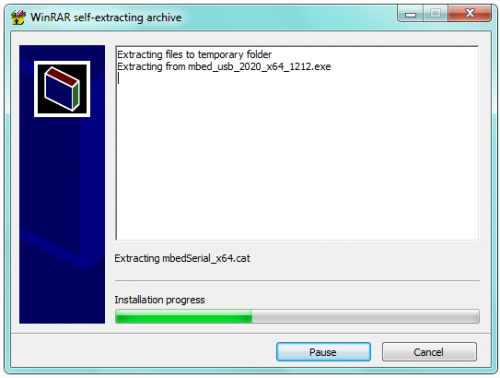
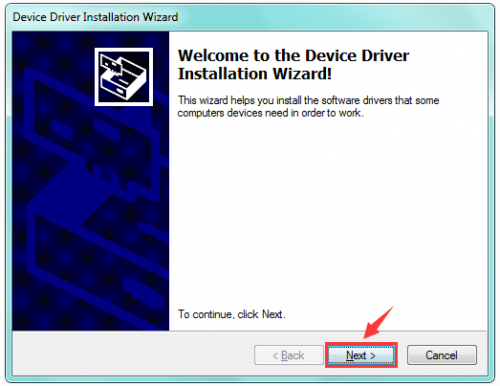
3) After that, click Next to continue the installation.
4) Wait the driver installing finished.
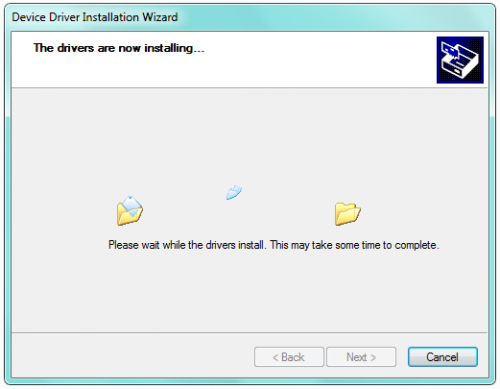
5) Wait the driver installing finished.
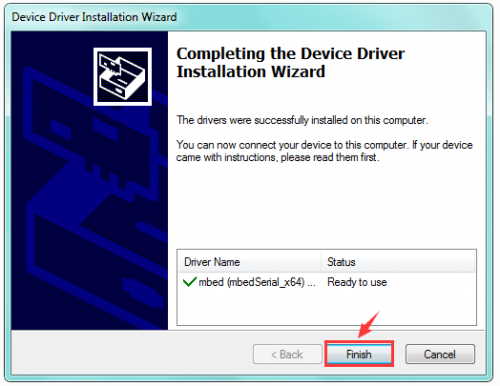
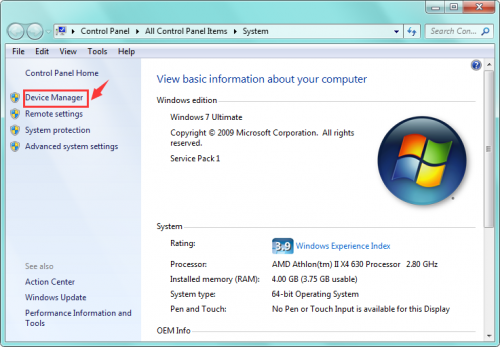
6) Driver installation completed, then you can right click the “Computer” —> “Properties”—> “Device Manager”.
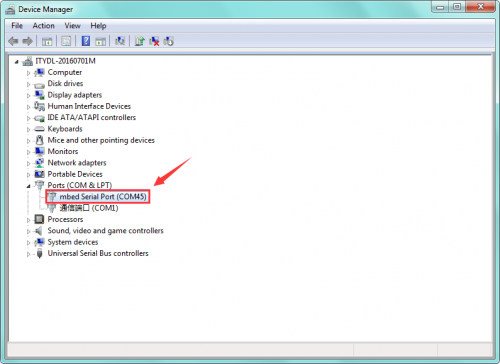
You can check the detailed Ports information shown as below.
micro:bit Example Use
Step 1: Connect It
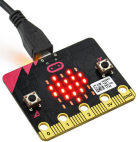
Connect the micro:bit to your computer via a micro USB cable. Your micro:bit will show up on your computer as a drive called 'MICROBIT'.
Step 2: Program It
Using micro bit MakeCode Block editor https://makecode.microbit.org/, write your first micro:bit code.
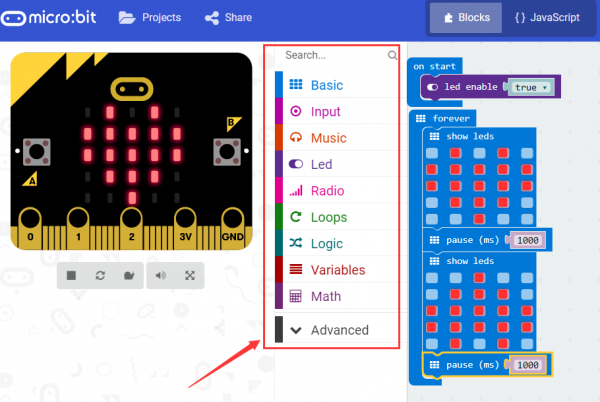
You can drag and drop some example blocks and try your program on the Simulator in the Javascript Blocks Editor, like in the image below.
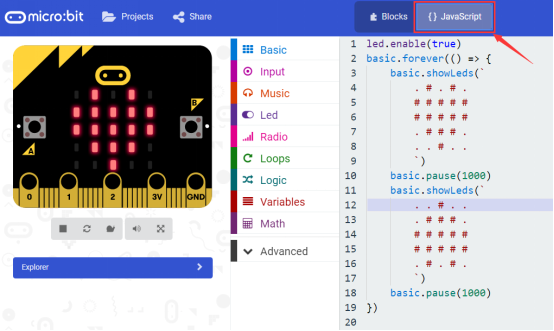
Click the JavaScript, you can see the corresponding program code. Shown as below figure.
Step 3: Download It
Click the Download button in the editor. This will download a 'hex' file, which is a compact format of your program that your micro:bit can read.
Here you can name the project as LED1, then click “Save”. Shown below.

Once the hex file has downloaded, copy it to your micro:bit just like copying a file to a USB drive. On Windows find the microbit-LED1 file, you can right click and choose "Send To→MICROBIT."


Step 4: Play It
The micro:bit will pause and the yellow 5*5 LED on the back of the micro:bit will display the images while your code is programmed.

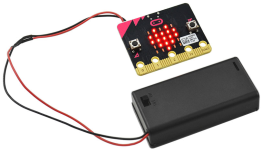
You can power it using USB cable or battery. The battery holder need to connect two 1.5V AA batteries. Shown below.
micro:bit Pins
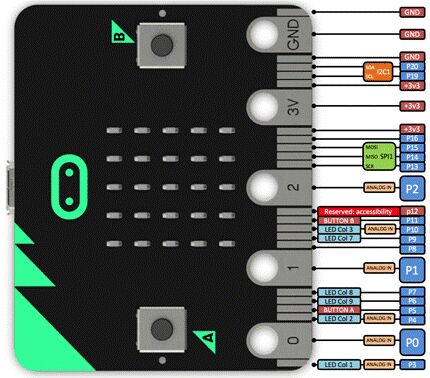
Before getting started with the following projects, first need to figure out each pin of micro:bit main board. Please refer to the reference diagram shown below.
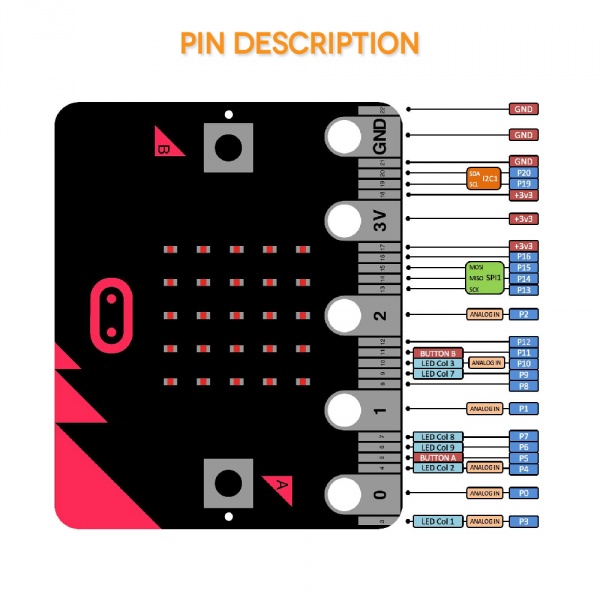
The BBC micro:bit has 25 external connections on the edge connector of the board, which we refer to as ‘pins’. The edge connector is the grey area on the right side of the figure above. There are five large pins, that are also connected to holes in the board labelled: 0, 1, 2, 3V, and GND. And along the same edge, there are 20 small pins that you can use when plugging the BBC micro:bit into an edge connector.
Note that it read from the BBC micro:bit official website. More reference you can click the link below:
BBC micro bit Pins: http://microbit.org/guide/hardware/pins/
BBC micro:bit website: http://microbit.org/
Micro bit MakeCode Block Editor: https://makecode.microbit.org/
Meet micro:bit starter programming: http://microbit.org/guide/
BBC micro:bit Features Guide: http://microbit.org/guide/features/
BBC micro:bit Safety Warnings: http://microbit.org/guide/features/
BBC micro:bit Quick Start Guide: http://microbit.org/guide/quick/
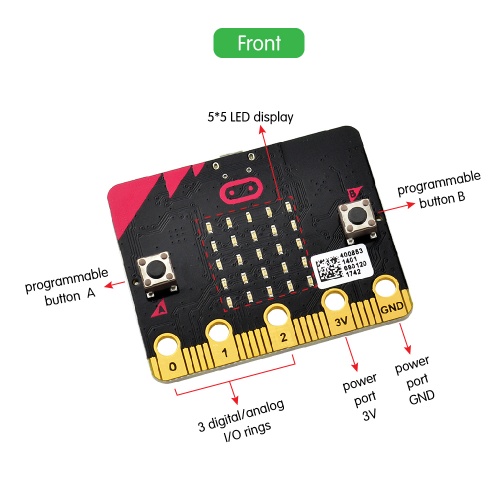
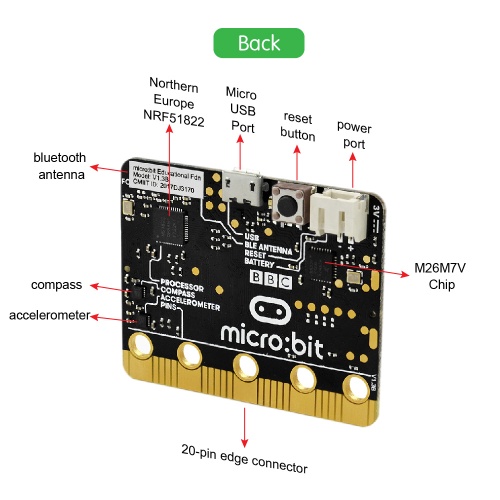
After mastering the basic information of BBC micro:bit, in the following part let’s move on to programming projects. Use this small board with keyestudio micro bit sensor shield and other sensor modules to make some interactive experiments. Play it and learn it. Enjoy your wonderful time!
Installing Arduino Software
When you get the UNO development board, first you should install the Arduino software and driver.
We usually use the Windows software Arduino 1.5.6 version. You can download it from the link below:
https://www.arduino.cc/en/Main/OldSoftwareReleases#1.5.x
Or you can browse the ARDUINO website to download the latest version from this link, https://www.arduino.cc, pop up the following interface.
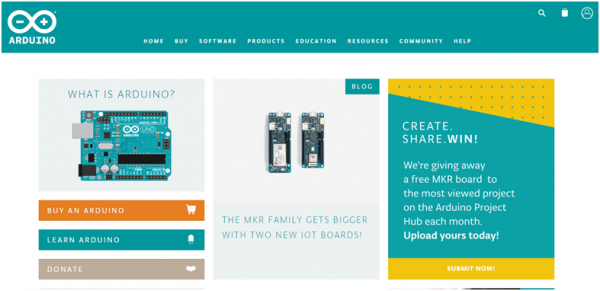
Then click the SOFTWARE on the browse bar, you will have two options ONLINE TOOLS and DOWNLOADS.
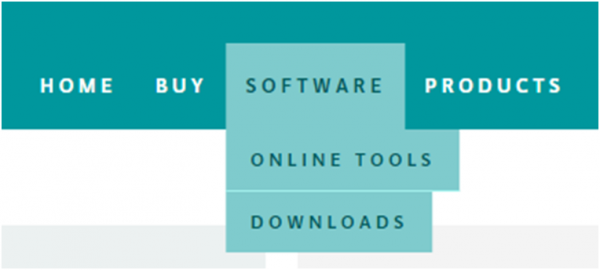
Click DOWNLOADS, it will appear the latest software version of ARDUINO 1.8.5 shown as below.
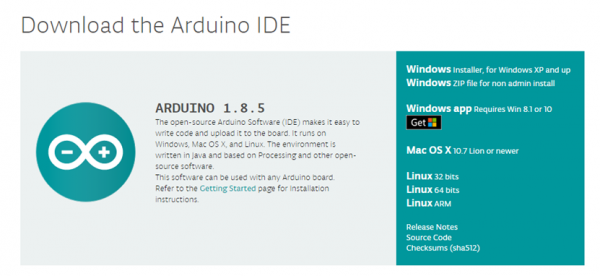
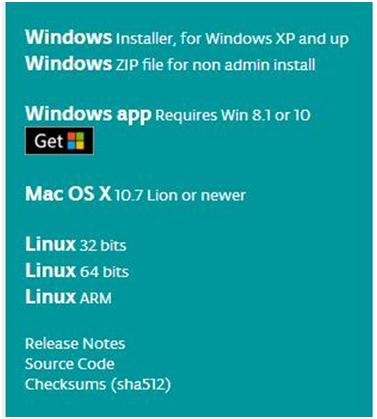
In this software page, on the right side you can see the version of development software for different operating systems. ARDUINO has a powerful compatibility. You should download the software that is compatible with the operating system of your computer.
We will take WINDOWS system as an example here. There are also two options under Windows system, one is installed version, the other is non-installed version.
For simple installed version, first click Windows Installer, you will get the following page.

This way you just need to click JUST DOWNLOAD, then click the downloaded file to install it.
For non-installed version, first click Windows ZIP file, you will also get the pop-up interface as the above figure.
Click JUST DOWNLOAD, and when the ZIP file is downloaded well to your computer, you can directly unzip the file and click the icon of ARDUINO software to start it.
Installing Arduino (Windows)
Install Arduino with the exe. Installation package downloaded well.

Click“I Agree”to see the following interface.
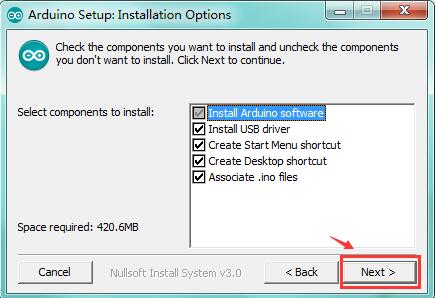
Click “Next”. Pop up the interface below.
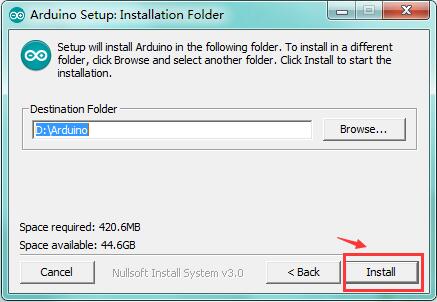
You can press Browse… to choose an installation path or directly type in the directory you want.
Then click “Install” to initiate installation.
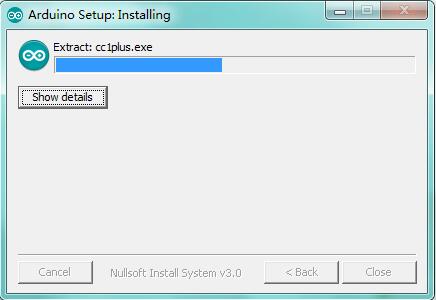
Wait for the installing process, if appear the interface of Window Security, just continue to click Install to finish the installation.
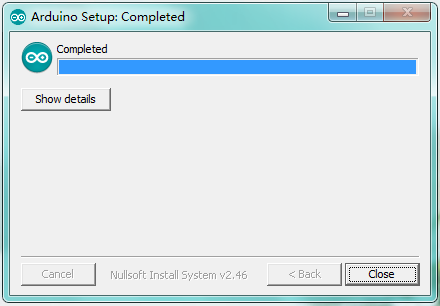
Installing Driver
Next, we will introduce the driver installation of UNO R3 development board. The driver installation may have slight differences in different computer systems. So in the following let’s move on to the driver installation in the WIN 7 system.
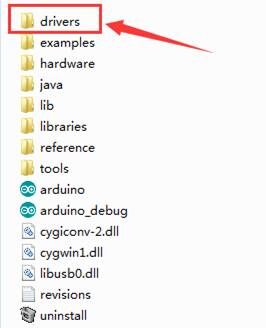
The Arduino folder contains both the Arduino program itself and the drivers that allow the Arduino to be connected to your computer by a USB cable. Before we launch the Arduino software, you are going to install the USB drivers.
Plug one end of your USB cable into the Arduino and the other into a USB socket on your computer.
When you connect UNO board to your computer at the first time, right click the icon of your “Computer” —>for “Properties”—> click the “Device manager”, under “Other Devices”, you should see an icon for “Unknown device” with a little yellow warning triangle next to it. This is your Arduino.
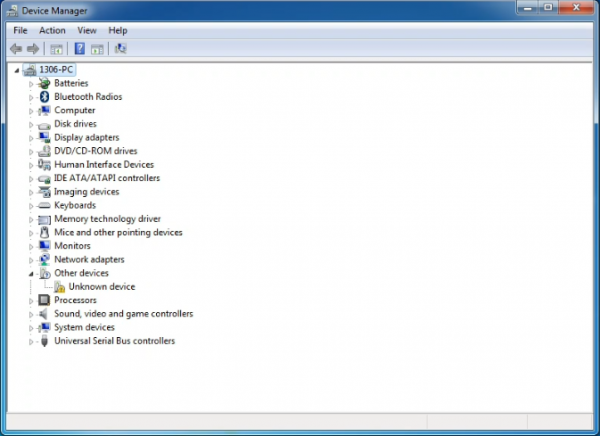
Then right-click on the device and select the top menu option (Update Driver Software...) shown as the figure below..
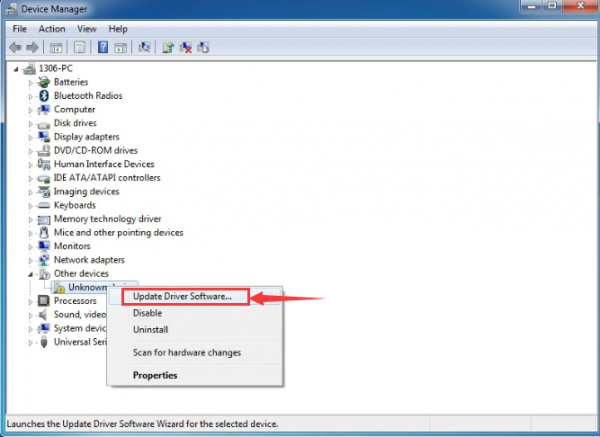
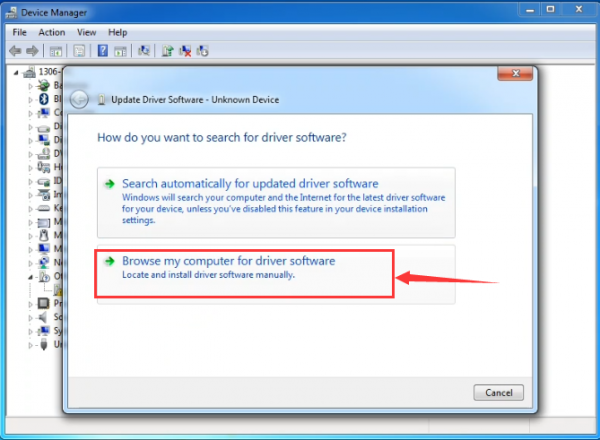
It will then be prompted to either “Search Automatically for updated driversoftware” or “Browse my computer for driver software”. Shown as below. In this page, select “Browse my computer for driver software”.
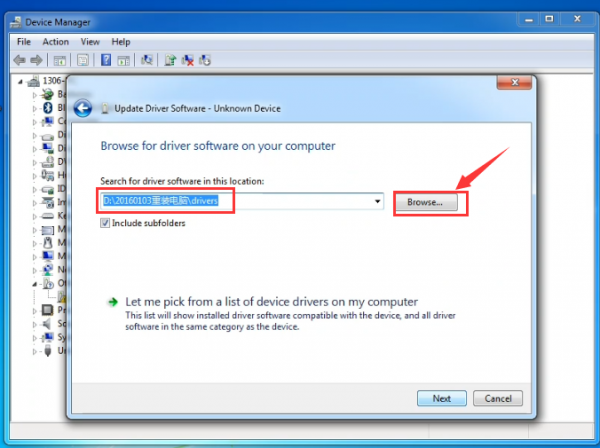
After that, select the option to browseand navigate to the “drivers” folder of Arduino installation.
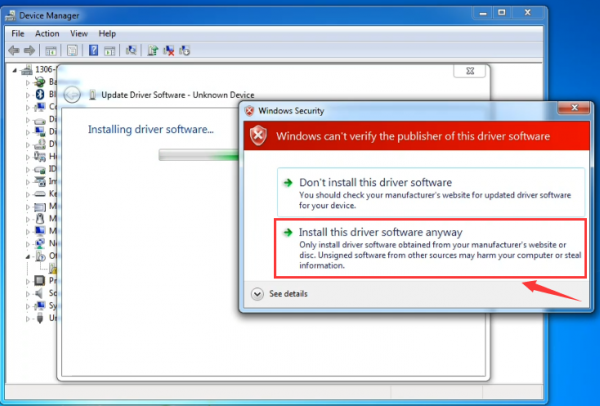
Click “Next” and you may get a security warning, if so, allow the software to be installed. Shown as below.
Once the software has been installed, you will get a confirmation message. Installation completed, click “Close”.
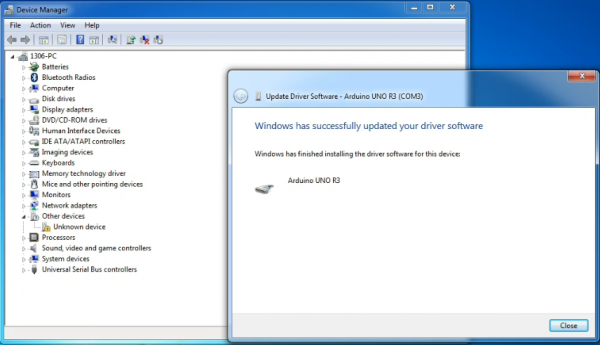
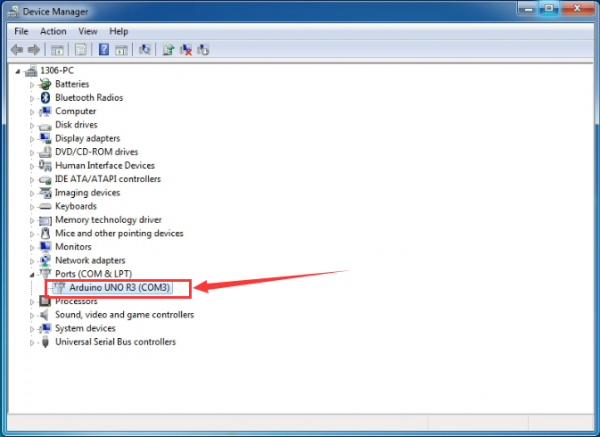
Up to now, the driver is installed well. Then you can right click “Computer” —>“Properties”—>“Device manager”, you should see the device as the figure shown below.
Example Projects
Project 1: Hello world
Overview
This project is very simple. You can use only a micro:bit main board and a USB cable to display the “Hello World!”. It is a communication experiment between the micro:bit and PC. This is an entry experiment for you to enter the programming world of micro bit.
Note that need to use a serial communication software, Arduino IDE. In the above part, you can check the detailed use of Arduino IDE.
Component Required
- Micro:bit main board*1
- USB cable*1
Connect It Up
Connect the micro:bit to your computer via a micro USB cable.

Test Code
If you are not familiar to make code, don't worry. Firstly, you can enter this link:https://makecode.microbit.org/reference to know more about microbit blocks. Then you can directly enter the https://makecode.microbit.org/ to edit your project program. Below is an example code we have done for you as reference.
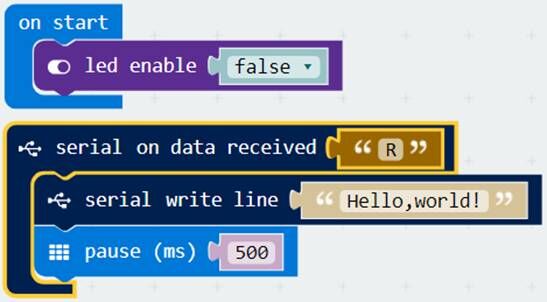
After wiring, send the above code to your micro:bit, then open Arduino IDE.
Example Result
Open Arduino IDE, set well the COM port.
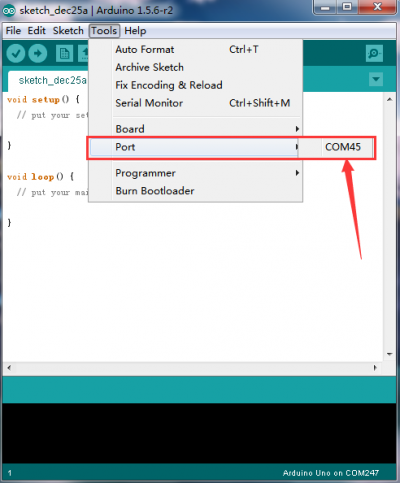
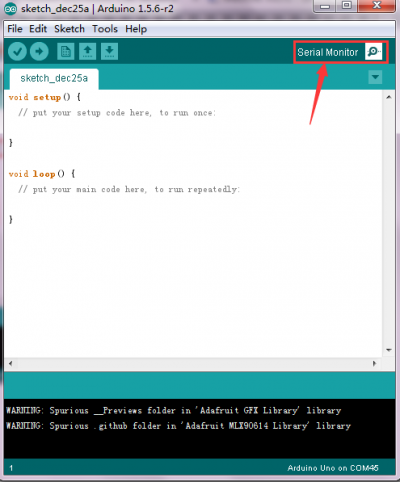
Then open the serial monitor, set the baud rate as 115200 (beacuse the USB-to-serial communication buad rate of micro:bit is 115200).
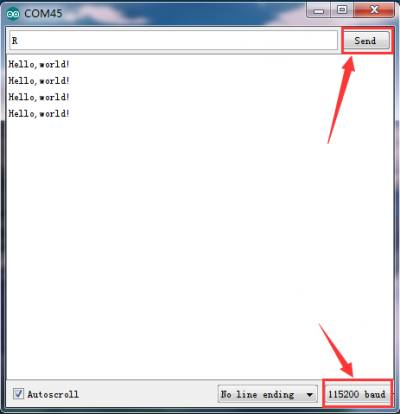
Enter an “R” and click “Send”, you should see “Hello world!” is displayed on the monitor. Shown below. Congrats! The first simple program is finished.
Project 2: LED Blink
Overview
The LED blink is one of the more basic experiments. In the above example use of micro:bit, we have mentioned the 25 LED display of micro:bit. In this project, you will learn how to control an LED blink using a keyestudio digital white LED module and micro:bit sensor shield. Before testing, you should first turn off the 5*5 LED function of micro:bit.
Component Required
- Micro:bit main board*1
- Keyestudio Micro bit sensor V2 shield*1
- USB Cable*1
- keyestudio Digital White LED Module*1
- Dupont jumper wire*3
Component Introduction
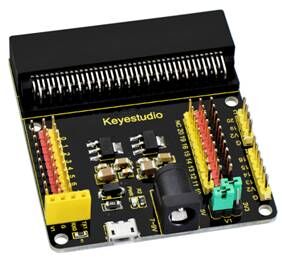
Keyestudio Micro bit Sensor V2 Shield:
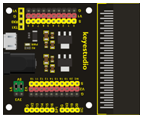
This shield is very easy for microbit wiring. It breaks out the PI0 ports in the form of 3Pin (GND, VCC, PI0), easy to connect other sensor modules. Also with communication interfaces, like serial port、I2C and SPI pin headers.
You can power the shield via USB connection or external DC power jack (DC7-9V). If power the sensor module, you can control it via two cap V1 and V2 on the shield, with DC3.3V and 5V.
Power the sensor shield with DC 7-9V, and this shield can power the micro:bit and other sensor modules, pretty convenient.
keyestudio Digital White LED Module:
This white LED light module is ideal for Arduino starters. It can be easily connected to IO/Sensor shield. It enables some light-interactive works. Specifications:
- Type: Digital
- PH2.54 socket
- Size: 30*20mm
Connect It Up
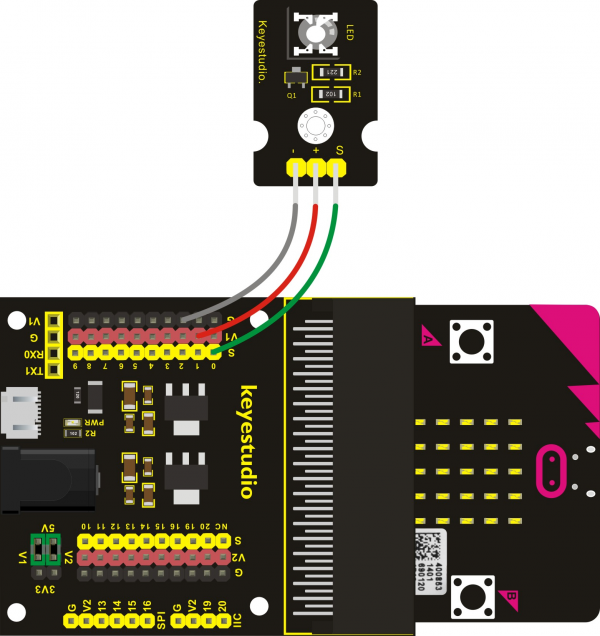
Insert the micro:bit into keyestudio micro:bit sensor V2 shield.Then connect LED module to microbit sensor shield, connect the S pin to S pin header, + pin to V1 header, - pin to ground header.
Test Code
If you are not familiar to make code, don't worry. Firstly, you can enter this link:https://makecode.microbit.org/reference to know more about microbit blocks.
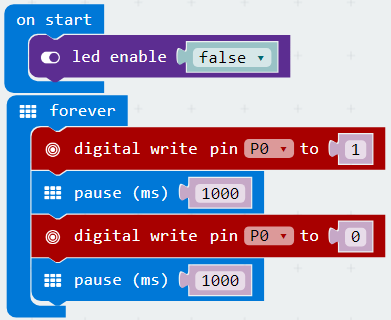
Then you can directly enter the https://makecode.microbit.org/ to edit your project program. Below is an example code we have done for you as reference.
Example Result
Done wiring and powered up, send the code to MICROBIT, you will see an LED blink on the module, with an interval about one second.
Project 3: Breath
Overview
The light breath experiment is a little bit similar to the previous project. This time we connect the keyestudio Piranha LED module to the sensor shield. Connect the Signal pin of LED module to P0 of micro:bit. From the Pinout diagram of microbit, you can get the P0 can be used as Analog IN. This lesson you will learn how to control the brightness of LED on the module, gradually becoming brighter and dimming, just like the LED is breathing.
Component Required
- Micro:bit main board*1
- Keyestudio Micro bit Sensor V2 Shield*1
- USB Cable*1
- keyestudio Piranha LED Module*1
- Dupont jumper wire*3
Component Introduction
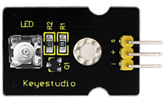
Keyestudio Piranha LED Module:
This keyestudio Piranha LED module has the same function as keyestudio digital white LED module. The difference between them is the appearance and brightness of LED on the module.
Connect It Up
Insert the micro:bit into keyestudio micro:bit sensor V2 shield.
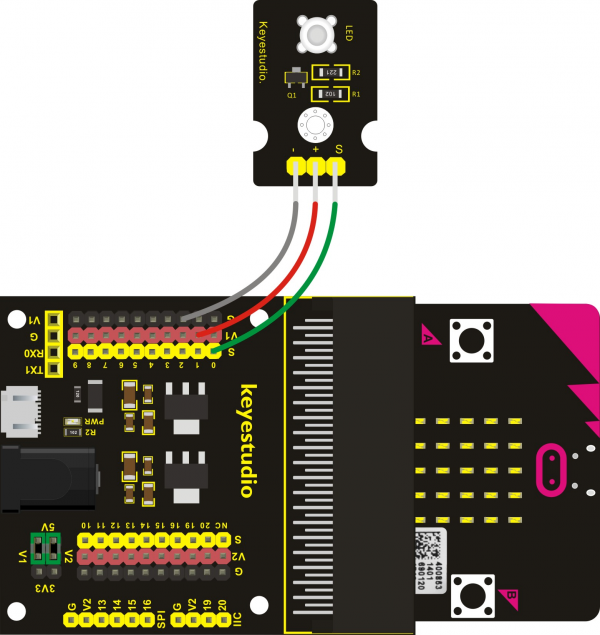
Then connect LED module to microbit sensor shield, connect the S pin to S0 pin header, + pin to V1 header, - pin to ground header.
Test Code
If you are not familiar to make code, don't worry. Firstly, you can enter this link:https://makecode.microbit.org/reference to know more about microbit blocks.
Then you can directly enter the https://makecode.microbit.org/ to edit your project program. Below is an example code we have done for you as reference.

Example Result
Done wiring and powered up, send the code to MICROBIT, you should finally see an LED on the module gradually become brighter, then gradually dim, circularly just like the LED is breathing.
Project 4: Blink and Breath
Overview
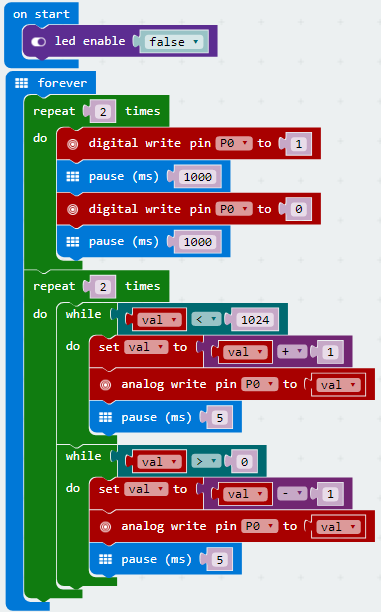
In this project, we combine the project 2 and project 3. You will learn how to control the LED on the module blink for two times, then breath for two times, circularly. This time we use keyestudio 3W LED module, which has high brightness and can be used as illumination.
Component Required
- Micro:bit main board*1
- Keyestudio Micro bit Sensor V2 Shield*1
- USB Cable*1
- keyestudio 3W LED Module*1
- Dupont jumper wire*3
Component Introduction
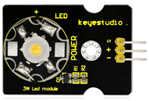
Keyestudio 3W LED Module:
This LED module is of high brightness because the lamp beads it carries is 3w. You can apply this module to Arduino or other projects, ideal for Robot or search and rescue application. For example, intelligent robots can use this module for illumination purpose.
Please note that the LED light can't be exposed directly to human eyes forsafety concerns.
Specifications
- Color temperature: 6000~7000K
- Luminous flux: 180~210lm
- Current: 700~750mA
- Power: 3W
- Light angle: 140 degree
- Working temperature: -50~80℃
- Storage temperature: -50~100℃
- High power LED module, controlled by IO port of microcontroller
- IO Type: Digital
- Supply Voltage: 3.3V to 5V
Connect It Up
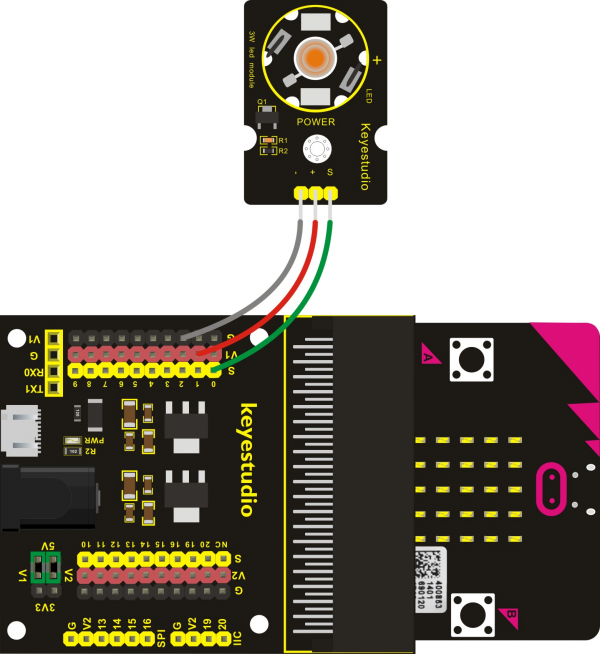
Insert the micro:bit into keyestudio micro:bit sensor V2 shield.Then connect 3W LED module to micro:bit sensor shield, connect the S pin to S pin header, + pin to V1 header, - pin to ground header.
Test Code
If you are not familiar to make code, don't worry. Firstly, you can enter this link:https://makecode.microbit.org/reference to know more about microbit blocks.
Then you can directly enter the https://makecode.microbit.org/ to edit your project program. Below is an example code we have done for you as reference.
Example Result
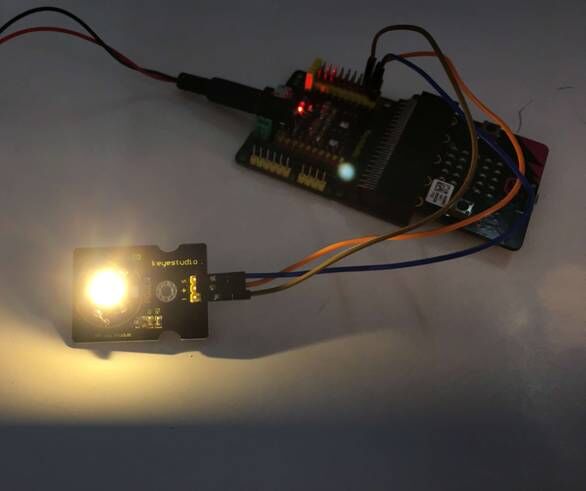
Done wiring and powered up, send the code to MICROBIT, you should see the LED on the module firstly blink two times, then breath two times, circularly.
Project 5: Make a Sound
Overview
In this project, you will learn how to generate a sound with keyestudio digital active buzzer module. Here you can refer to LED blink, in this lesson control the buzzer on and off circularly.
Component Required
- Micro:bit main board*1
- Keyestudio Micro bit Sensor V2 Shield*1
- USB Cable*1
- keyestudio Digital Buzzer Module*1
- Dupont jumper wire*3
Component Introduction
Keyestudio Digital Buzzer Module:
It is the simplest sound making module. You can use High/Low level to drive it. Changing the frequency it buzzes can produce different sounds.
Buzzers can be categorized as active and passive ones. The difference between the two is that an active buzzer has a built-in oscillating source, so it will generate a sound when electrified. The buzzer on this module is an active buzzer.
This module is widely used in our daily appliances like PC, refrigerator, telephones, timers and other electronic products for voice devices. etc.
Specifications
- Working voltage: 3.3-5v
- Interface type: digital
- Size: 30*20mm
Connect It Up
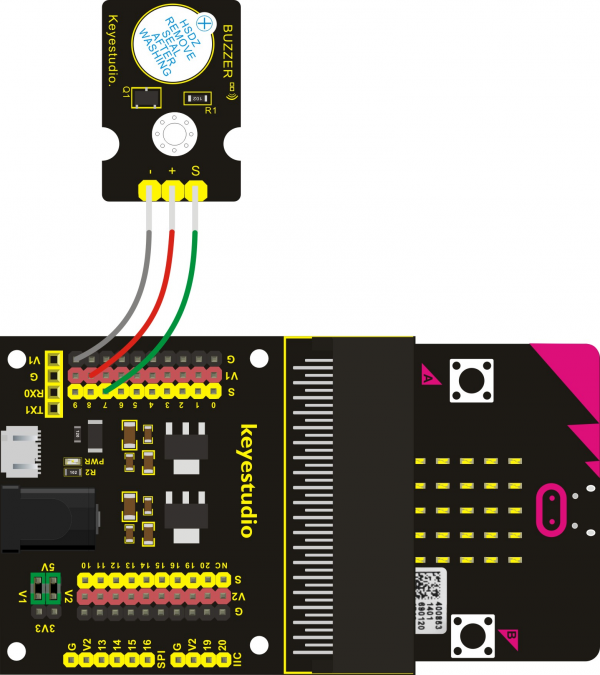
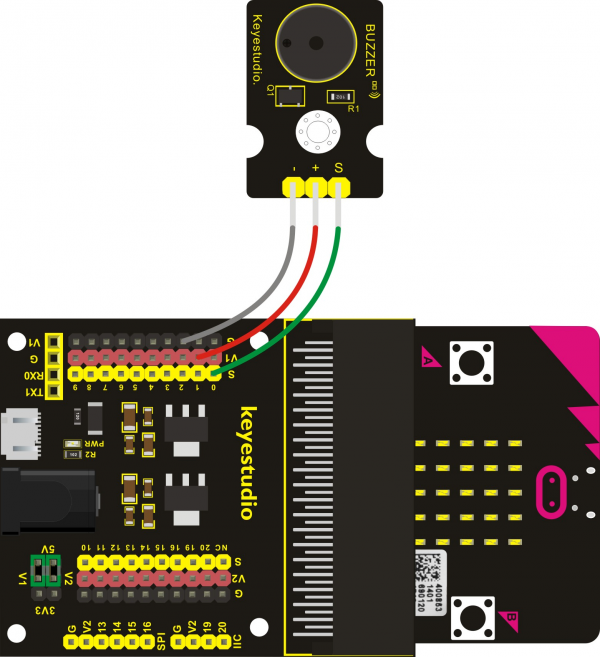
Insert the micro:bit into keyestudio micro:bit sensor V2 shield.Then connect buzzer module to micro:bit sensor shield, connect the S pin to S7 pin header (P7 of micro:bit), + pin to V1 header, - pin to ground header.
If input HIGH level to P7 end, buzzer will continue to sound.
Test Code
If you are not familiar to make code, don't worry. Firstly, you can enter this link:https://makecode.microbit.org/reference to know more about microbit blocks.
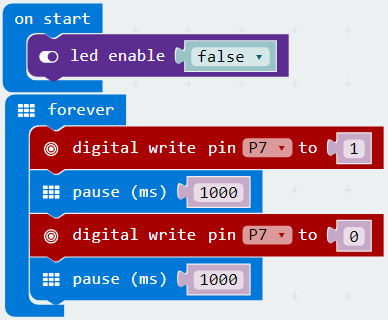
Then you can directly enter the https://makecode.microbit.org/ to edit your project program. Below is an example code we have done for you as reference.
Example Result
Done wiring and powered up, send the code to MICROBIT, you should hear the buzzer module sound and then stop, circularly. It seems like the sound is interrupted.
Project 6: Play Music
Overview
In this project, you will learn how to play music with keyestudio passive buzzer module. We are going to complete two experiments.
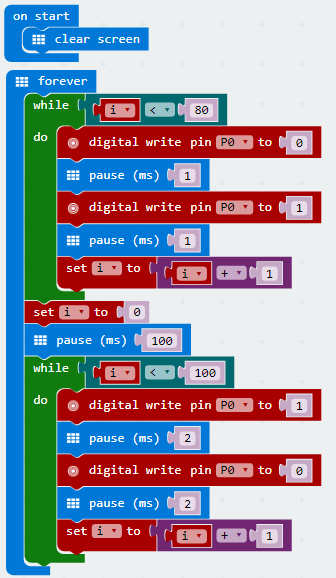
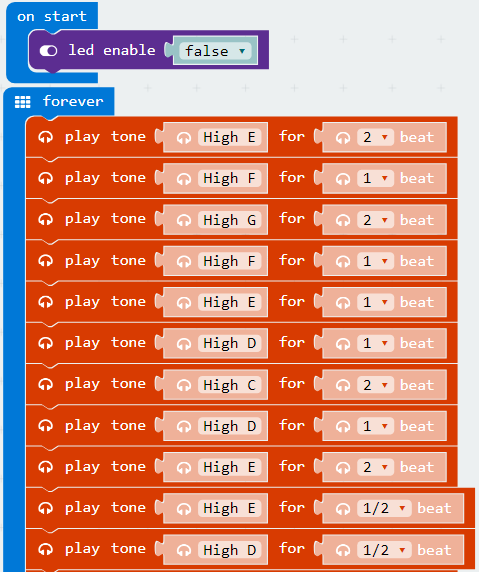
One is to directly control the High and Low level input of micro:bit P0 end, set two square waves to control the buzzer sound. The other is to use the software's own function, input the square waves of different frequencies and different lengths on the P0 end. Finally make the buzzer module play the song "Ode to Joy". (The input PIO port can only be P0, can not be other interfaces).
Component Required
- Micro:bit main board*1
- Keyestudio Micro bit Sensor V2 Shield*1
- USB Cable*1
- keyestudio Passive Buzzer Module*1
- Dupont jumper wire*3
Component Introduction
Passive Buzzer Module:
Buzzers can be categorized as active and passive ones. The difference between the two is that an active buzzer has a built-in oscillating source, so it will generate a sound when electrified. The buzzer used on this module is a passive buzzer. A passive buzzer does not have such a source, so DC signal cannot drive it beep. Instead, you need to use square waves whose frequency is between 2K and 5K to drive it. Different frequencies produce different sounds. You can use micro:bit to code the melody of a song, quite fun and simple.
Specifications
- Working voltage: 3.3-5V
- Interface type: Digital
Connect It Up
Insert the micro:bit into keyestudio micro:bit sensor V2 shield.Then connect passive buzzer module to micro:bit sensor shield, connect the S pin to S0 pin header, + pin to V1 header, - pin to ground header.
Test Code
If you are not familiar to make code, don't worry. Firstly, you can enter this link:https://makecode.microbit.org/reference to know more about microbit blocks.
Then you can directly enter the https://makecode.microbit.org/ to edit your project program. Below is an example code we have done for you as reference.
Program 1:
Program 2:
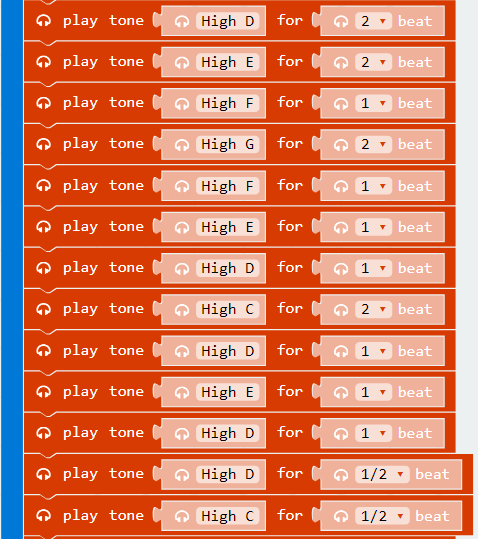
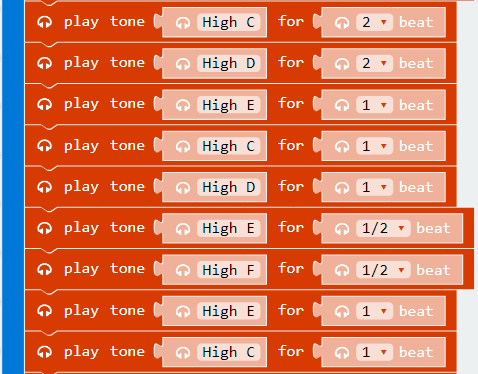
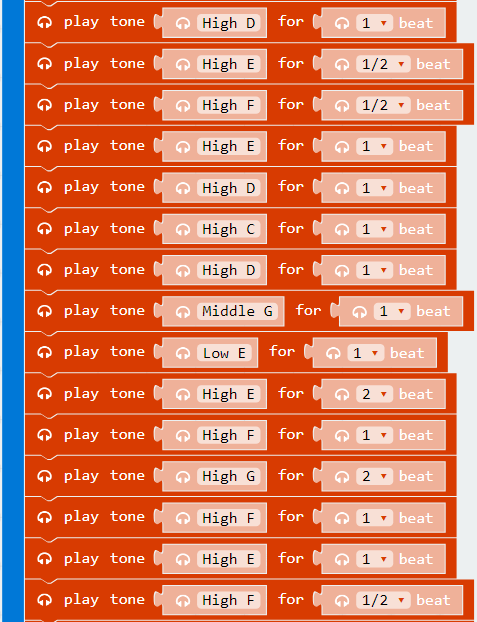
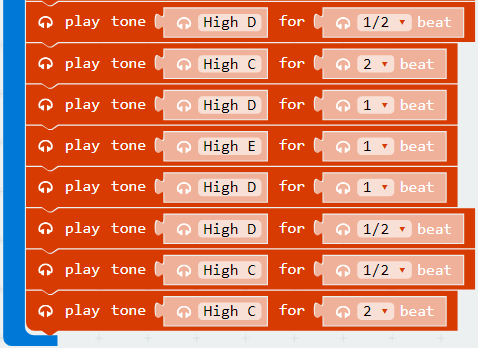
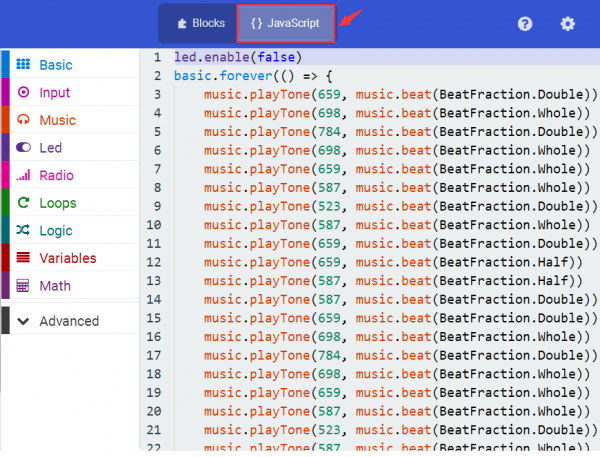
Note: on the MakeCode Block webpage, click the icon ![]() , you can see the frequency of each tone as follows.
, you can see the frequency of each tone as follows.
Example Result
Done wiring and powered up, send the code 1 to MICROBIT, you should hear two sounds produced from passive buzzer circularly. If send the code 2 to MICROBIT, the buzzer will play the song Ode To Joy! Really amazing. Right? You can try to change the tone to play other music.
Project 7: Changing Color
Overview
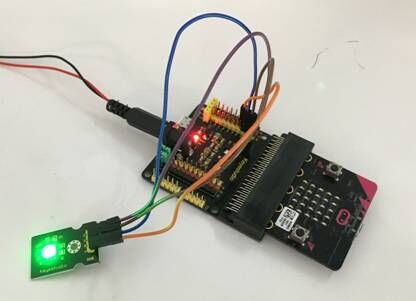
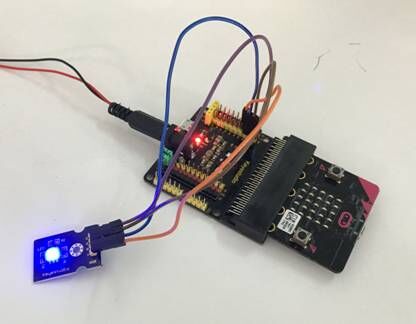
In this project, we will use a keyestudio RGB LED module. This Common Anode RGB LED module is a fun and easy way to add some color to your projects. In our program, we will connect the RGB module to micro:bit, then control the P0, P1, P2 Analog Input of micro:bit main board. You will learn how to control the RGB LED on the module firstly show three colors (Red, Green and Blue), then quickly change the color state.
Component Required
- Micro:bit main board*1
- Keyestudio Micro bit Sensor V2 Shield*1
- USB Cable*1
- keyestudio RGB LED Module*1
- Dupont jumper wire*4
Component Introduction
RGB LED Module:
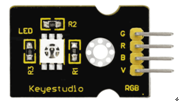
RGB comes from the initials of three additive primary colors, red, green, and blue. RGB LEDs are like 3 regular LEDs in one, how to use and connect them is not much different. They come mostly in 2 versions: Common Anode or Common Cathode. Common Anode uses 5V on the common pin, while Common Cathode connects to ground.
This keyestudio RGB LED module is Common Anode. It can be seen as separate LEDs. LEDs have three different color-emitting diodes that can combined to create all sorts of colors. This RGB LED module is very easy for wiring, with a fixed hole that you can mount it on your any devices..
Specifications
- Light Color: red, green and blue
- Brightness: High
- Voltage: 5V
- Input: digital level
Connect It Up
Insert the micro:bit into keyestudio micro:bit sensor V2 shield.Then connect RGB LED module to micro:bit sensor shield, separately connect the B, R,G pin to P0, P1, P2 Analog Input header, ground pin to ground.
If input HIGH level to P7 end, buzzer will continue to sound.
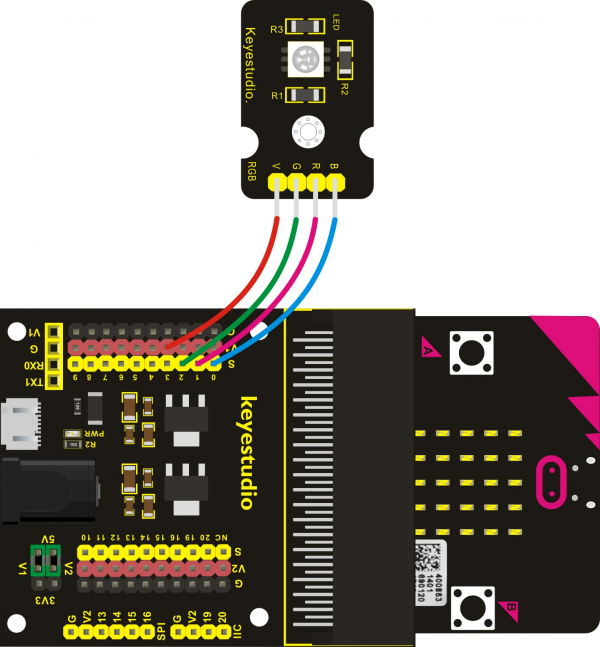
Test Code
If you are not familiar to make code, don't worry. Firstly, you can enter this link:https://makecode.microbit.org/reference to know more about microbit blocks.
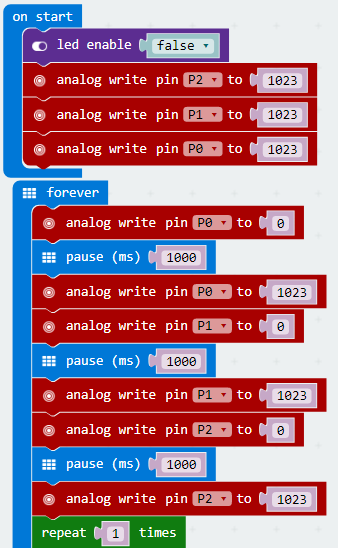
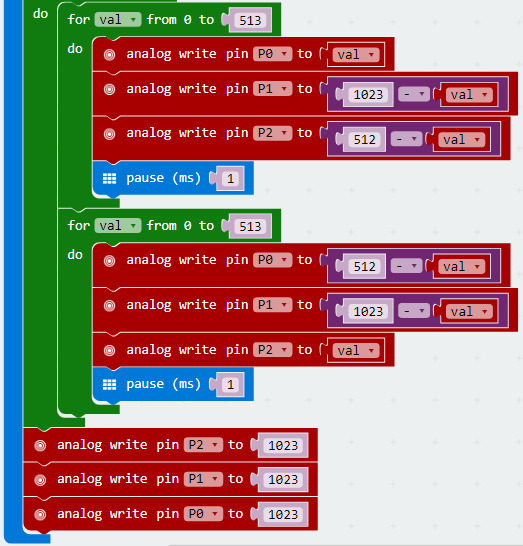
Then you can directly enter the https://makecode.microbit.org/ to edit your project program. Below is an example code we have done for you as reference.
Example Result
Done wiring and powered up, send the code to MICROBIT, you should see the RGB module firstly show three colors, separately red, green and blue light. Then change the color quickly and circularly.
Project 8: Button Control
Overview
When design the circuit, button switch is a commonly used component. The micro:bit main board has two built-in buttons, however, sometimes still need to use external button when design the circuit. So in this project, you will learn how to use our push button module to control 5*5 LED of micro:bit display different images.
Component Required
- Micro:bit main board*1
- Keyestudio Micro bit Sensor V2 Shield*1
- USB Cable*1
- keyestudio Digital Push Button*1
- Dupont jumper wire*3
Component Introduction
Digital Push Button Module:
This is a basic button module. Buttons are a type of commonly used components to control electronic devices. Usually they are used as switches to connect or disconnect circuits to control the operation of electronic devices or other devices. This module integrates a push button on it and with three connection pins. It is very convenient for you connect it to other IO shields.
Features
- Voltage range from 3.3V to 5V
- Large button with yellow cap
- High-quality connection pin
- Clear interface label
- Easy to plug and operate
- With a fixed hole that you can fix it on any devices
Specifications
- Supply Voltage: 3.3V to 5V
- Interface: Digital
- Dimensions: 30*20mm
Connect It Up
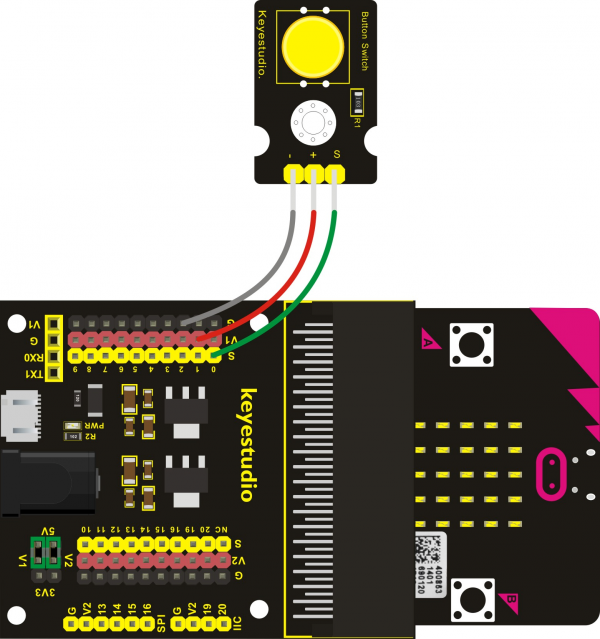
Insert the micro:bit into keyestudio micro:bit sensor V2 shield.Then connect button module to micro:bit sensor shield, connect S pin to S0 pin header, + pin to V1 header, - pin to ground. Shown below.
Test Code
If you are not familiar to make code, don't worry. Firstly, you can enter this link:https://makecode.microbit.org/reference to know more about microbit blocks.
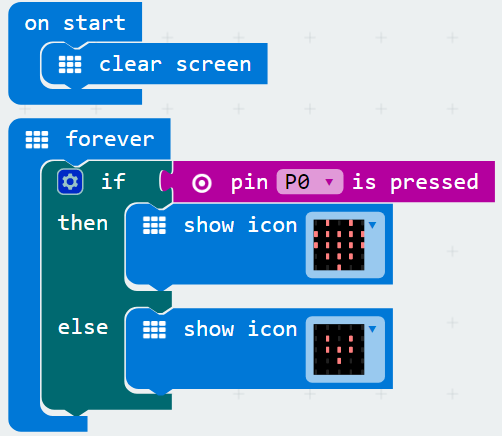
Then you can directly enter the https://makecode.microbit.org/ to edit your project program. Below is an example code we have done for you as reference.
Example Result
Done wiring and powered up, send the code to MICROBIT. When press the button on the module, you should see the LED matrix of micro:bit show the icon like a heart. Otherwise, it will show the icon like this.
 ![]()
Project 9: Tilt Control
Overview
When design the circuit, sometimes you will need to test whether an object is tilted left or right, so in this case you can use our tilt sensor. In this project, you will learn how to use our digital tilt sensor to control 5*5 LED of micro:bit display different images.
Component Required
- Micro:bit main board*1
- Keyestudio Micro bit Sensor V2 Shield*1
- USB Cable*1
- keyestudio Digital Tilt Sensor*1
- Dupont jumper wire*3
Component Introduction
Tilt Sensor:
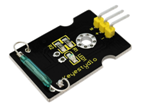
This keystudio digital tilt sensor mainly integrates a tilt sensor. The tilt sensor is a component that can detect the tilting of an object.
The principle is very simple. It mainly uses the ball in the switch changing with different angle of inclination to achieve the purpose of triggering circuits. When the ball in tilt switch runs from one end to the other end because of external force shaking, the tilt switch will conduct, or it will break.
Specifications
- WSupply Voltage: 3.3V to 5V
- Interface: Digital
- Size: 30*20mm
Connect It Up
Insert the micro:bit into keyestudio micro:bit sensor V2 shield.Then connect tilt module to micro:bit sensor shield, connect S pin to S0 pin header, + pin to V1 header, - pin to ground. Shown below.
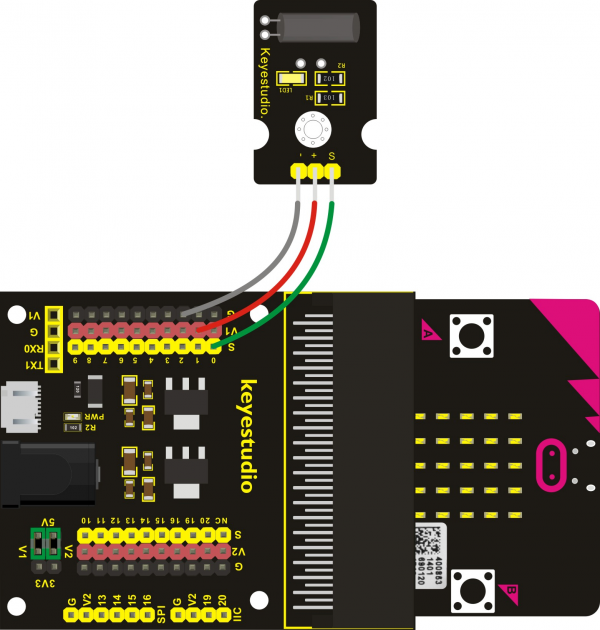
Test Code
If you are not familiar to make code, don't worry. Firstly, you can enter this link:https://makecode.microbit.org/reference to know more about microbit blocks.
Then you can directly enter the https://makecode.microbit.org/ to edit your project program. Below is an example code we have done for you as reference.
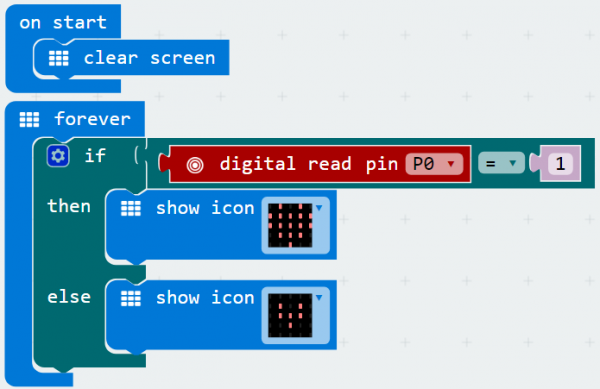
Example Result
Done wiring and powered up, send the code to MICROBIT. When tilt the sensor to the left, you should see the LED matrix of micro:bit show the icon like a heart. If tilted to the right, it will show the icon like this.
 ![]()
Project 10: Light Interrupter
Overview
In daily life, we often need to implement the function of counting and speed measurement. How to achieve these functions? You can easily match photo-interrupter module with microcontroller via code debugging. In this lesson, we connect a keyestudio photo-interrupter module to micro:bit sensor shield, then control 5*5 LED of micro:bit show different images.
Component Required
- Micro:bit main board*1
- Keyestudio Micro bit Sensor V2 Shield*1
- USB Cable*1
- keyestudio Photo Interrupter Module*1
- Dupont jumper wire*3
Component Introduction
Photo Interrupter Module:
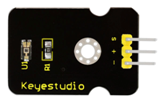
A photo-interrupter is a sensor that arranges light-emitting component and light-receiving component face-to-face and packages them together. It applies the principle that light is interrupted when an object passes through the sensor. Therefore, photo-interrupters are widely used in many fields like speed measurement, positioning and counting, small household appliances, optical limit switches, object detection and so on.
During the test, if let an object continue to block the notch of photo-interrupter sensor, the module’s signal end will continuously appear High and Low level changes, then we can get the motion state of object through calculating the signal data, thus implement the counting and Speed measurement function.
Specifications
- Support quick response; highly sensitive
- With power light and 3-pin interface
- Supply Voltage: 3.3V to 5V
- Interface: Digital
- Size: 30*20mm
Connect It Up
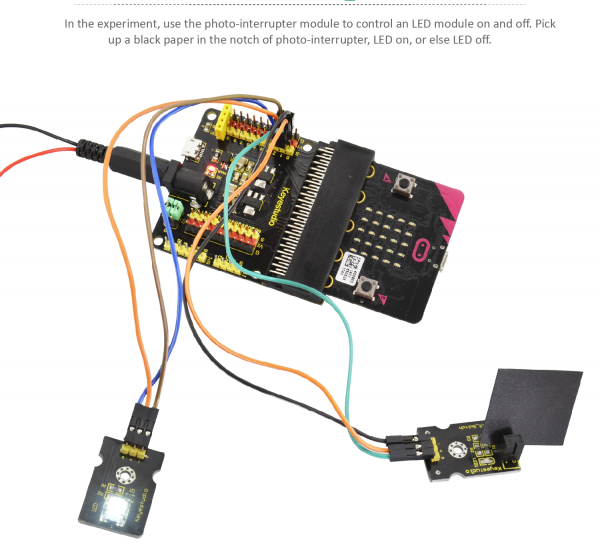
Insert the micro:bit into keyestudio micro:bit sensor V2 shield.Then connect light interrupter module to micro:bit sensor shield, connect S pin to S0 pin header, + pin to V1 header, - pin to ground. Shown below.
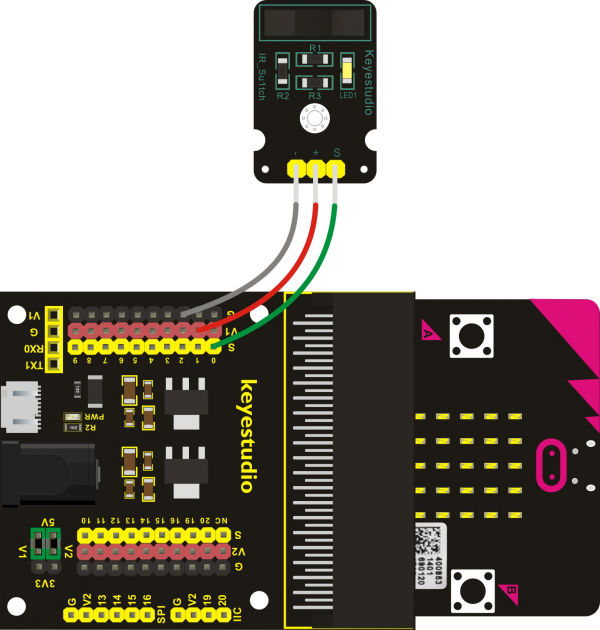
Test Code
If you are not familiar to make code, don't worry. Firstly, you can enter this link:https://makecode.microbit.org/reference to know more about microbit blocks.
Then you can directly enter the https://makecode.microbit.org/ to edit your project program. Below is an example code we have done for you as reference.

Example Result
Done wiring and powered up, send the code to MICROBIT. When cover the notch of sensor with a piece of paper, you should see the LED matrix of micro:bit show the icon like a heart. Or else, it will show the icon like this
![]()
Project 5: Make a Sound
Overview
In this project, you will learn how to generate a sound with keyestudio digital active buzzer module. Here you can refer to LED blink, in this lesson control the buzzer on and off circularly.
Component Required
- Micro:bit main board*1
- Keyestudio Micro bit Sensor V2 Shield*1
- USB Cable*1
- keyestudio Digital Buzzer Module*1
- Dupont jumper wire*3
Component Introduction
Keyestudio Digital Buzzer Module:
It is the simplest sound making module. You can use High/Low level to drive it. Changing the frequency it buzzes can produce different sounds.
Buzzers can be categorized as active and passive ones. The difference between the two is that an active buzzer has a built-in oscillating source, so it will generate a sound when electrified. The buzzer on this module is an active buzzer.
This module is widely used in our daily appliances like PC, refrigerator, telephones, timers and other electronic products for voice devices. etc.
Specifications
- Working voltage: 3.3-5v
- Interface type: digital
- Size: 30*20mm
Connect It Up
Insert the micro:bit into keyestudio micro:bit sensor V2 shield.Then connect buzzer module to micro:bit sensor shield, connect the S pin to S7 pin header (P7 of micro:bit), + pin to V1 header, - pin to ground header.
If input HIGH level to P7 end, buzzer will continue to sound.

Test Code
If you are not familiar to make code, don't worry. Firstly, you can enter this link:https://makecode.microbit.org/reference to know more about microbit blocks.
Then you can directly enter the https://makecode.microbit.org/ to edit your project program. Below is an example code we have done for you as reference.

Example Result
Done wiring and powered up, send the code to MICROBIT, you should hear the buzzer module sound and then stop, circularly. It seems like the sound is interrupted.

