Ks0008 keyestudio Joystick Module: Difference between revisions
Jump to navigation
Jump to search
Keyestudio (talk | contribs) No edit summary |
Keyestudio (talk | contribs) No edit summary |
||
| Line 3: | Line 3: | ||
==Introduction== | ==Introduction== | ||
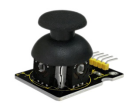
Lots of robot projects need joystick. This module provides an affordable solution. By simply connecting to two analog inputs, the robot is at your commands with X, Y control. It also has a switch that is connected to a digital pin. This joystick module can be easily connected to Arduino by IO Shield. This module is for Arduino(V5) with cables supplied. | Lots of robot projects need joystick. This module provides an affordable solution. By simply connecting to two analog inputs, the robot is at your commands with X, Y control. It also has a switch that is connected to a digital pin. This joystick module can be easily connected to Arduino by IO Shield. This module is for Arduino(V5) with cables supplied. | ||
<br>[[File:Joystick.png|500px|frameless | <br>[[File:Joystick.png|500px|frameless|thumb]]<br> | ||
==Specification== | ==Specification== | ||
* | *Supply Voltage: 3.3V to 5V | ||
* | *Interface: Analog x2, Digital x1 | ||
* | *Size: 40*28mm | ||
* | *Weight: 12g | ||
== | ==Connection Diagram == | ||
[[File: | <br>[[File:Diagram.png|500px|frameless|thumb]]<br> | ||
==Sample Code == | |||
<pre> | <pre> | ||
int JoyStick_X = 0; //x | |||
int JoyStick_Y = 1; //y | |||
int JoyStick_Z = 3; //key | |||
void setup() | |||
{ | { | ||
pinMode(JoyStick_Z, INPUT); | |||
Serial.begin(9600); // 9600 bps | |||
} | } | ||
void loop() | |||
void loop() | { | ||
{ | int x,y,z; | ||
x=analogRead(JoyStick_X); | |||
y=analogRead(JoyStick_Y); | |||
z=digitalRead(JoyStick_Z); | |||
Serial.print(x ,DEC); | |||
Serial.print(","); | |||
Serial.print(y ,DEC); | |||
Serial.print(","); | |||
Serial.println(z ,DEC); | |||
delay(100); | |||
}</pre> | }</pre> | ||
[[Category: | |||
[[Category: | [[Category: Sensor]] | ||
[[Category: Module]] | |||
Revision as of 11:40, 11 August 2016
Introduction
Lots of robot projects need joystick. This module provides an affordable solution. By simply connecting to two analog inputs, the robot is at your commands with X, Y control. It also has a switch that is connected to a digital pin. This joystick module can be easily connected to Arduino by IO Shield. This module is for Arduino(V5) with cables supplied.

Specification
- Supply Voltage: 3.3V to 5V
- Interface: Analog x2, Digital x1
- Size: 40*28mm
- Weight: 12g
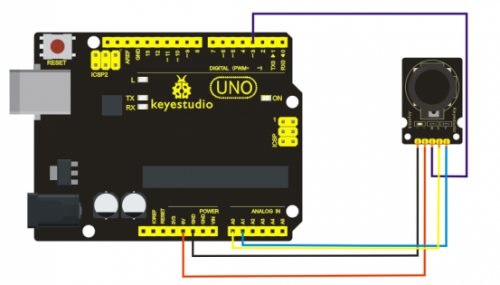
Connection Diagram
==Sample Code ==
int JoyStick_X = 0; //x
int JoyStick_Y = 1; //y
int JoyStick_Z = 3; //key
  void setup()
{
  pinMode(JoyStick_Z, INPUT);
  Serial.begin(9600); // 9600 bps
}
void loop()
{
  int x,y,z;
  x=analogRead(JoyStick_X);
  y=analogRead(JoyStick_Y);
  z=digitalRead(JoyStick_Z);
  Serial.print(x ,DEC);
  Serial.print(",");
  Serial.print(y ,DEC);
  Serial.print(",");
  Serial.println(z ,DEC);
  delay(100);
}