Ks0031 keyestudio Capacitive Touch Sensor: Difference between revisions
Jump to navigation
Jump to search
Keyestudio (talk | contribs) |
Keyestudio (talk | contribs) |
||
| (14 intermediate revisions by the same user not shown) | |||
| Line 1: | Line 1: | ||
<br> | |||
==Introduction== | ==Introduction== | ||
Are you tired of clicking mechanic button? Well, | Are you tired of clicking mechanic button? Well, try our capacitive touch sensor. You can find touch sensors mostly used on electronic device. So upgrade your Arduino project with our new version touch sensor and make it cool!!<br> | ||
This little sensor can "feel" people and metal touch and feedback | This little sensor can "feel" people and metal touch and feedback a high/low voltage level. Even isolated by some cloth and paper, it can still feel the touch. Its sensitivity decreases as isolation layer gets thicker. | ||
<br>[[File: | <br>[[File:KS0031 (4).jpg|500px|frameless|thumb]]<br> | ||
<br> | |||
==Specification== | ==Specification== | ||
*Supply Voltage: 3.3V to 5V | *Supply Voltage: 3.3V to 5V | ||
*Interface: Digital | *Interface: Digital | ||
<br> | |||
==Connection Diagram == | ==Connection Diagram == | ||
<br>[[File:Ks0031-1.png|700px|frameless|thumb]]<br> | |||
<br> | |||
==Sample Code == | ==Sample Code == | ||
<pre> | <pre> | ||
int ledPin = 13; | int ledPin = 13; // Connect LED on pin 13, or use the onboard one | ||
int KEY = 2; | int KEY = 2; // Connect Touch sensor on Digital Pin 2 | ||
void setup(){ | void setup(){ | ||
pinMode(ledPin, OUTPUT); // Set ledPin to output mode | |||
pinMode(KEY, INPUT); //Set touch sensor pin to input mode | |||
} | } | ||
void loop(){ | void loop(){ | ||
if(digitalRead(KEY)==HIGH) { //Read Touch sensor signal | |||
digitalWrite(ledPin, HIGH); // if Touch sensor is HIGH, then turn on | |||
} | |||
else{ | |||
digitalWrite(ledPin, LOW); // if Touch sensor is LOW, then turn off the led | |||
}</pre> | } | ||
} | |||
</pre> | |||
<br> | |||
== Result == | |||
Done wiring and powered up, upload well the code, then touch the sensor with your finger, both D2 led on the sensor and D13 indicator on UNO board are on. Otherwise, those two indicators are turned off. | |||
<br>[[File:Ks0031-2.png|800px|frameless|thumb]]<br> | |||
<br> | |||
==Resources == | ==Resources == | ||
'''Video''' | * '''Video'''<br> | ||
http://video.keyestudio.com/ks0031/ | |||
* '''PDF and Code'''<br> | |||
https://fs.keyestudio.com/KS0031 | |||
<br> | |||
==Buy from == | ==Buy from == | ||
https://www. | *[https://www.keyestudio.com/free-shipping-keyestudio-capacitive-touch-sensor-module-for-arduino-p0162.html '''Official Website'''] | ||
*[https://www.aliexpress.com/store/product/Free-shipping-Capacitive-digital-touch-sensor/1452162_32222202754.html?spm=2114.12010615.8148356.1.20f11b6dia0AZU '''Shop on aliexpress'''] | |||
[[Category: Sensor]] | [[Category: Sensor]] | ||
Latest revision as of 14:50, 7 January 2021
Introduction
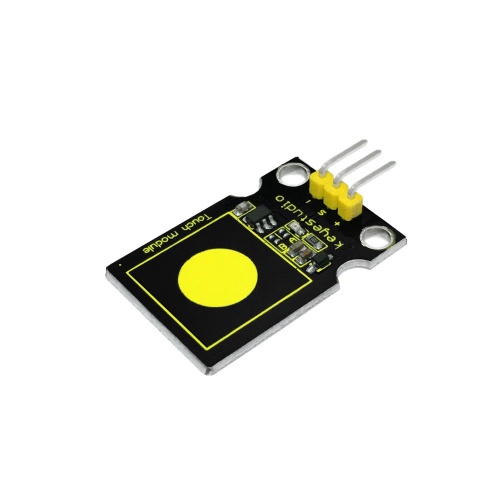
Are you tired of clicking mechanic button? Well, try our capacitive touch sensor. You can find touch sensors mostly used on electronic device. So upgrade your Arduino project with our new version touch sensor and make it cool!!
This little sensor can "feel" people and metal touch and feedback a high/low voltage level. Even isolated by some cloth and paper, it can still feel the touch. Its sensitivity decreases as isolation layer gets thicker.

Specification
- Supply Voltage: 3.3V to 5V
- Interface: Digital
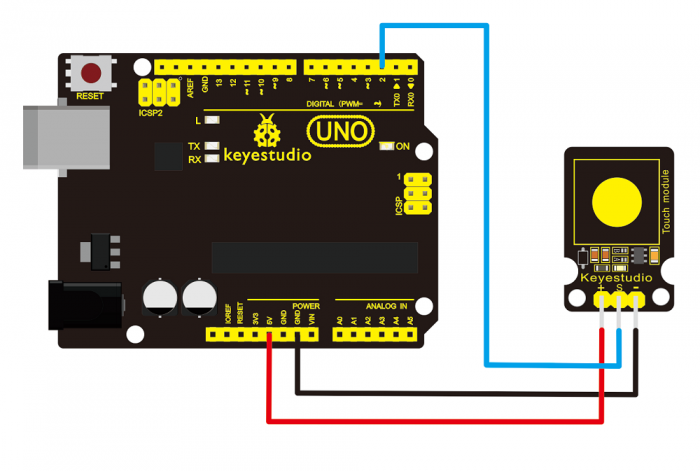
Connection Diagram
Sample Code
int ledPin = 13;                // Connect LED on pin 13, or use the onboard one
int KEY = 2;                 // Connect Touch sensor on Digital Pin 2

void setup(){
  pinMode(ledPin, OUTPUT);      // Set ledPin to output mode
  pinMode(KEY, INPUT);       //Set touch sensor pin to input mode
}

void loop(){
   if(digitalRead(KEY)==HIGH) {      //Read Touch sensor signal
        digitalWrite(ledPin, HIGH);   // if Touch sensor is HIGH, then turn on
     }
   else{
        digitalWrite(ledPin, LOW);    // if Touch sensor is LOW, then turn off the led
     }
}
Result
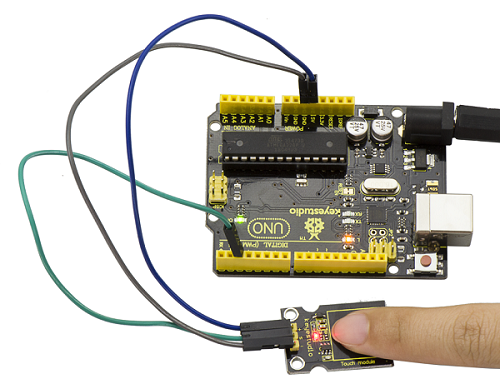
Done wiring and powered up, upload well the code, then touch the sensor with your finger, both D2 led on the sensor and D13 indicator on UNO board are on. Otherwise, those two indicators are turned off.

Resources
- Video
http://video.keyestudio.com/ks0031/
- PDF and Code
https://fs.keyestudio.com/KS0031
