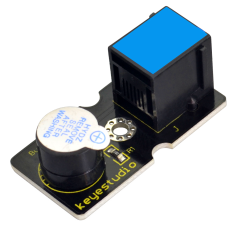
Ks0102 keyestudio EASY plug Active Buzzer Module: Difference between revisions
Keyestudio (talk | contribs) No edit summary |
Keyestudio (talk | contribs) |
||
| (10 intermediate revisions by the same user not shown) | |||
| Line 1: | Line 1: | ||
[[image: | [[image:Ks0102-.png|thumb|600px|right|EASY plug Active Buzzer Module]] | ||
<br> | <br> | ||
| Line 8: | Line 8: | ||
This module is widely used on your daily appliance, like PC, refrigerator, phones, etc. <br> | This module is widely used on your daily appliance, like PC, refrigerator, phones, etc. <br> | ||
<span style="color: red">'''Note: ''' </span> this module should be used together with EASY plug control board.<br> | <span style="color: red">'''Note: ''' </span> this module should be used together with EASY plug control board.<br> | ||
<span style=color:red> '''Special Note:''' <br> | |||
The sensor/module is equipped with the RJ11 6P6C interface, compatible with our keyestudio EASY plug Control Board with RJ11 6P6C interface. <br> If you have the control board of other brands, it is also equipped with the RJ11 6P6C interface but has different internal line sequence, can’t be used compatibly with our sensor/module. </span><br> | |||
<br> | <br> | ||
| Line 14: | Line 18: | ||
*Sensor type: Digital | *Sensor type: Digital | ||
*Working voltage: 3.3-5V | *Working voltage: 3.3-5V | ||
*High quality connector | *High quality connector | ||
<br> | <br> | ||
==Technical Details== | ==Technical Details== | ||
* Dimensions: 39mm*20mm*18mm | * Dimensions: 39mm*20mm*18mm | ||
| Line 25: | Line 29: | ||
== Connect It Up == | == Connect It Up == | ||
Connect the EASY Plug active buzzer module to control board using an RJ11 cable. Then connect the control board to your PC with a USB cable. | Connect the EASY Plug active buzzer module to control board using an RJ11 cable. Then connect the control board to your PC with a USB cable. | ||
<br>[[File: | <br>[[File:Ks0102-2-.png|700px|frameless|thumb]]<br> | ||
<br> | <br> | ||
==Sample Code== | ==Sample Code== | ||
Open or drag below code to [https://wiki.keyestudio.com/Getting_Started_with_Mixly Mixly Blocks] and upload. | |||
< | <br>[[File:Active buzzer-2.png|600px|frameless|thumb]]<br> | ||
< | |||
<br> | <br> | ||
==What You Should See== | ==What You Should See== | ||
Done uploading the code, you should be able to hear | <br>[[File:Ks0102.png|600px|frameless|thumb]]<br> | ||
<br>[[File: | Done uploading the code, you should be able to hear an audible beep. | ||
<br>[[File:Ks0102-3.png|600px|frameless|thumb]]<br> | |||
<br> | <br> | ||
==Resources == | ==Resources == | ||
https://fs.keyestudio.com/KS0102 | |||
https:// | |||
<br> | <br> | ||
==Buy from == | ==Buy from == | ||
* | *[https://www.keyestudio.com/keyestudio-rj11-easy-plug-active-buzzer-module-for-arduino-steam-p0086-p0086.html '''Official Website'''] | ||
*[https://www.aliexpress.com/store/product/ | *[https://www.aliexpress.com/store/product/2016-New-Keyestudio-EASY-plug-Active-Buzzer-Module-for-Arduino/1452162_32638816632.html?spm=2114.12010612.8148356.20.122b57f6hJzrRS '''Shop on aliexpress''' ] | ||
[[category: EASY Plug]] | [[category: EASY Plug]] | ||
Latest revision as of 15:25, 20 May 2021
Introduction
Hey want to hear a really loud noise? Apply 3.3V to 5V to this buzzer module and you'll be rewarded with a loud beep.
Here is the simplest sound making module. You can use high/low level to drive it. Just change the frequency it buzzes, you can hear different sound.
It is really great for integrating into projects with this small but useful module. Have a try! You will find the electronic sound it creates so fascinating.
This module is widely used on your daily appliance, like PC, refrigerator, phones, etc.
Note: this module should be used together with EASY plug control board.
Special Note:
The sensor/module is equipped with the RJ11 6P6C interface, compatible with our keyestudio EASY plug Control Board with RJ11 6P6C interface.
If you have the control board of other brands, it is also equipped with the RJ11 6P6C interface but has different internal line sequence, can’t be used compatibly with our sensor/module.
Specification
- Sensor type: Digital
- Working voltage: 3.3-5V
- High quality connector
Technical Details
- Dimensions: 39mm*20mm*18mm
- Weight: 6g
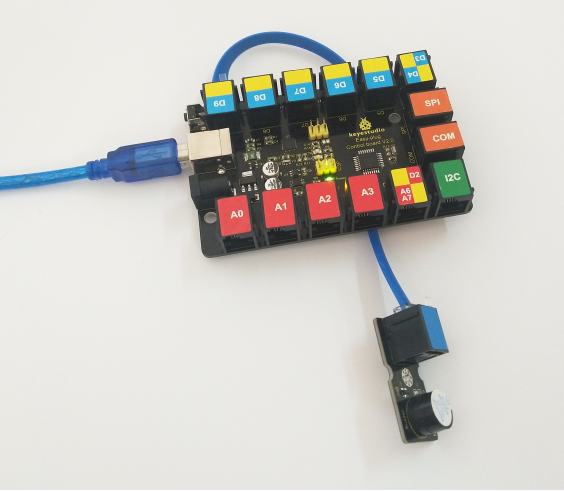
Connect It Up
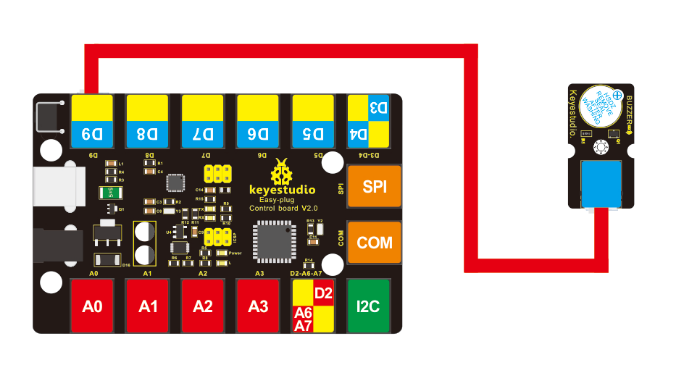
Connect the EASY Plug active buzzer module to control board using an RJ11 cable. Then connect the control board to your PC with a USB cable.
Sample Code
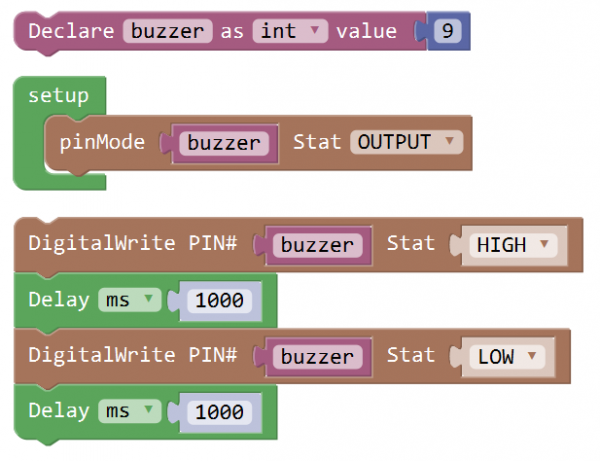
Open or drag below code to Mixly Blocks and upload.
What You Should See
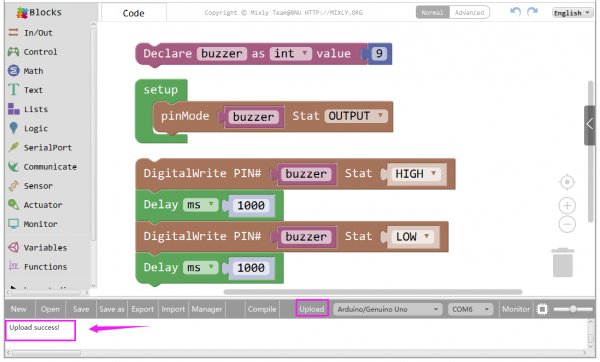
Done uploading the code, you should be able to hear an audible beep.
Resources
https://fs.keyestudio.com/KS0102
