Ks0114 keyestudio EASY plug Knock Sensor: Difference between revisions
Keyestudio (talk | contribs) |
Keyestudio (talk | contribs) |
||
| (14 intermediate revisions by the same user not shown) | |||
| Line 1: | Line 1: | ||
[[image:ks0114图.jpg|thumb|600px|right|EASY plug Knock Sensor ]] | |||
==Introduction== | ==Introduction== | ||
The knock sensor is mainly composed of SW-280 vibration switch, which is an inductive proximity switch. <br> | |||
It is an electronic switch that transmits the sensing result to the circuit device and induces the circuit to start working when the vibration force is induced. <br> | |||
The module comes with a positioning hole for you to fix it to other devices.<br> | |||
You can make full use of it with creative thinking, like electronic drum, and so on. <br> | |||
This module should be used together with EASY plug control board.<br> | |||
<span style=color:red> '''Special Note:''' <br> | |||
The sensor/module is equipped with the RJ11 6P6C interface, compatible with our keyestudio EASY plug Control Board with RJ11 6P6C interface. <br> If you have the control board of other brands, it is also equipped with the RJ11 6P6C interface but has different internal line sequence, can’t be used compatibly with our sensor/module. </span><br> | |||
== | <br> | ||
* | |||
==Features== | |||
* Connector: Easy plug | |||
* Working voltage: 5V | * Working voltage: 5V | ||
* Sensor type: | * Sensor type: Digital | ||
* | |||
* Weight: | <br> | ||
==Technical Details== | |||
* Dimensions: 38mm*20mm*18mm | |||
* Weight: 4.4g | |||
<br> | |||
==Connect It Up== | |||
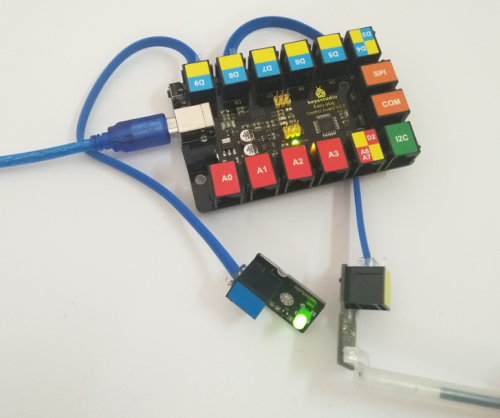
Connect the EASY Plug knock sensor and LED module to control board using RJ11 cable. Then connect the control board to your PC with a USB cable. | |||
<br>[[File:敲击灯.jpg|500px|frameless|thumb]]<br> | |||
<br> | |||
==Upload the Code== | |||
Below is an example code. Open or drag below code to [https://wiki.keyestudio.com/Getting_Started_with_Mixly Mixly Blocks] and upload. <br> | |||
<br>[[File:Ks0398 3.1.png|500px|frameless|thumb]]<br> | |||
<br> | |||
==What You Should See== | |||
Done uploading the code, if knock the module hard, the led will be turned on. | |||
<br>[[File:ks0398 3-1.png|500px|frameless|thumb]]<br> | |||
<br>[[File:ks0398 3-3.png|500px|frameless|thumb]]<br> | |||
<br> | |||
==Resources == | |||
https://fs.keyestudio.com/KS0114 | |||
<br> | |||
== | ==Buy from == | ||
*[https://www.keyestudio.com/new-keyestudio-rj11-easy-plug-knock-sensor-module-for-arduino-steam-p0080-p0080.html '''Official Website''' ] | |||
*[https://www.aliexpress.com/store/product/New-Keyestudio-EASY-plug-Knock-Sensor-Module-for-Arduino/1452162_32641685279.html?spm=2114.12010612.8148356.24.2dc64ba7vDlelq Shop on aliexpress ] | |||
[[category: | [[category:EASY Plug]] | ||
Latest revision as of 16:14, 7 January 2021
Introduction
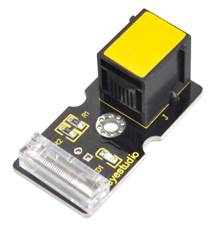
The knock sensor is mainly composed of SW-280 vibration switch, which is an inductive proximity switch.
It is an electronic switch that transmits the sensing result to the circuit device and induces the circuit to start working when the vibration force is induced.
The module comes with a positioning hole for you to fix it to other devices.
You can make full use of it with creative thinking, like electronic drum, and so on.
This module should be used together with EASY plug control board.
Special Note:
The sensor/module is equipped with the RJ11 6P6C interface, compatible with our keyestudio EASY plug Control Board with RJ11 6P6C interface.
If you have the control board of other brands, it is also equipped with the RJ11 6P6C interface but has different internal line sequence, can’t be used compatibly with our sensor/module.
Features
- Connector: Easy plug
- Working voltage: 5V
- Sensor type: Digital
Technical Details
- Dimensions: 38mm*20mm*18mm
- Weight: 4.4g
Connect It Up
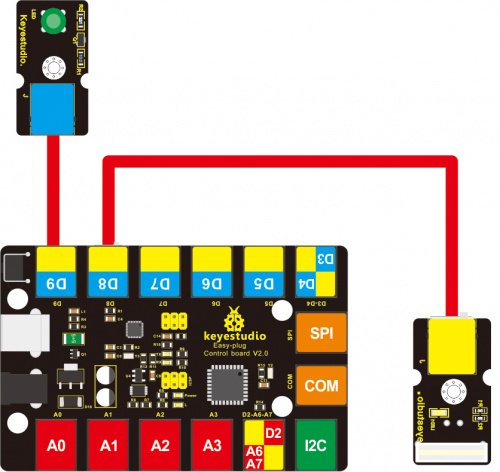
Connect the EASY Plug knock sensor and LED module to control board using RJ11 cable. Then connect the control board to your PC with a USB cable.
Upload the Code
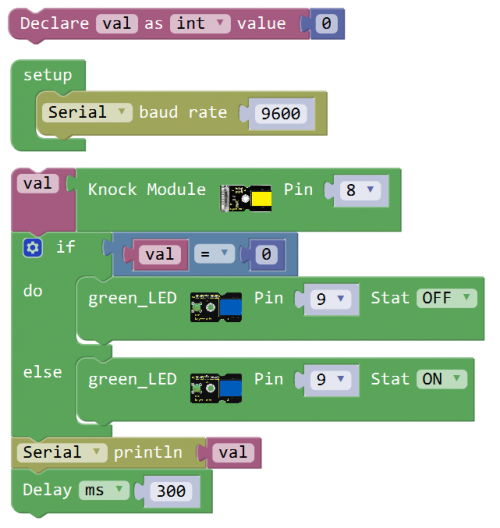
Below is an example code. Open or drag below code to Mixly Blocks and upload.
What You Should See
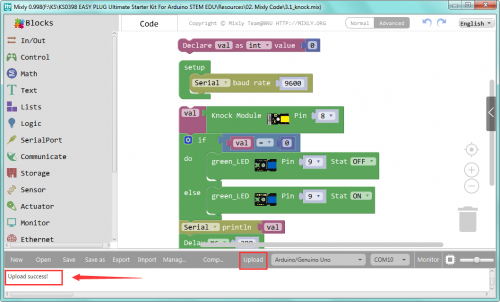
Done uploading the code, if knock the module hard, the led will be turned on.
Resources
https://fs.keyestudio.com/KS0114
