Ks0116 keyestudio EASY plug Flame Sensor Module: Difference between revisions
Keyestudio (talk | contribs) (Created page with "==EASY plug Flame Sensor module== <br>500px|frameless|thumb<br> ==Introduction== This flame sensor can be used to detect fire or other lights whose wave...") |
Keyestudio (talk | contribs) |
||
| (13 intermediate revisions by the same user not shown) | |||
| Line 1: | Line 1: | ||
[[image:ks0116图.jpg|thumb|600px|right|EASY plug Flame Sensor Module]] | |||
==Introduction== | ==Introduction== | ||
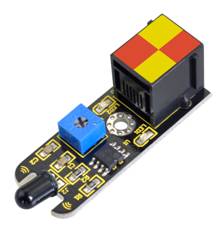
The flame sensor can be used to detect fire or other wavelength at 760nm ~1100nm light. <br> | |||
In the fire-fighting robot game, the flame plays an important role in the probe, which can be used as the robot's eyes to find fire source.<br> | |||
The potentiometer on the flame sensor can be used to adjust the sensitivity.<br> | |||
This module should be used together with EASY plug control board.<br> | |||
<span style=color:red> '''Special Note:''' <br> | |||
The sensor/module is equipped with the RJ11 6P6C interface, compatible with our keyestudio EASY plug Control Board with RJ11 6P6C interface. <br> If you have the control board of other brands, it is also equipped with the RJ11 6P6C interface but has different internal line sequence, can’t be used compatibly with our sensor/module. </span><br> | |||
<br> | |||
==Specification== | ==Specification== | ||
* | * Connector: Easy plug | ||
* Supply Voltage: 3.3V to 5V | * Supply Voltage: 3.3V to 5V | ||
* Detection range: 500px (4.8V) ~ 2500px (1V) | * Detection range: 500px (4.8V) ~ 2500px (1V) | ||
* | * Spectral Bandwidth Range: 760nm ~ 1100nm | ||
* Operating temperature: - | * Operating temperature: -25℃ to 85℃ | ||
* Sensor type: digital | * Sensor type: digital | ||
== | <br> | ||
<br>[[File: | ==Technical Details== | ||
* Dimensions: 48mm*17mm*18mm | |||
* Weight: 4.6g | |||
<br> | |||
==Connect It Up== | |||
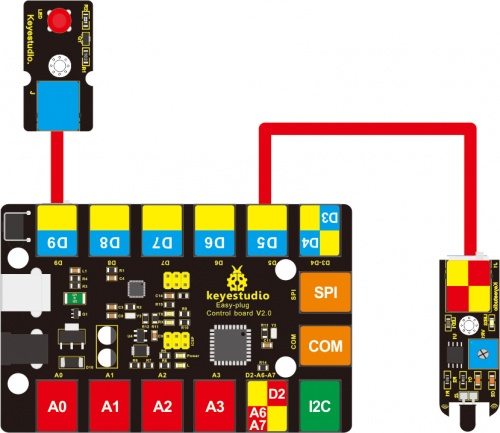
Connect the EASY Plug Flame Sensor and LED module to control board using RJ11 cables. Then connect the control board to your PC with a USB cable. | |||
<br>[[File:火焰灯.jpg|500px|frameless|thumb]]<br> | |||
<br> | |||
==Upload the Code== | |||
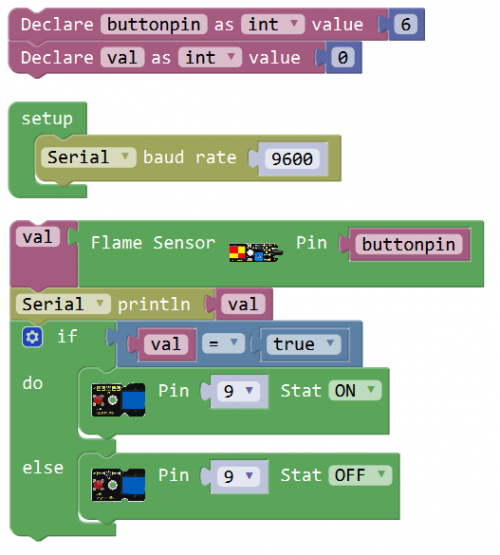
Below is an example code. Open or drag below code to [https://wiki.keyestudio.com/Getting_Started_with_Mixly Mixly Blocks] and upload. <br> | |||
<br>[[File:ks0398 8.1.png|500px|frameless|thumb]]<br> | |||
<br> | |||
==What You Should See== | |||
Done uploading the code, put a lighter close to the flame sensor. Once the sensor detects the flame, the led lights up. <br> | |||
If isn’t, you are able to adjust the sensitivity by a potentiometer. | |||
<br>[[File:ks0398 8-1.png|500px|frameless|thumb]]<br> | |||
<br> | |||
<span style="color: red">''' Little Knowledge:'''</span> <br> | |||
* You are able to adjust the sensitivity by a blue potentiometer on the sensor. | |||
[[image:ks0116图.jpg|thumb|600px|right|EASY plug Flame Sensor Module]] | |||
<br> | |||
==Simulating Fire Extinguisher == | |||
<br> | |||
Let’s go into an interesting project. When detecting the flame by flame sensor, the fan motor will rotate to blow out the fire. | |||
<br> | |||
'''Hookup Guide'''<br> | |||
<br>[[File:火焰电机.jpg|600px|frameless|thumb]]<br> | |||
<br> | |||
'''Test Code'''<br> | |||
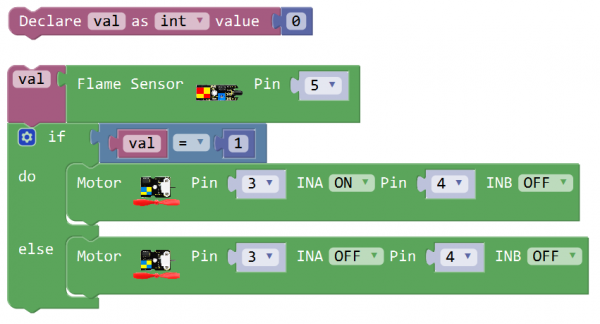
<br>[[File:ks0398 8.2.png|600px|frameless|thumb]]<br> | |||
<br> | |||
'''What You Should See'''<br> | |||
Done uploading the code, put a lighter close to the flame sensor. Once the sensor detects the flame, you should see the fan motor rotate. | |||
<br>[[File:ks0398 8-2.png|600px|frameless|thumb]]<br> | |||
<br> | |||
<br> | |||
==Resources == | |||
https://fs.keyestudio.com/KS0116 | |||
<br> | |||
==Buy from == | |||
*[https://www.keyestudio.com/new-keyestudio-rj11-easy-plug-flame-sensor-module-for-arduino-steam-p0090-p0090.html '''Official Website''' ] | |||
*[https://www.aliexpress.com/store/product/New-Keyestudio-EASY-plug-Flame-Sensor-module-for-Arduino/1452162_32643691546.html?spm=2114.12010612.8148356.58.2dc64ba7CLVAOv Shop on aliexpress ] | |||
[[category: | [[category:EASY Plug]] | ||
Latest revision as of 16:17, 7 January 2021
Introduction
The flame sensor can be used to detect fire or other wavelength at 760nm ~1100nm light.
In the fire-fighting robot game, the flame plays an important role in the probe, which can be used as the robot's eyes to find fire source.
The potentiometer on the flame sensor can be used to adjust the sensitivity.
This module should be used together with EASY plug control board.
Special Note:
The sensor/module is equipped with the RJ11 6P6C interface, compatible with our keyestudio EASY plug Control Board with RJ11 6P6C interface.
If you have the control board of other brands, it is also equipped with the RJ11 6P6C interface but has different internal line sequence, can’t be used compatibly with our sensor/module.
Specification
- Connector: Easy plug
- Supply Voltage: 3.3V to 5V
- Detection range: 500px (4.8V) ~ 2500px (1V)
- Spectral Bandwidth Range: 760nm ~ 1100nm
- Operating temperature: -25℃ to 85℃
- Sensor type: digital
Technical Details
- Dimensions: 48mm*17mm*18mm
- Weight: 4.6g
Connect It Up
Connect the EASY Plug Flame Sensor and LED module to control board using RJ11 cables. Then connect the control board to your PC with a USB cable.
Upload the Code
Below is an example code. Open or drag below code to Mixly Blocks and upload.
What You Should See
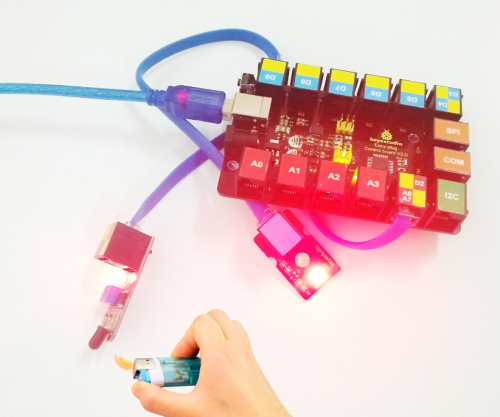
Done uploading the code, put a lighter close to the flame sensor. Once the sensor detects the flame, the led lights up.
If isn’t, you are able to adjust the sensitivity by a potentiometer.
Little Knowledge:
- You are able to adjust the sensitivity by a blue potentiometer on the sensor.
Simulating Fire Extinguisher
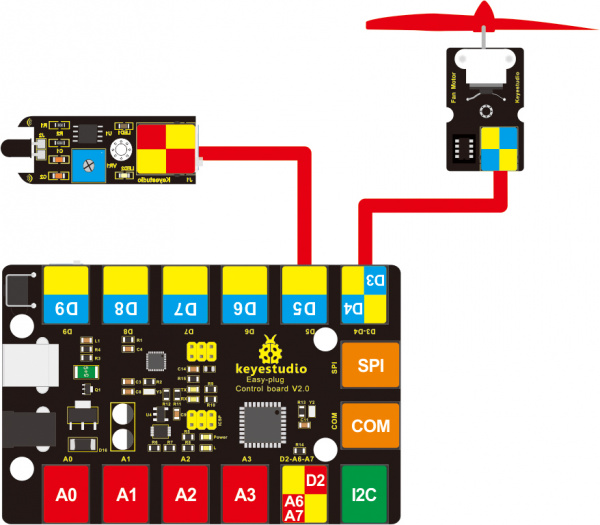
Let’s go into an interesting project. When detecting the flame by flame sensor, the fan motor will rotate to blow out the fire.
Hookup Guide
What You Should See
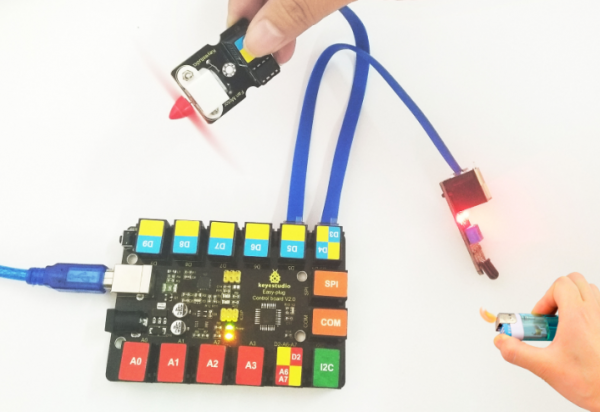
Done uploading the code, put a lighter close to the flame sensor. Once the sensor detects the flame, you should see the fan motor rotate.
Resources
https://fs.keyestudio.com/KS0116
