Ks0124 keyestudio EASY plug DS18B20 Temperature Sensor: Difference between revisions
Keyestudio (talk | contribs) No edit summary |
Keyestudio (talk | contribs) |
||
| Line 24: | Line 24: | ||
==Connect It Up == | ==Connect It Up == | ||
Connect the EASY Plug DS18B20 temperature sensor to control board using an RJ11 cable. Then connect the control board to your PC with a USB cable. | Connect the EASY Plug DS18B20 temperature sensor to control board using an RJ11 cable. Then connect the control board to your PC with a USB cable. | ||
<br>[[File:ks0124. | <br>[[File:ks0124.jpg|500px|frameless|thumb]]<br> | ||
<br> | <br> | ||
==Upload the Code== | ==Upload the Code== | ||
Copy and paste below code to [http://wiki.keyestudio.com/index.php/How_to_Download_Arduino_IDE Arduino IDE] and upload. | Copy and paste below code to [http://wiki.keyestudio.com/index.php/How_to_Download_Arduino_IDE Arduino IDE] and upload. | ||
Revision as of 09:33, 23 November 2018
Introduction
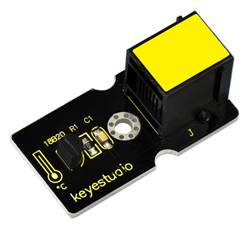
The DS18B20 temperature sensor is exactly what it sounds like - a sensor used to measure ambient temperature.
The usable temperature ranges from -55°C to +125°C. It also supports multi-point mesh networking.
While there are many types of temperature sensors available in the market, the DS18B20 temperature sensor is the best choice in applications which require high accuracy and high reliability.
For electronic enthusiasts and hobbyists, the DS18B20 is a good start for learning and developing temperature-dependent prototypes.
Note: this module should be used together with EASY plug control board.
Specification
- Connector: Easy plug
- Supply Voltage: 3.3V to 5V
- Temperature range: -55°C to +125°C
- Interface: Digital
Technical Details
- Dimensions: 38mm*20mm*18mm
- Weight: 4.4g
Connect It Up
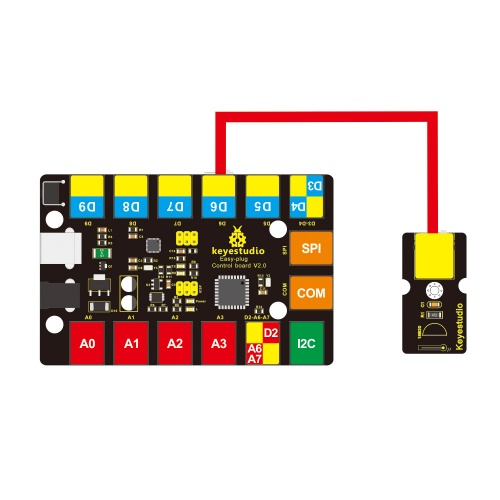
Connect the EASY Plug DS18B20 temperature sensor to control board using an RJ11 cable. Then connect the control board to your PC with a USB cable.

Upload the Code
Copy and paste below code to Arduino IDE and upload.
#include <OneWire.h>
int DS18S20_Pin = 6; //DS18S20 Signal pin on digital pin 6
//Temperature chip i/o
OneWire ds(DS18S20_Pin);// on digital pin 6
void setup(void) {
Serial.begin(9600);
}
void loop(void) {
float temperature = getTemp();
Serial.println(temperature);
delay(100); //to slow down the output so it is easier to read
}
float getTemp(){
//returns the temperature from one DS18S20 in DEG Celsius
byte data[12];
byte addr[8];
if ( !ds.search(addr)) {
//no more sensors on chain, reset search
ds.reset_search();
return -1000;
}

if ( OneWire::crc8( addr, 7) != addr[7]) {
Serial.println("CRC is not valid!");
return -1000;
}
if ( addr[0] != 0x10 && addr[0] != 0x28) {
Serial.print("Device is not recognized");
return -1000;
}
ds.reset();
ds.select(addr);
ds.write(0x44,1); // start conversion, with parasite power on at the end
byte present = ds.reset();
ds.select(addr);
ds.write(0xBE); // Read Scratchpad

for (int i = 0; i < 9; i++) { // we need 9 bytes
data[i] = ds.read();
}
ds.reset_search();
byte MSB = data[1];
byte LSB = data[0];
float tempRead = ((MSB << 8) | LSB); //using two's compliment
float TemperatureSum = tempRead / 16;
return TemperatureSum;
}
What You Should See
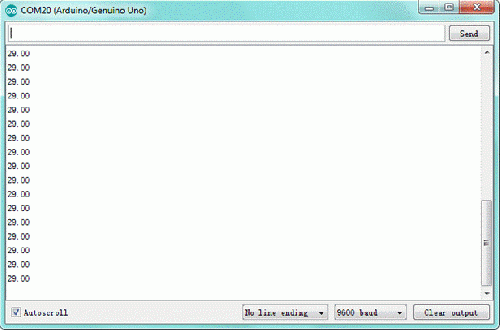
Done uploading the code, you should be able to read the temperature your temperature sensor is detecting on the serial monitor in the Arduino IDE.

Resources
PDF
https://drive.google.com/open?id=1thhRA_Qcgri0Z0hs8L2zu6FqEyOiLvi3
Libraries
https://drive.google.com/open?id=14ikf_FgLyNAIecA9zvV2A1b3Lmr24hPm
Buy from
Official Website
http://www.keyestudio.com/keyestudio-easy-plug-ds18b20-temperature-sensor-for-arduino.html
