Ks0128 keyestudio EASY plug ADXL345 Three Axis Acceleration Module: Difference between revisions
Keyestudio (talk | contribs) No edit summary |
Keyestudio (talk | contribs) |
||
| (12 intermediate revisions by the same user not shown) | |||
| Line 1: | Line 1: | ||
[[image: | [[image:ks0128图.jpg|thumb|600px|right|Keyestudio EASY plug ADXL345 Acceleration Module]] | ||
==Introduction== | ==Introduction== | ||
| Line 5: | Line 5: | ||
Digital output data is formatted as 16-bit twos complement, and is accessible through either a SPI or I2C digital interface.<br> | Digital output data is formatted as 16-bit twos complement, and is accessible through either a SPI or I2C digital interface.<br> | ||
The ADXL345 is well suited to measures the static acceleration of gravity in tilt-sensing applications, as well as dynamic acceleration resulting from motion or shock.<br> | The ADXL345 is well suited to measures the static acceleration of gravity in tilt-sensing applications, as well as dynamic acceleration resulting from motion or shock.<br> | ||
<span style= | This module needs to be used together with EASY plug control board.<br> | ||
<span style=color:red> '''Special Note:''' <br> | |||
The sensor/module is equipped with the RJ11 6P6C interface, compatible with our keyestudio EASY plug Control Board with RJ11 6P6C interface. <br> If you have the control board of other brands, it is also equipped with the RJ11 6P6C interface but has different internal line sequence, can’t be used compatibly with our sensor/module. </span><br> | |||
<br> | <br> | ||
| Line 28: | Line 32: | ||
<br> | <br> | ||
==Upload the Code== | ==Upload the Code== | ||
Below is an example code. Open or drag below code to [https://wiki.keyestudio.com/Getting_Started_with_Mixly Mixly Blocks] and upload the code to your board to check the 3-axis acceleration data and the module's tilt information.<br> | |||
< | <br>[[File:ks0397 22.1.png|500px|frameless|thumb]]<br> | ||
<br> | |||
==What You Should See== | |||
Open the Serial monitor to see the 3-axis acceleration data. See changes as you sway the Accelerometer. | |||
<br>[[File:ks0397 22-2.png|600px|frameless|thumb]]<br> | |||
/ | <br> | ||
<span style="color: red">'''Little Knowledge:'''</span> <br> | |||
If you think the monitor’s result is too fast to see the data clearly, you can drag a Delay block to add into the source code. Shown below. <br> | |||
After that, upload the code again and open the monitor, you should be able to see the display data clearly. <br> | |||
<br>[[File:ks0397 22-3.png|600px|frameless|thumb]]<br> | |||
<br> | |||
==Extension Experiment== | |||
<br> | |||
<span style=color:brown><big>'''Controlling Three LEDs'''</big> </span><br> | |||
<br> | |||
'''Hookup Guide'''<br> | |||
Connect the EASY Plug ADXL345 Acceleration module and three LED modules to control board using RJ11 cables. | |||
<br>[[File:三轴灯.jpg|500px|frameless|thumb]]<br> | |||
<br> | |||
'''Test Code'''<br> | |||
Upload the test code below to your board to check the 3-axis acceleration data and the module's tilt information. | |||
<br>[[File:ks0397 22.2.png|600px|frameless|thumb]]<br> | |||
<br> | |||
'''What You Should See'''<br> | |||
<br>[[File:ks0397 22-4.png|500px|frameless|thumb]]<br> | |||
<br> | |||
Upload success, open the serial monitor, it prints out the value of X,Y,Z axis. Each axis controls a light. If the measured value is greater than 200, LED lights up. | |||
<br>[[File:ks0397 22-6.png|500px|frameless|thumb]]<br> | |||
<br>[[File:ks0397 22-7.png|500px|frameless|thumb]]<br> | |||
<br>[[File:ks0397 22-8.png|500px|frameless|thumb]]<br> | |||
<br> | <br> | ||
==Resources == | ==Resources == | ||
https:// | https://fs.keyestudio.com/KS0128 | ||
<br> | <br> | ||
==Buy from == | ==Buy from == | ||
'''Official Website''' | *[https://www.keyestudio.com/newkeyestudio-easy-plug-adxl345-three-axis-acceleration-module-for-arduino-steam-p0098-p0098.html '''Official Website''' ] | ||
*[https://www.aliexpress.com/store/product/New-Keyestudio-EASY-plug-ADXL345-Three-Axis-Acceleration-Module-for-arduino/1452162_32644046717.html?spm=2114.12010612.8148356.48.41484ba7Q6bjKs Shop on aliexpress] | |||
[[category:EASY Plug]] | [[category:EASY Plug]] | ||
Latest revision as of 16:41, 7 January 2021
Introduction
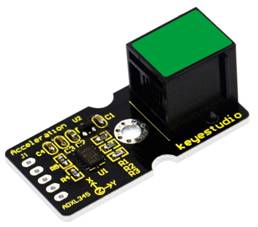
The ADXL345 module is a low power, 3-axis MEMS accelerometer with high resolution (13-bit) and measurement at up to ±16g (gravitational force).
Digital output data is formatted as 16-bit twos complement, and is accessible through either a SPI or I2C digital interface.
The ADXL345 is well suited to measures the static acceleration of gravity in tilt-sensing applications, as well as dynamic acceleration resulting from motion or shock.
This module needs to be used together with EASY plug control board.
Special Note:
The sensor/module is equipped with the RJ11 6P6C interface, compatible with our keyestudio EASY plug Control Board with RJ11 6P6C interface.
If you have the control board of other brands, it is also equipped with the RJ11 6P6C interface but has different internal line sequence, can’t be used compatibly with our sensor/module.
Features
- Connector: Easy plug
- Working Voltage: 2.0-3.6V
- Ultra Low Power @2.5v: 40uA /working mode; 0.1uA / standby mode
- Communication interface: I2C / SPI
- Tap/Double Tap Detection
- Free-Fall Detection
Technical Details
- Dimensions: 41mm*20mm*18mm
- Weight: 4.6g
Connect It Up
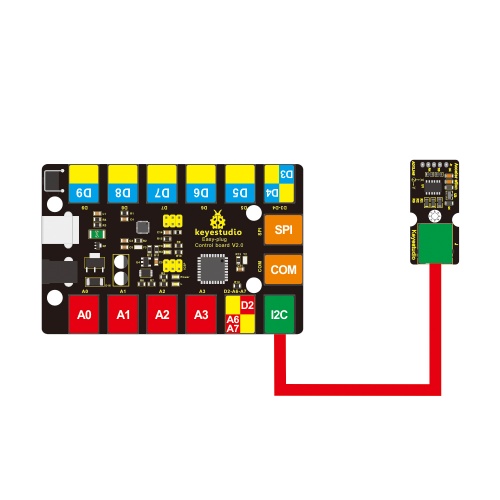
Connect the EASY Plug ADXL345 Acceleration module to control board using an RJ11 cable. Then connect the control board to your PC with a USB cable.
Upload the Code
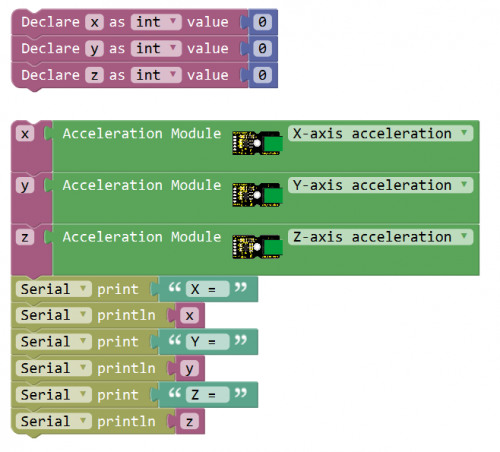
Below is an example code. Open or drag below code to Mixly Blocks and upload the code to your board to check the 3-axis acceleration data and the module's tilt information.
What You Should See
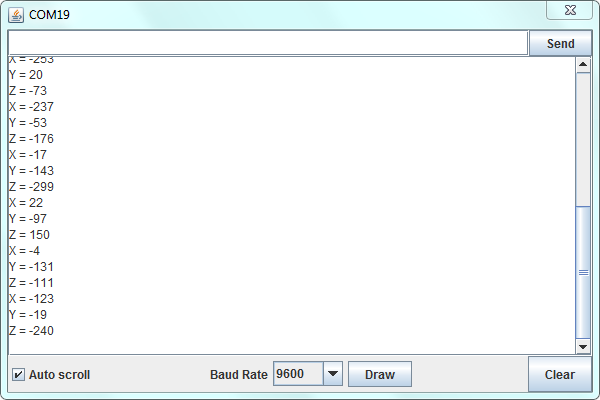
Open the Serial monitor to see the 3-axis acceleration data. See changes as you sway the Accelerometer.
Little Knowledge:
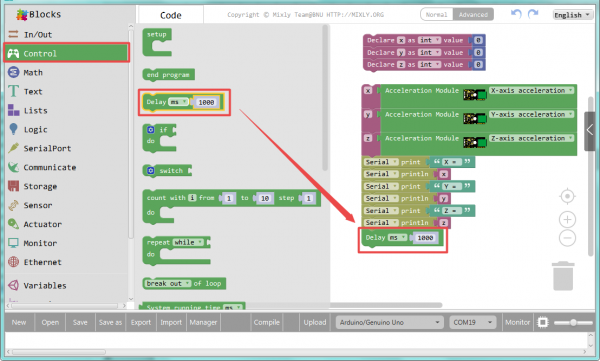
If you think the monitor’s result is too fast to see the data clearly, you can drag a Delay block to add into the source code. Shown below.
After that, upload the code again and open the monitor, you should be able to see the display data clearly.
Extension Experiment
Controlling Three LEDs
Hookup Guide
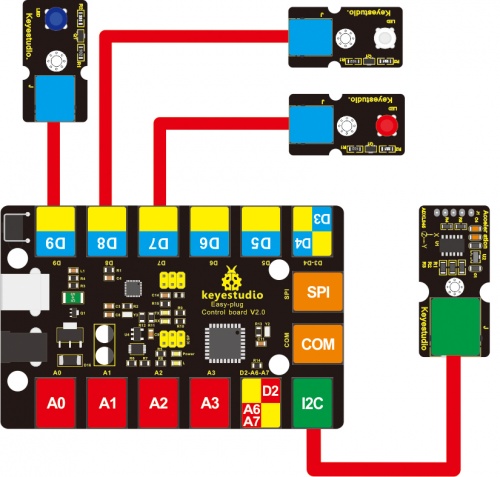
Connect the EASY Plug ADXL345 Acceleration module and three LED modules to control board using RJ11 cables.
Test Code
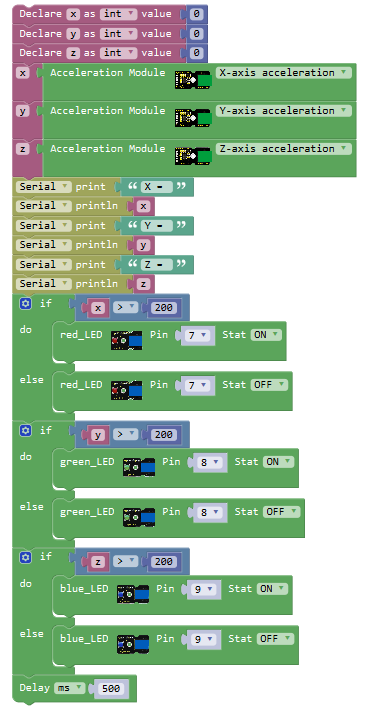
Upload the test code below to your board to check the 3-axis acceleration data and the module's tilt information.
What You Should See
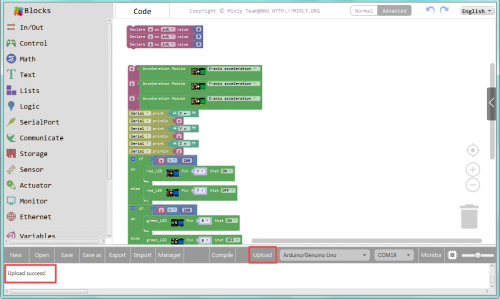
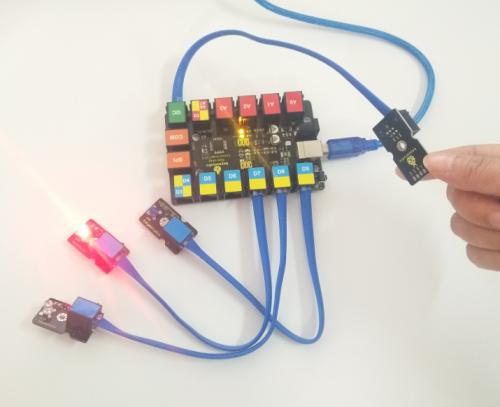
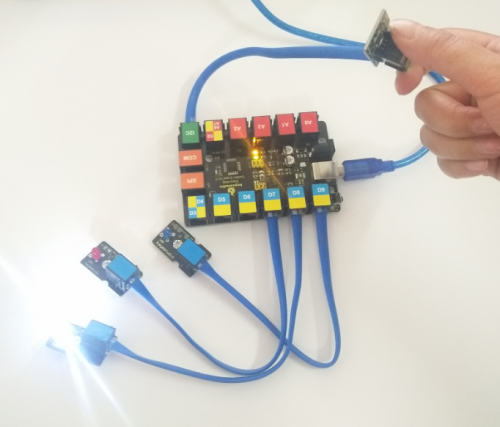
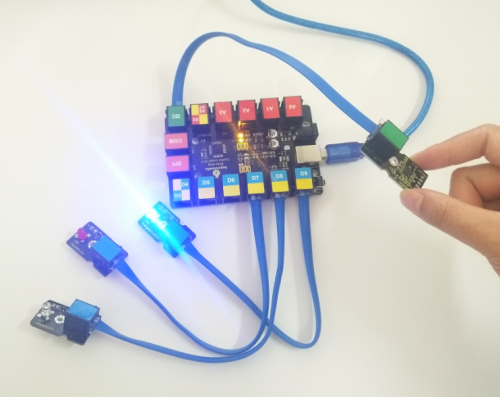
Upload success, open the serial monitor, it prints out the value of X,Y,Z axis. Each axis controls a light. If the measured value is greater than 200, LED lights up.
Resources
https://fs.keyestudio.com/KS0128
