Ks0129 keyestudio EASY plug DHT11 Temperature and Humidity Sensor: Difference between revisions
Keyestudio (talk | contribs) |
Keyestudio (talk | contribs) No edit summary |
||
| Line 1: | Line 1: | ||
[[image:ks0129图.jpg|thumb|600px|right|Keyestudio EASY plug DHT11 Temperature and Humidity Sensor]] | |||
==Introduction== | ==Introduction== | ||
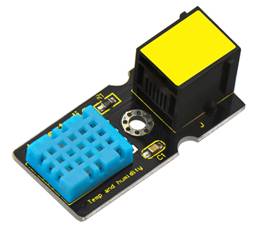
The DHT11 is a basic, ultra low-cost digital temperature and humidity sensor. <br> | |||
It uses a capacitive humidity sensor and a thermistor to measure the surrounding air, and provides a pre-calibrated digital signal output. <br> | |||
This DHT11 sensor has fast response, anti-interference ability, excellent reliability and long term stability.<br> | |||
<br> | |||
==Specification== | ==Specification== | ||
* | * Connector: Easy plug | ||
* Supply Voltage: | * Supply Voltage: 5V | ||
* | * Relative Humidity and temperature measurement | ||
* | * Good for 20-90% humidity readings with 5% accuracy | ||
* Good for 0-50°C temperature readings ±2°C accuracy | |||
* Interface: Digital | * Interface: Digital | ||
* | * Low Cost | ||
== | <br> | ||
==Technical Details== | |||
* Dimensions: 42mm*20mm*18mm | |||
* Weight: 5.6g | |||
<br> | |||
==Connect It Up == | |||
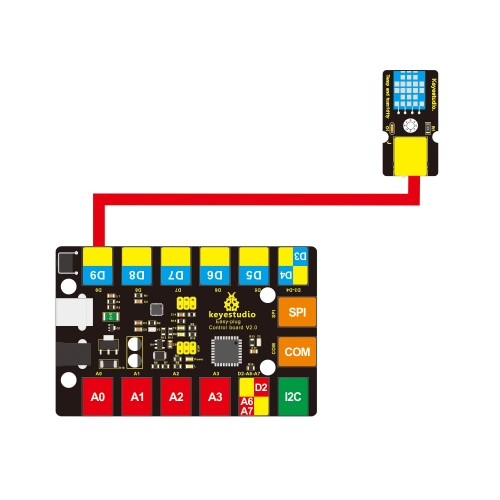
Connect the EASY Plug DHT11 sensor to control board using an RJ11 cable. Then connect the control board to your PC with a USB cable. | |||
<br>[[File:ks0129.jpg|500px|frameless|thumb]]<br> | |||
== | <br> | ||
==Upload the Code== | |||
Copy and paste below code to [http://wiki.keyestudio.com/index.php/How_to_Download_Arduino_IDE Arduino IDE] and upload. | |||
<pre> | <pre> | ||
#include <dht11.h> | #include <dht11.h> | ||
dht11 DHT; | dht11 DHT; | ||
#define DHT11_PIN | #define DHT11_PIN 9 | ||
void setup(){ | void setup(){ | ||
Serial.begin(9600); | |||
Serial.println("DHT TEST PROGRAM "); | |||
Serial.print("LIBRARY VERSION: "); | |||
Serial.println(DHT11LIB_VERSION); | |||
Serial.println(); | |||
Serial.println("Type,\tstatus,\tHumidity (%),\tTemperature (C)"); | |||
} | } | ||
void loop(){ | void loop(){ | ||
int chk; | |||
Serial.print("DHT11, \t"); | |||
chk = DHT.read(DHT11_PIN);//READ DATA | |||
switch (chk){ | |||
case DHTLIB_OK: | |||
Serial.print("OK,\t"); | |||
break; | |||
case DHTLIB_ERROR_CHECKSUM: | |||
Serial.print("Checksum error,\t"); | |||
break; | |||
case DHTLIB_ERROR_TIMEOUT: | |||
Serial.print("Time out error,\t"); | |||
break; | |||
default: | |||
Serial.print("Unknown error,\t"); | |||
break; | |||
} | |||
// DISPLAT DATA | // DISPLAT DATA | ||
Serial.print(DHT.humidity,1); | |||
Serial.print(",\t"); | |||
Serial.println(DHT.temperature,1); | |||
delay(1000); | |||
} | } | ||
</pre> | </pre> | ||
== | <span style="color: red">'''Code to Note: ''' | ||
Before compile the code, do remember to put the libraries needed inside the libraries folder of Arduino IDE directory.<br> | |||
Download all the libraries:<br> | |||
https://drive.google.com/open?id=1GIaSDErMAz5O6N_h9Ml_Zk4dRjR-WapT | |||
<br> | |||
==What You Should See== | |||
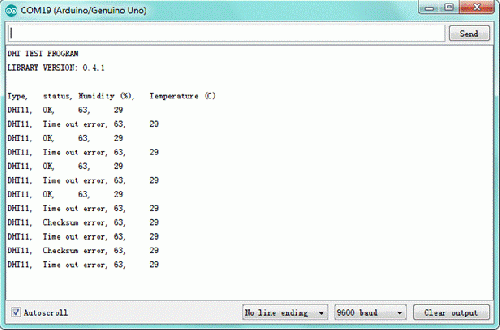
Open the Serial monitor to see the temperature and humidity data. | |||
<br>[[File:ks0129 Result.gif|500px|frameless|thumb]]<br> | |||
<br> | |||
==Resources == | |||
'''Datasheet'''<br> | |||
https://drive.google.com/open?id=16c0ZfBYkPR77hy53iIoWxFF7lu-q7crj | https://drive.google.com/open?id=16c0ZfBYkPR77hy53iIoWxFF7lu-q7crj | ||
<br> | |||
'''Download the libraries of dht11''' | '''Download the libraries of dht11'''<br> | ||
https://drive.google.com/open?id=1qY8b3_gpWn53gIKmSqr1kBF1kzFQSyMC | https://drive.google.com/open?id=1qY8b3_gpWn53gIKmSqr1kBF1kzFQSyMC | ||
<br> | |||
==Buy from == | ==Buy from == | ||
'''Official Website''' | '''Official Website'''<br> | ||
http://www.keyestudio.com/keyestudio-easy-plug-dht11-temperature-humidity-sensor-module-for-arduino.html | http://www.keyestudio.com/keyestudio-easy-plug-dht11-temperature-humidity-sensor-module-for-arduino.html | ||
[[category:EASY Plug]] | [[category:EASY Plug]] | ||
Revision as of 11:53, 16 November 2018
Introduction
The DHT11 is a basic, ultra low-cost digital temperature and humidity sensor.
It uses a capacitive humidity sensor and a thermistor to measure the surrounding air, and provides a pre-calibrated digital signal output.
This DHT11 sensor has fast response, anti-interference ability, excellent reliability and long term stability.
Specification
- Connector: Easy plug
- Supply Voltage: 5V
- Relative Humidity and temperature measurement
- Good for 20-90% humidity readings with 5% accuracy
- Good for 0-50°C temperature readings ±2°C accuracy
- Interface: Digital
- Low Cost
Technical Details
- Dimensions: 42mm*20mm*18mm
- Weight: 5.6g
Connect It Up
Connect the EASY Plug DHT11 sensor to control board using an RJ11 cable. Then connect the control board to your PC with a USB cable.

Upload the Code
Copy and paste below code to Arduino IDE and upload.
#include <dht11.h>
dht11 DHT;
#define DHT11_PIN 9
void setup(){
Serial.begin(9600);
Serial.println("DHT TEST PROGRAM ");
Serial.print("LIBRARY VERSION: ");
Serial.println(DHT11LIB_VERSION);
Serial.println();
Serial.println("Type,\tstatus,\tHumidity (%),\tTemperature (C)");
}
void loop(){
int chk;
Serial.print("DHT11, \t");
chk = DHT.read(DHT11_PIN);//READ DATA
switch (chk){
case DHTLIB_OK:
Serial.print("OK,\t");
break;
case DHTLIB_ERROR_CHECKSUM:
Serial.print("Checksum error,\t");
break;
case DHTLIB_ERROR_TIMEOUT:
Serial.print("Time out error,\t");
break;
default:
Serial.print("Unknown error,\t");
break;
}
// DISPLAT DATA
Serial.print(DHT.humidity,1);
Serial.print(",\t");
Serial.println(DHT.temperature,1);
delay(1000);
}
Code to Note:
Before compile the code, do remember to put the libraries needed inside the libraries folder of Arduino IDE directory.
Download all the libraries:
https://drive.google.com/open?id=1GIaSDErMAz5O6N_h9Ml_Zk4dRjR-WapT
What You Should See
Open the Serial monitor to see the temperature and humidity data.

Resources
Datasheet
https://drive.google.com/open?id=16c0ZfBYkPR77hy53iIoWxFF7lu-q7crj
Download the libraries of dht11
https://drive.google.com/open?id=1qY8b3_gpWn53gIKmSqr1kBF1kzFQSyMC
Buy from
Official Website
http://www.keyestudio.com/keyestudio-easy-plug-dht11-temperature-humidity-sensor-module-for-arduino.html
