Ks0210 keyestudio RPI TTP229L 16-key Capacitive Touch Keypad: Difference between revisions
Keyestudio (talk | contribs) |
Keyestudio (talk | contribs) No edit summary |
||
| Line 1: | Line 1: | ||
<br> | |||
==Introduction== | ==Introduction== | ||
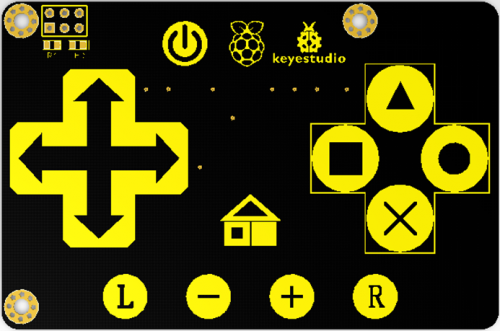
This keypad is designed for Raspberry Pi and supplies your Pi with 16 keys. It has an I2C communication mode and uses 3.3 V supply voltage with a power indicator. We provide you with installation package, source codes and a document to help you complete your programs.<br> | This keypad is designed for Raspberry Pi and supplies your Pi with 16 keys. It has an I2C communication mode and uses 3.3 V supply voltage with a power indicator. We provide you with installation package, source codes and a document to help you complete your programs.<br> | ||
<br>[[File:ks0210-1.png|500px|frameless|thumb]]<br> | |||
<br> | |||
==Specification== | ==Specification== | ||
* Chip: TTP229-LSF | * Chip: TTP229-LSF | ||
* Supply Voltage: 3.3V | * Supply Voltage: 3.3V | ||
* Interface: I2C | * Interface: I2C | ||
<br> | |||
==Connection Diagram == | ==Connection Diagram == | ||
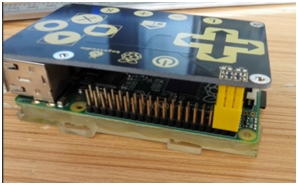
Plug it directly into Raspberry Pi to start your works as shown in below figure. After power-on have about 0.5sec stable-time. During the time do not touch the key pad, and all functions are disabled. | Plug it directly into Raspberry Pi to start your works as shown in below figure.<br> After power-on have about 0.5sec stable-time. During the time do not touch the key pad, and all functions are disabled. | ||
<br>[[File:ks0210-2.png|500px|frameless|thumb]]<br> | <br>[[File:ks0210-2.png|500px|frameless|thumb]]<br> | ||
<br> | |||
==Sample Code== | ==Sample Code== | ||
<pre> | <pre> | ||
| Line 51: | Line 54: | ||
</pre> | </pre> | ||
<br> | |||
==Program Writing== | ==Program Writing== | ||
===1.Installing bcm-2835 Library=== | ===1.Installing bcm-2835 Library=== | ||
Here is the tutorial for installing bcm-2835 library in Raspberry Pi. To install bcm-2835, first we need to download bcm2835 library. So we will provide an installation package or click its official web http://www.airspayce.com/mikem/bcm2835/ to download it.<br> | Here is the tutorial for installing bcm-2835 library in Raspberry Pi. To install bcm-2835, first we need to download bcm2835 library. So we will provide an installation package or click its official web http://www.airspayce.com/mikem/bcm2835/ to download it. <br> | ||
Step1: | |||
Step2: | '''Step1:''' Now after downloading library, copy it in any folder of your raspberry pi by winSCP(we provide its installation package, but please refer to usage by yourselves). <br> | ||
Step3: | |||
Step4: | '''Step2:''' Now it’s time to extract the library, so open terminal of raspberry pi and go to the folder where you have copied your library and type this command: '''tar zxvf bcm2835-1.26.tar.gz''' <br> | ||
Step5: | |||
Step6: | '''Step3:''' Now to into library folder, type this command: '''cd bcm2835-1.26''' <br> | ||
Step7: | |||
'''Step4:''' Now, we are ready to install bcm2835 library, so to start installation type this command: '''./configure''' <br> | |||
'''Step5:''' then type this command: '''make''' <br> | |||
'''Step6:''' then this: '''sudo make check''' <br> | |||
'''Step7:'''and finally this: '''sudo make install''' <br> | |||
Congrats your library is installed. Now use “#include <bcm2835.h>” in your program to use bcm2835 library.<br> | Congrats your library is installed. Now use “#include <bcm2835.h>” in your program to use bcm2835 library.<br> | ||
<br> | |||
===2.Programming=== | ===2.Programming=== | ||
Now its time to write a program. If you need to create a new directory within raspberry pi, you can use the ‘mkdir’ command. So type at your terminal: mkdir rpi_shield | Now its time to write a program. If you need to create a new directory within raspberry pi, you can use the ‘mkdir’ command. So type at your terminal: '''mkdir rpi_shield''' <br> | ||
then copy the file rpi_TTP229L provided by us and put it into the directory rpi_shield through winSCP. Next , type this command: | then copy the file '''rpi_TTP229L''' provided by us and put it into the directory rpi_shield through winSCP. Next, type this command: c'''d rpi_TTP229L''' to go inside the rpi_TTP229L folder. <br> | ||
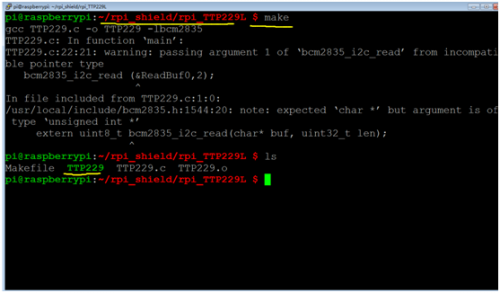
Then type this command: '''make''' to make an executable file, This means this is the file we run to launch the program as shown in below figure.<br> | |||
<br>[[File:ks0210-3.png|500px|frameless|thumb]]<br> | <br>[[File:ks0210-3.png|500px|frameless|thumb]]<br> | ||
Finally type this: sudo ./TTP229 to launch the program. | <br> | ||
Finally type this: '''sudo ./TTP229''' to launch the program. | |||
<br> | |||
== Result == | == Result == | ||
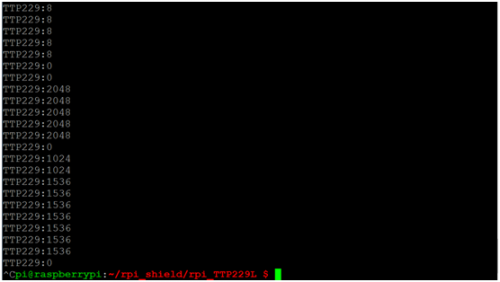
Touch the keys, and corresponding value is printed on the terminal as shown in below figure. Use Ctrl+C to exit the processing program. | Touch the keys, and corresponding value is printed on the terminal as shown in below figure. <br> | ||
Use '''Ctrl+C''' to exit the processing program.<br> | |||
<br>[[File:ks0210-4.png|500px|frameless|thumb]]<br> | <br>[[File:ks0210-4.png|500px|frameless|thumb]]<br> | ||
sudo ./TTP229 to running program | |||
'''sudo ./TTP229''' to running program | |||
<br>[[File:ks0210-5.png|500px|frameless|thumb]]<br> | <br>[[File:ks0210-5.png|500px|frameless|thumb]]<br> | ||
<br> | |||
Touching different keys to print various value | Touching different keys to print various value | ||
<br> | |||
== Documents== | == Documents== | ||
'''PDF File:''' <br> | * '''PDF File:''' <br> | ||
https://drive.google.com/open?id=1GpCS5u584dze9oL2H59eQN4ECBozHBMK | https://drive.google.com/open?id=1GpCS5u584dze9oL2H59eQN4ECBozHBMK | ||
'''Libraries:''' <br> | * '''Libraries:''' <br> | ||
https://drive.google.com/open?id=1YiotA1_YywxBC6e-vhe5NqDApinmMwxX | https://drive.google.com/open?id=1YiotA1_YywxBC6e-vhe5NqDApinmMwxX | ||
'''Code:''' <br> | * '''Code:''' <br> | ||
https://drive.google.com/open?id=16er-T8rqGNWJlm12jUkCXNjcSPyysc5e | https://drive.google.com/open?id=16er-T8rqGNWJlm12jUkCXNjcSPyysc5e | ||
'''Installation Tool:''' <br> | * '''Installation Tool:''' <br> | ||
https://drive.google.com/open?id=1Gb_QSIF88zyKsN_UNwtbo0URfmBoP-F- | |||
<br> | |||
== Get One Now == | == Get One Now == | ||
*[https://www.keyestudio.com/keyestudio-rpi-ttp229l-16-channel-touch-shield-for-raspberry-pi-ce-certification-p0473-p0473.html '''Official website''' ] | |||
*[https://www.aliexpress.com/store/product/Keyestudio-RPI-TTP229L-16-channel-Touch-shield-for-Raspberry-Pi/1452162_32779485623.html?spm=2114.12010612.8148356.21.4ae46485CwvPRi '''Aliexpress store''' ] | |||
[[Category:Raspberry Pi]] | [[Category:Raspberry Pi]] | ||
Revision as of 10:09, 17 April 2019
Introduction
This keypad is designed for Raspberry Pi and supplies your Pi with 16 keys. It has an I2C communication mode and uses 3.3 V supply voltage with a power indicator. We provide you with installation package, source codes and a document to help you complete your programs.

Specification
- Chip: TTP229-LSF
- Supply Voltage: 3.3V
- Interface: I2C
Connection Diagram
Plug it directly into Raspberry Pi to start your works as shown in below figure.
After power-on have about 0.5sec stable-time. During the time do not touch the key pad, and all functions are disabled.

Sample Code
 #include <bcm2835.h>
    #include <stdio.h>
    #include <unistd.h>
    unsigned char WriteBuf;
    unsigned char WriteBuf1;
    unsigned int ReadBuf0;

    int main(int argc, char **argv)
    {
        if (!bcm2835_init())
        return 1;
        bcm2835_i2c_begin();
        bcm2835_i2c_setSlaveAddress(0x57);
        bcm2835_i2c_set_baudrate(10000);
        printf("start..........\n");

        while(1)
        {
		WriteBuf = 0x00;
		bcm2835_i2c_write_read_rs(&WriteBuf,2,&WriteBuf1,2);
		bcm2835_i2c_read (&ReadBuf0,2);
		printf("TTP229:%d\n",ReadBuf0);
		printf ("\r");
		fflush (stdout);
		bcm2835_delay(100);
        }

        bcm2835_i2c_end();
        bcm2835_close();

        return 0;
}
Program Writing
1.Installing bcm-2835 Library
Here is the tutorial for installing bcm-2835 library in Raspberry Pi. To install bcm-2835, first we need to download bcm2835 library. So we will provide an installation package or click its official web http://www.airspayce.com/mikem/bcm2835/ to download it.
Step1: Now after downloading library, copy it in any folder of your raspberry pi by winSCP(we provide its installation package, but please refer to usage by yourselves).
Step2: Now it’s time to extract the library, so open terminal of raspberry pi and go to the folder where you have copied your library and type this command: tar zxvf bcm2835-1.26.tar.gz
Step3: Now to into library folder, type this command: cd bcm2835-1.26
Step4: Now, we are ready to install bcm2835 library, so to start installation type this command: ./configure
Step5: then type this command: make
Step6: then this: sudo make check
Step7:and finally this: sudo make install
Congrats your library is installed. Now use “#include <bcm2835.h>” in your program to use bcm2835 library.
2.Programming
Now its time to write a program. If you need to create a new directory within raspberry pi, you can use the ‘mkdir’ command. So type at your terminal: mkdir rpi_shield
then copy the file rpi_TTP229L provided by us and put it into the directory rpi_shield through winSCP. Next, type this command: cd rpi_TTP229L to go inside the rpi_TTP229L folder.
Then type this command: make to make an executable file, This means this is the file we run to launch the program as shown in below figure.

Finally type this: sudo ./TTP229 to launch the program.
Result
Touch the keys, and corresponding value is printed on the terminal as shown in below figure.
Use Ctrl+C to exit the processing program.
sudo ./TTP229 to running program

Touching different keys to print various value
Documents
- PDF File:
https://drive.google.com/open?id=1GpCS5u584dze9oL2H59eQN4ECBozHBMK
- Libraries:
https://drive.google.com/open?id=1YiotA1_YywxBC6e-vhe5NqDApinmMwxX
- Code:
https://drive.google.com/open?id=16er-T8rqGNWJlm12jUkCXNjcSPyysc5e
- Installation Tool:
https://drive.google.com/open?id=1Gb_QSIF88zyKsN_UNwtbo0URfmBoP-F-
