Ks0305 keyestudio Basic Starter Kit for micro bit(with battery holder and USB cable): Difference between revisions
Keyestudio (talk | contribs) |
Keyestudio (talk | contribs) No edit summary |
||
| (26 intermediate revisions by the same user not shown) | |||
| Line 1: | Line 1: | ||
<span style=color:red><big>'''Note: the micro:bit has beed updated to V2.0 version; therefore, you can get more details for KS0305 V2.0 basic kit in the following link: | |||
https://fs.keyestudio.com/KS0305''' </big></span> | |||
==keyestudio Basic Starter Kit for micro:bit == | ==keyestudio Basic Starter Kit for micro:bit == | ||
<br>[[File:Ks0305.png|500px|frameless|thumb]]<br> | <br>[[File:Ks0305.png|500px|frameless|thumb]]<br> | ||
<span style=color:red>Note: <big>'''we adopt V1.5 micro:bit in the whole tutorial, but our tutorial is also compatible with the latest version micro:bit. | |||
When doing experiment with latest micro:bit, you need to transfer code into Makecode online editor first, save code again then download it to micro:bit.'''</big></span> | |||
<br> | |||
==Description== | ==Description== | ||
[http://microbit.org/guide/features/ micro: bit ] is a microcontroller of ARM structure designed by BBC. It is only half size of a credit card, onboard with Bluetooth, accelerometer, electronic compass, three buttons, 5x5 LED dot matrix, mainly used for teens programming education. <br> | |||
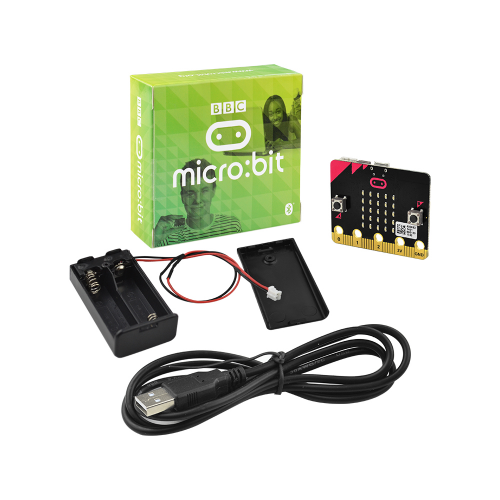
We specially make this [https://www.keyestudio.com/keyestudio-bbc-microbit-basic-starter-kit-p0256-p0256.html basic starter kit] for you to conveniently learn micro:bit, in which includes a micro: bit control board, 1m USB cable and a battery holder with lead (<span style=color:red> battery not included</span>, wire length 160mm).<br> | |||
<span style=color:red> Note that USB cable is for programming the micro:bit. Battery holder is for power supply, and it comes with a switch button, very convenient for controlling. </span> <br> | |||
<br> | |||
==Features== | ==Features== | ||
* USB and Bluetooth Low energy connectivity | * USB and Bluetooth Low energy connectivity | ||
* Compass and Accelerometer | * Compass and Accelerometer | ||
* 2xprogrammable buttons | * 2xprogrammable buttons | ||
* A 25 LED display | * A 25 LED display | ||
* 20 pin edge connector | * 20 pin edge connector | ||
* A USB cable for programming | * A USB cable for programming | ||
* A battery case with lead for power supply | * A battery case with lead for power supply | ||
<br> | |||
==Pinout Display== | ==Pinout Display== | ||
<br>[[File:MB0098 英文版 (4).jpg| | <br>[[File:MB0098 英文版 (4).jpg|600px|frameless|thumb]] [[File:MB0098 英文版 (5).jpg|600px|frameless|thumb]]<br> | ||
<br>[[File:MB0098 英文版 (7).jpg| | <br>[[File:MB0098 英文版 (7).jpg|800px|frameless|thumb]]<br> | ||
<br> | |||
==Using Method== | ==Using Method== | ||
<br> | |||
===Step 1: Connect It=== | ===Step 1: Connect It=== | ||
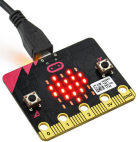
Connect the micro:bit to your computer via a micro USB cable. Your micro:bit will show up on your computer as a drive called 'MICROBIT'. | Connect the micro:bit to your computer via a micro USB cable. Your micro:bit will show up on your computer as a drive called 'MICROBIT'. | ||
<br>[[File:Ks0305-6.png| | <br>[[File:Ks0305-6.png|800px|frameless|thumb]]<br> | ||
<br> | |||
===Step 2: Program It=== | ===Step 2: Program It=== | ||
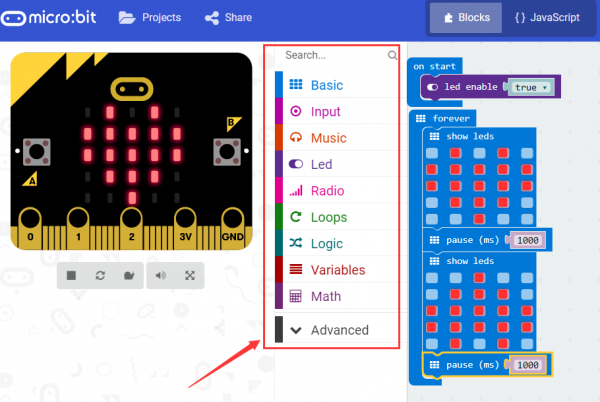
Using micro bit MakeCode Block editor https://makecode.microbit.org/, write your first micro:bit code. You can drag and drop some example blocks and try your program on the Simulator in the Javascript Blocks Editor, like in the image below. | Using micro bit MakeCode Block editor https://makecode.microbit.org/, write your first micro:bit code. <br> | ||
You can drag and drop some example blocks and try your program on the Simulator in the Javascript Blocks Editor, like in the image below. | |||
<br>[[File:Ks0305-1.png| | <br>[[File:Ks0305-1.png|600px|frameless|thumb]]<br> | ||
<br> | |||
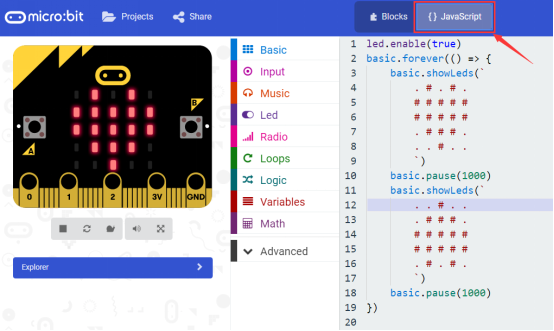
Click the JavaScript, you can see the corresponding program code. Shown as below figure. | Click the JavaScript, you can see the corresponding program code. Shown as below figure. | ||
<br>[[File:Ks0305-2.png| | <br>[[File:Ks0305-2.png|700px|frameless|thumb]]<br> | ||
<br> | |||
===Step 3: Download It=== | ===Step 3: Download It=== | ||
Click the Download button in the editor. This will download a 'hex' file, which is a compact format of your program that your micro:bit can read. | Click the Download button in the editor. This will download a 'hex' file, which is a compact format of your program that your micro:bit can read. | ||
Here you can name the project as LED1, then click “Save”. Shown below. | Here you can name the project as LED1, then click “Save”. Shown below. | ||
<br>[[File:Ks0305-3.png| | <br>[[File:Ks0305-3.png|700px|frameless|thumb]]<br> | ||
<br> | |||
Once the hex file has downloaded, copy it to your micro:bit just like copying a file to a USB drive. On Windows find the microbit-LED1 file, you can right click and choose "Send To→MICROBIT." | Once the hex file has downloaded, copy it to your micro:bit just like copying a file to a USB drive. On Windows find the microbit-LED1 file, you can right click and choose "Send To→MICROBIT." | ||
<br>[[File:Ks0305-4.png| | <br>[[File:Ks0305-4.png|700px|frameless|thumb]]<br> | ||
<br>[[File:Ks0305-5.png| | <br>[[File:Ks0305-5.png|700px|frameless|thumb]]<br> | ||
<br> | |||
===Step 4: Play It=== | ===Step 4: Play It=== | ||
The micro:bit will pause and the yellow 5*5 LED on the back of the micro:bit will display the images while your code is programmed. | The micro:bit will pause and the yellow 5*5 LED on the back of the micro:bit will display the images while your code is programmed. | ||
<br>[[File:Ks0305-6.png| | <br>[[File:Ks0305-6.png|800px|frameless|thumb]]<br> | ||
<br> | |||
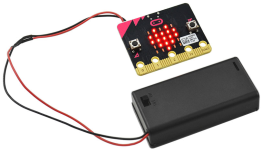
You can power it using USB cable or battery. The battery holder need to connect two 1.5V AA batteries. Shown below. | |||
<br> [[File:Ks0305-7.png|800px|frameless|thumb]] <br> | |||
<br> | |||
== Resources == | == Resources == | ||
* [http://microbit.org/ BBC micro:bit website ] <br> | |||
* [https://makecode.microbit.org/ Micro:bit MakeCode Block Editor ]<br> | |||
* [http://microbit.org/guide/ Meet micro:bit starter programming] <br> | |||
* [http://microbit.org/guide/features/ BBC micro:bit Features Guide ] <br> | |||
* [http://microbit.org/guide/features/ BBC micro:bit Safety Warnings ] <br> | |||
* [http://microbit.org/guide/quick/ BBC micro:bit Quick Start Guide ] <br> | |||
* [http://microbit.org/guide/hardware/pins/ BBC micro:bit Pins ] | |||
https://fs.keyestudio.com/KS0305 | |||
<br> | |||
== Buy From == | |||
You can get one now from the links below: <br> | |||
*[https://www.keyestudio.com/keyestudio-bbc-microbit-basic-starter-kit-p0256-p0256.html '''Official Website''' ] | |||
*[https://www.aliexpress.com/store/product/keyestudio-BBC-Micro-Bit-Basic-Starter-Kit/1452162_32846994183.html?spm=2114.12010612.0.0.322e73f2KUAZwF Shop on AliExpress] | |||
*[https://www.amazon.com/KEYESTUDIO-Starter-Graphical-Programming-Bluetooth/dp/B07BT1LL38?ref_=w_bl_hsx_s_pc_web_13497667011 Shop on Amazon ] | |||
*[https://www.amazon.de/KEYESTUDIO-Basic-Starter-Kit-Micro/dp/B07QRHC1WD/ref=sr_1_1?__mk_de_DE=%C3%85M%C3%85%C5%BD%C3%95%C3%91& keywords=keyestudio+Basic+Starter+Kit+for+micro+bit&qid=1573463768&sr=8-1 '''amazon.de'''] | |||
*[https://www.amazon.fr/KEYESTUDIO-Starter-Graphical-Programming-Bluetooth/dp/B07QRHC1WD/ref=sr_1_1?__mk_fr_FR=%C3%85M%C3%85%C5%BD%C3%95%C3%91&keywords=keyestudio+Basic+Starter+Kit+for+micro+bit&qid=1573463818&sr=8-1 '''amazon.fr'''] | |||
*[https://www.amazon.it/KEYESTUDIO-Starter-Graphical-Programming-Bluetooth/dp/B07QRHC1WD/ref=sr_1_1?__mk_it_IT=%C3%85M%C3%85%C5%BD%C3%95%C3%91&keywords=keyestudio+Basic+Starter+Kit+for+micro+bit&qid=1573463842&sr=8-1 '''amazon.it'''] | |||
*[https://www.amazon.es/Shiwaki-Keyestudio-Micro-Starter-Learning/dp/B07Z2LBCPB/ref=sr_1_3?__mk_es_ES=%C3%85M%C3%85%C5%BD%C3%95%C3%91&keywords=keyestudio+Basic+Starter+Kit+for+micro+bit&qid=1573463938&sr=8-3 '''amazon.es'''] | |||
*[https://www.amazon.co.uk/KEYESTUDIO-Starter-Graphical-Programming-Bluetooth/dp/B07QRHC1WD/ref=sr_1_5?keywords=keyestudio+Basic+Starter+Kit+for+micro+bit&qid=1573463965&sr=8-5 '''amazon.co.uk'''] | |||
[[Category: Micro:bit]] | [[Category: Micro:bit]] | ||
Latest revision as of 08:27, 28 May 2021
Note: the micro:bit has beed updated to V2.0 version; therefore, you can get more details for KS0305 V2.0 basic kit in the following link:
https://fs.keyestudio.com/KS0305
keyestudio Basic Starter Kit for micro:bit
Note: we adopt V1.5 micro:bit in the whole tutorial, but our tutorial is also compatible with the latest version micro:bit.
When doing experiment with latest micro:bit, you need to transfer code into Makecode online editor first, save code again then download it to micro:bit.
Description
micro: bit is a microcontroller of ARM structure designed by BBC. It is only half size of a credit card, onboard with Bluetooth, accelerometer, electronic compass, three buttons, 5x5 LED dot matrix, mainly used for teens programming education.
We specially make this basic starter kit for you to conveniently learn micro:bit, in which includes a micro: bit control board, 1m USB cable and a battery holder with lead ( battery not included, wire length 160mm).
Note that USB cable is for programming the micro:bit. Battery holder is for power supply, and it comes with a switch button, very convenient for controlling.
Features
- USB and Bluetooth Low energy connectivity
- Compass and Accelerometer
- 2xprogrammable buttons
- A 25 LED display
- 20 pin edge connector
- A USB cable for programming
- A battery case with lead for power supply
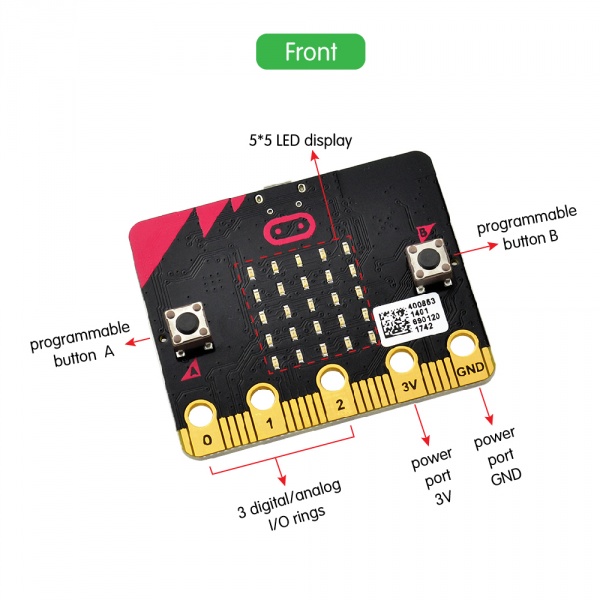
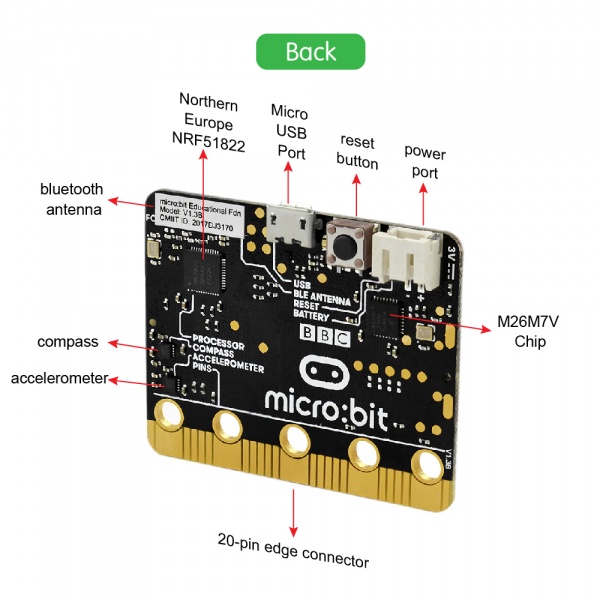
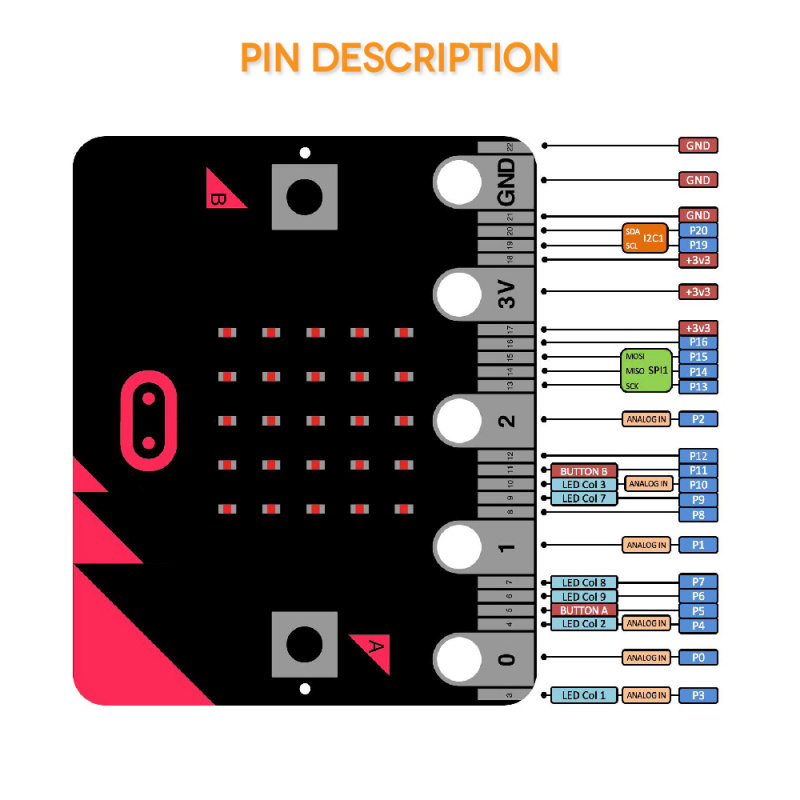
Pinout Display
Using Method
Step 1: Connect It
Connect the micro:bit to your computer via a micro USB cable. Your micro:bit will show up on your computer as a drive called 'MICROBIT'.
Step 2: Program It
Using micro bit MakeCode Block editor https://makecode.microbit.org/, write your first micro:bit code.
You can drag and drop some example blocks and try your program on the Simulator in the Javascript Blocks Editor, like in the image below.
Click the JavaScript, you can see the corresponding program code. Shown as below figure.
Step 3: Download It
Click the Download button in the editor. This will download a 'hex' file, which is a compact format of your program that your micro:bit can read.
Here you can name the project as LED1, then click “Save”. Shown below.

Once the hex file has downloaded, copy it to your micro:bit just like copying a file to a USB drive. On Windows find the microbit-LED1 file, you can right click and choose "Send To→MICROBIT."


Step 4: Play It
The micro:bit will pause and the yellow 5*5 LED on the back of the micro:bit will display the images while your code is programmed.

You can power it using USB cable or battery. The battery holder need to connect two 1.5V AA batteries. Shown below.
Resources
- BBC micro:bit website
- Micro:bit MakeCode Block Editor
- Meet micro:bit starter programming
- BBC micro:bit Features Guide
- BBC micro:bit Safety Warnings
- BBC micro:bit Quick Start Guide
- BBC micro:bit Pins
https://fs.keyestudio.com/KS0305
Buy From
You can get one now from the links below:
