Ks0136 keyestudio EASY plug OLED Module: Difference between revisions
Keyestudio (talk | contribs) No edit summary |
Keyestudio (talk | contribs) No edit summary |
||
| Line 11: | Line 11: | ||
<br> | <br> | ||
==Specification== | ==Specification== | ||
* 0.96" diagonal OLED | * 0.96" diagonal OLED | ||
| Line 23: | Line 22: | ||
* Dimensions: 39mm*27mm*18mm | * Dimensions: 39mm*27mm*18mm | ||
* Weight: 7g | * Weight: 7g | ||
<br> | <br> | ||
==Connect It Up == | ==Connect It Up == | ||
Connect the EASY Plug OLED module to control board using an RJ11 cable. Then connect the control board to your PC with a USB cable.<br> | Connect the EASY Plug OLED module to control board using an RJ11 cable. Then connect the control board to your PC with a USB cable.<br> | ||
| Line 30: | Line 29: | ||
<br> | <br> | ||
==Upload the Code== | ==Upload the Code== | ||
Below is an example code. Open or drag below code to [https://wiki.keyestudio.com/Getting_Started_with_Mixly Mixly Blocks] and upload. <br> | |||
<br>[[File:ks0398 16.1.png|500px|frameless|thumb]]<br> | |||
< | |||
<br> | <br> | ||
==What You Should See== | ==What You Should See== | ||
Done uploading the code, you should be able to see the text | <br>[[File:ks0398 16-1.png|500px|frameless|thumb]]<br> | ||
<br>[[File: | <br> | ||
Done uploading the code, you should be able to see the text is displayed on the OLED screen. | |||
<br>[[File:ks0398 16-2.png|500px|frameless|thumb]]<br> | |||
<br> | <br> | ||
<span style="color: red"><big>'''Troubleshooting:'''</big> </span> <br> | |||
* Upload Failed ?<br> | |||
This happens sometimes, the most likely case is a confused Board and serial port, you should firstly select your proper board and port.<br> | |||
Or make sure you have placed all the libraries below into arduino-1.8.5 libraries folder directory. <br> | |||
Pay more attention that the library folder can’t be overlapped. | |||
<br>[[File:ks0398 16-3.png|500px|frameless|thumb]]<br> | |||
<br>[[File:Ks0398 9-5.png|500px|frameless|thumb]]<br> | |||
<br> | |||
==Resources == | ==Resources == | ||
'''Download the PDF:'''<br> | '''Download the Arduino Code and PDF:'''<br> | ||
https://drive.google.com/open?id= | https://drive.google.com/open?id=1QK_jX96Ec7wpBRtqDHluxTS31hitkton | ||
'''Download the | '''Download the Mixly Code and Datasheet:'''<br> | ||
https://drive.google.com/open?id= | https://drive.google.com/open?id=1qP1RKLzUwKgQXpzZXzLEk76hZw4-d15j | ||
<br> | <br> | ||
==Buy from == | ==Buy from == | ||
* | *[https://www.keyestudio.com/newkeyestudio-rj11-easy-plug-128-x-64-oled-module-for-arduino-steam-p0102-p0102.html '''Official Website''' ] | ||
*[https://www.aliexpress.com/store/product/NEW-Keyestudio-EASY-plug-128-x-64-OLED-module-for-arduino/1452162_32646350610.html?spm=2114.12010612.8148356.18.4ecd4ba7I8rbcp Shop on aliexpress ] | *[https://www.aliexpress.com/store/product/NEW-Keyestudio-EASY-plug-128-x-64-OLED-module-for-arduino/1452162_32646350610.html?spm=2114.12010612.8148356.18.4ecd4ba7I8rbcp Shop on aliexpress ] | ||
Revision as of 15:04, 7 May 2019
Introduction
OLED is short for organic light emitting diode. On the microscopic level, an OLED display is a matrix of organic LEDs that light up when they emit energy.
Our EASY Plug OLED displays are perfect when you need a small display with vivid, high-contrast color.
The visible portion of the OLED measures 0.96" diagonal and contains 128 x 64 pixels.
An OLED display works without a backlight. Thus, it can display deep black levels and can be thinner and lighter than a liquid crystal display (LCD).
In low ambient light conditions such as a dark room an OLED screen can achieve a higher contrast ratio than an LCD.
OLED technology is used in commercial applications such as displays for mobile phones and portable digital media players, car radios and digital cameras among others.
Note: this module should be used together with EASY plug control board.
Specification
- 0.96" diagonal OLED
- Pixels: 128 × 64
- Color Depth: Monochrome (White)
- 5V power
- Brightness (cd/m2): 100 (Typ)
Technical Details
- Dimensions: 39mm*27mm*18mm
- Weight: 7g
Connect It Up
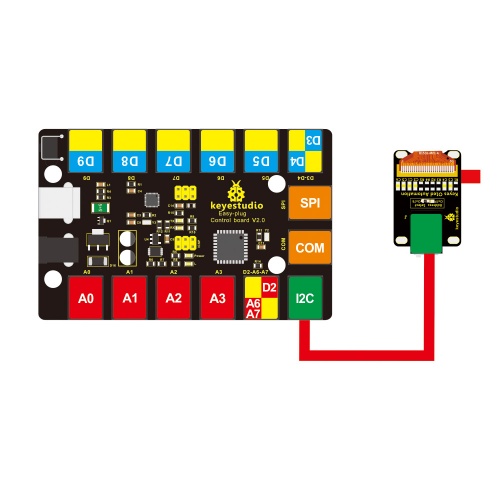
Connect the EASY Plug OLED module to control board using an RJ11 cable. Then connect the control board to your PC with a USB cable.
Upload the Code
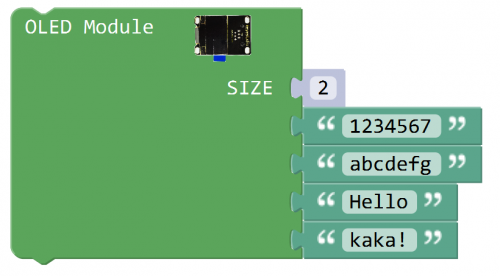
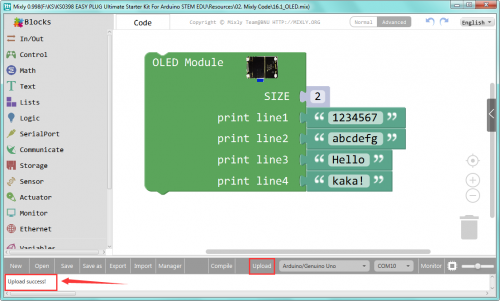
Below is an example code. Open or drag below code to Mixly Blocks and upload.
What You Should See
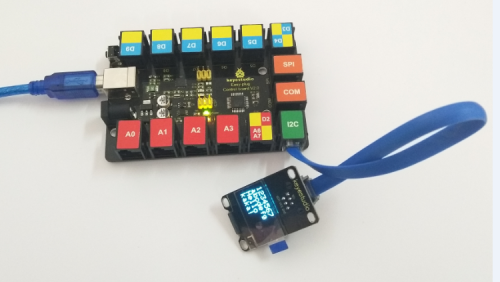
Done uploading the code, you should be able to see the text is displayed on the OLED screen.
Troubleshooting:
- Upload Failed ?
This happens sometimes, the most likely case is a confused Board and serial port, you should firstly select your proper board and port.
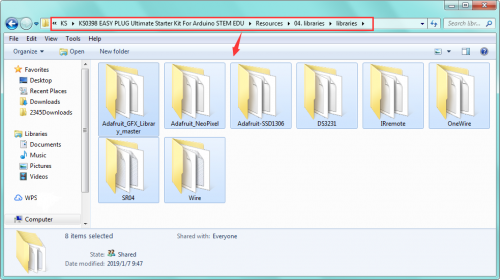
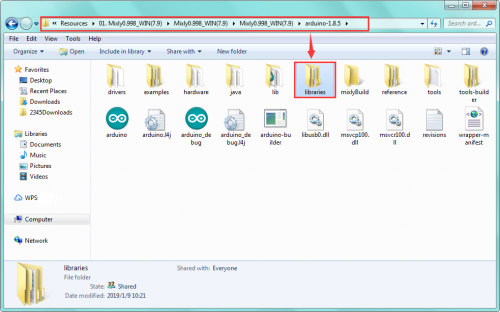
Or make sure you have placed all the libraries below into arduino-1.8.5 libraries folder directory.
Pay more attention that the library folder can’t be overlapped.
Resources
Download the Arduino Code and PDF:
https://drive.google.com/open?id=1QK_jX96Ec7wpBRtqDHluxTS31hitkton
Download the Mixly Code and Datasheet:
https://drive.google.com/open?id=1qP1RKLzUwKgQXpzZXzLEk76hZw4-d15j
