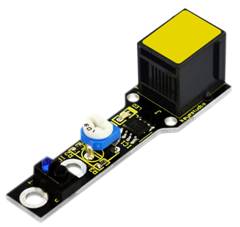
Ks0119 keyestudio EASY plug Line Tracking Sensor: Difference between revisions
Keyestudio (talk | contribs) No edit summary |
Keyestudio (talk | contribs) |
||
| (6 intermediate revisions by the same user not shown) | |||
| Line 5: | Line 5: | ||
The single line-tracking signal provides a stable output signal TTL for a more accurate and more stable line. <br> | The single line-tracking signal provides a stable output signal TTL for a more accurate and more stable line. <br> | ||
The working principle is simple, using infrared light's different reflectivity for different color, and converting the strength of the reflected signal into current signal. <br> | The working principle is simple, using infrared light's different reflectivity for different color, and converting the strength of the reflected signal into current signal. <br> | ||
<span style= | This sensor needs to be used together with EASY plug control board.<br> | ||
<span style=color:red> '''Special Note:''' <br> | |||
The sensor/module is equipped with the RJ11 6P6C interface, compatible with our keyestudio EASY plug Control Board with RJ11 6P6C interface. <br> If you have the control board of other brands, it is also equipped with the RJ11 6P6C interface but has different internal line sequence, can’t be used compatibly with our sensor/module. </span><br> | |||
<br> | <br> | ||
==Specification== | ==Specification== | ||
* Connector: Easy plug | * Connector: Easy plug | ||
| Line 20: | Line 24: | ||
* Dimensions: 57mm*16mm*18mm | * Dimensions: 57mm*16mm*18mm | ||
* Weight: 4.8g | * Weight: 4.8g | ||
<br> | <br> | ||
==Connect It Up == | ==Connect It Up == | ||
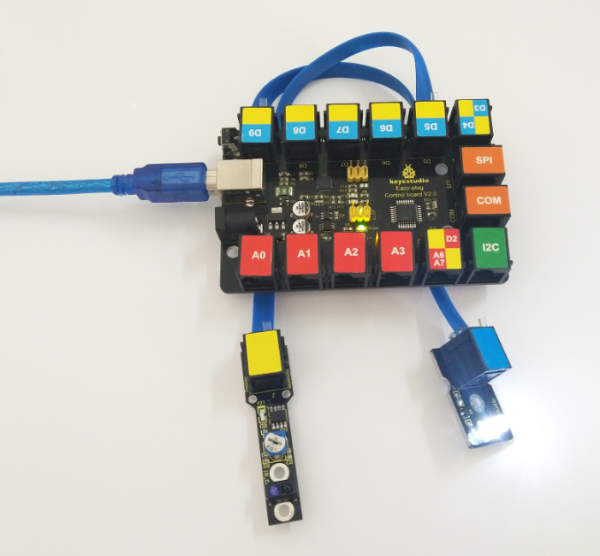
Connect the EASY Plug | Connect the EASY Plug Line Tracking sensor and LED module to control board using RJ11 cables. Then connect the control board to your PC with a USB cable. | ||
<br>[[File: | <br>[[File:循迹灯.png|600px|frameless|thumb]]<br> | ||
<br> | <br> | ||
==What You Should See== | ==What You Should See== | ||
<br>[[File:ks0397 3-1.png|600px|frameless|thumb]]<br> | |||
<br>[[File: | |||
<br> | <br> | ||
Done uploading the code to board, open the serial monitor and set the baud rate to 9600, then you can see the data is printed on the monitor, and will control LED on. | |||
<br>[[File:ks0397 3-2.png|600px|frameless|thumb]]<br> | |||
<br>[[File:ks0397 3-3.png|600px|frameless|thumb]]<br> | |||
<br> | |||
==Resources == | ==Resources == | ||
https:// | https://fs.keyestudio.com/KS0119 | ||
<br> | <br> | ||
==Buy from == | ==Buy from == | ||
'''Official Website''' | *[https://www.keyestudio.com/new-keyestudio-rj11-easy-plug-line-tracking-sensor-module-for-arduino-starter-steam-p0085-p0085.html '''Official Website''' ] | ||
*[https://www.aliexpress.com/store/product/New-Keyestudio-EASY-plug-Line-Tracking-Sensor-Module-for-Arduino-Starter/1452162_32641898662.html?spm=2114.12010612.8148356.2.579b66e63fI6km Shop on aliexpress ] | |||
[[category:EASY Plug]] | [[category:EASY Plug]] | ||
Latest revision as of 16:20, 7 January 2021
Introduction
The Line Tracking Sensor can tell white from in black or black from white accurately.
The single line-tracking signal provides a stable output signal TTL for a more accurate and more stable line.
The working principle is simple, using infrared light's different reflectivity for different color, and converting the strength of the reflected signal into current signal.
This sensor needs to be used together with EASY plug control board.
Special Note:
The sensor/module is equipped with the RJ11 6P6C interface, compatible with our keyestudio EASY plug Control Board with RJ11 6P6C interface.
If you have the control board of other brands, it is also equipped with the RJ11 6P6C interface but has different internal line sequence, can’t be used compatibly with our sensor/module.
Specification
- Connector: Easy plug
- Power supply: 5V
- Operating current: <10mA
- Operating temperature: 0℃~ 50℃
- Output Level: TTL (Black for LOW output, White for HIGH output)
- High quality connector
Technical Details
- Dimensions: 57mm*16mm*18mm
- Weight: 4.8g
Connect It Up
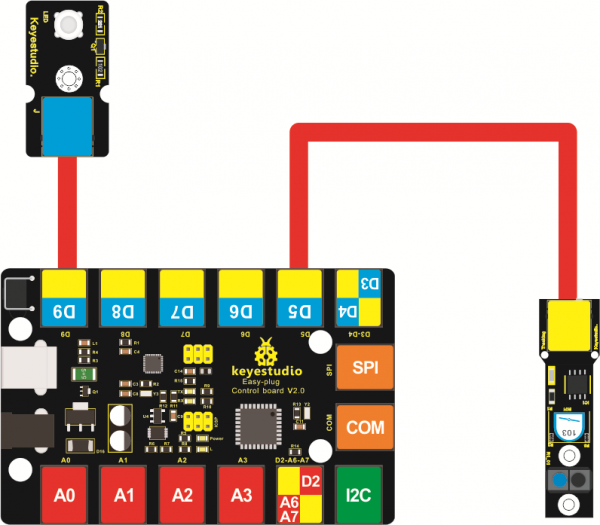
Connect the EASY Plug Line Tracking sensor and LED module to control board using RJ11 cables. Then connect the control board to your PC with a USB cable.
What You Should See
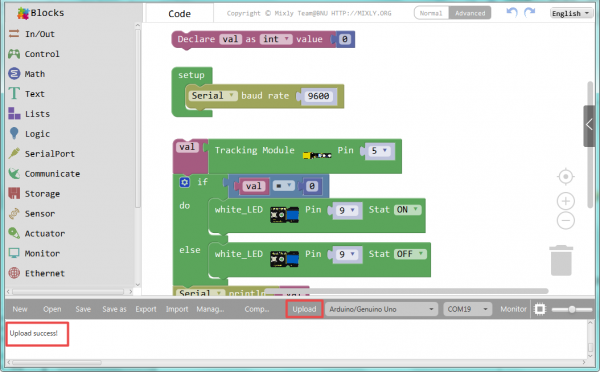
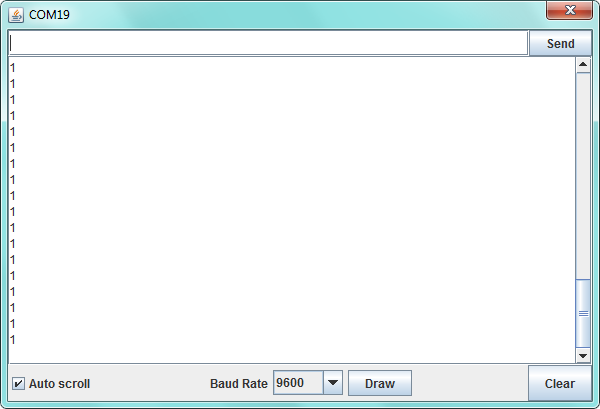
Done uploading the code to board, open the serial monitor and set the baud rate to 9600, then you can see the data is printed on the monitor, and will control LED on.
Resources
https://fs.keyestudio.com/KS0119
